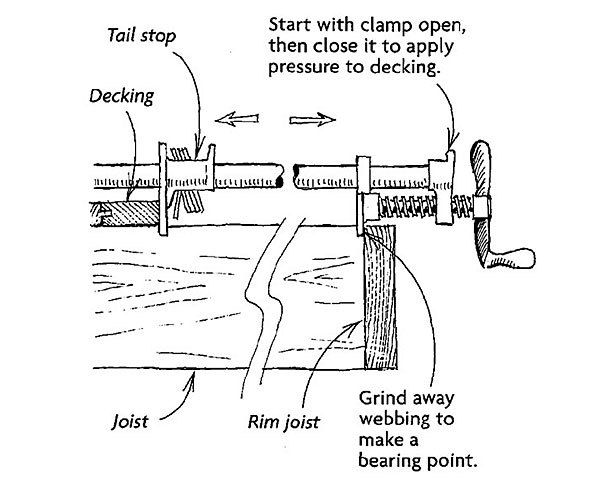
Brian Simmons’s clever method for Straightening warped deck boards uses a pry bar as a bearing point for a pipe clamp. Simply insert the pry bar into the gaps between the deck boards, and then hook the clamp to the pry bar. Repeat as necessary. But what if there are no gaps between the deck boards?
I installed tongue-and-groove decking on my porch, and as a consequence, I had to use other clamping methods to draw the boards together. I used the rim joist as the bearing point for one end of the clamp until my 12 ft. of pipe could no longer reach the boards. So I came at the problem from the other side.
As shown in the drawing, I turned the clamp’s tail stop around so that it was positioned to push on the workpiece. Then I used a grinder to remove a bit of the webbing from the back of the screw clamp. This created a flat bearing spot that gave me some purchase on the opposite rim joist. Now I could screw the clamp to its full open position, and then turn it toward its closed position to push on the deck boards. This trick made it easy and fast to get the boards into position.
—Bernard H. Derbyshire, Newtown, CT
Edited and illustrated by Charles Miller
From Fine Homebuilding #124
Fine Homebuilding Recommended Products
Fine Homebuilding receives a commission for items purchased through links on this site, including Amazon Associates and other affiliate advertising programs.
Metal Connector Nailer
Standard Marking Chalk
Drill Driver/Impact Driver







View Comments
I've used this method to space composite decking also. With a pipe clamp you can extend the length with a coupling and more pipe. It works great too!!!
Thanks for the tip. I have found that stubborn or badly warped boards may push the rim joist away from my joists with that method. So, I start with NOT fastening my first (straight) plank then after 3 or 4 planks are fastened in place, remove the first (unfastened) plank and draw them together to straighten them as you go as outlined in this tip. When they're all in, reinstall and screw down the first plank. It may help to use blocks against the clamp faces to spread the pressure and protect the tongues and grooves (or board edges) on the plank as you tighten the clamp. Time is money, however taking your time to protect your work will pay off in a nice looking project and happy customers.