Dressing up Stock Windows
Limited exterior-trim choices offered by window manufacturers create an opportunity for dressing up stock windows.

Synopsis: New windows may be energy efficient, but they often lack the trim details that were once common. This short article shows how to beef up exterior window trim with commonly available materials.
Mark Leas owns a thriving millwork business in the nation’s capital, specializing in high-end commercial interiors. Flawless bookmatched paneling and 8-in. crown moldings are all in a day’s work.
When the time came to build his own house, Leas was disappointed in the limited exterior-trim choices offered by even the best window manufacturers. The aluminum or vinyl-clad options didn’t mesh with the Georgian detailing of his new home. When it came to primed wood casings, most manufacturers proposed to trim their windows with rot-prone finger-jointed white pine. Leas was building this house to last, using premium materials such as redwood siding and copper flashing. He didn’t want to replace rotted window trim ten years down the road.
All the molding is back-primed to extend its life
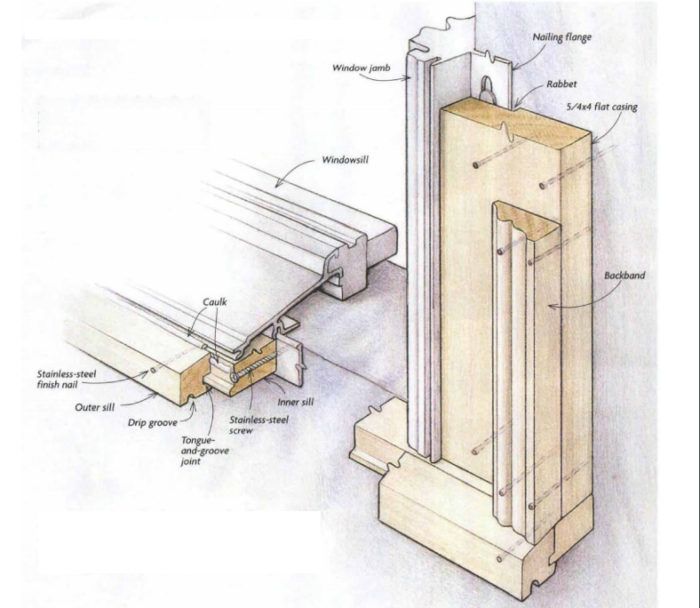
Faced with these options, Leas bought aluminum-clad Pella windows that attach to the house with nailing fins. He then milled his own trim from rot-resistant Honduras mahogany. The trim consists of a two-piece sill and a flat casing topped with a backband that’s shaped similar to lumberyard rake molding. The flat 5/4×4 casing is rabbeted 1/8 in. deep along its inner edge to accommodate the window’s nailing fins. All the material was alkyd-primed on four sides before delivery to the job.
Leas’s cigar-smoking band of Irish carpenters applied the trim at the job site, starting by holding the casing legs in place against the windows and marking their length. Their tops were mitered, and the legs were nailed home with 3-in. stainless-steel finish nails.
With the legs in place, the carpenters measured and cut the sills and head casings to length. Installing the head casing was simple: The carpenters caulked the mating surfaces of the miters with acrylic caulk, then nailed the heads to the wall.
Two-piece sill is sturdy
To extend beyond the combined depth of the casing and backband, the sill had to be 2-1/4 in. wide. Efficiently and discreetly attaching such a wide sill to the building was tricky.
Leas’s solution was a two-piece sill with a tongue-and-groove joint that aligns and strengthens the assembly. The square inner sill snugs up tightly below the window. It is first nailed to the bottoms of the casing legs; then stainlesssteel screws pull it against the sidewall. Fifteen-ga. finish nails fasten the outer sill to the inner. The resulting two-piece assembly has the strength of screws without the tedium of screw holes to plug. To keep out water, a bead of caulk is run between the two sill pieces before they’re nailed together.
The outer sill’s top is beveled to shed water. Caulk seals the joint between this sill and the window. A drip groove milled in the sill’s bottom defeats capillary action by causing water that follows the sill’s surface to drip off. The outer sill hangs 1/4 in. below the inner, giving the chunky look of a 2-in. thick sill and sheltering the siding that tucks below. Finally, the backband was nailed on flush with the outer edge of the casing. To finish, a copper drip cap covers the head.
For photos and more on trimming around the window, click the View PDF button below.


