Solo Clapboard Hanging
This homemade hanger makes it easy to install clapboard by yourself.
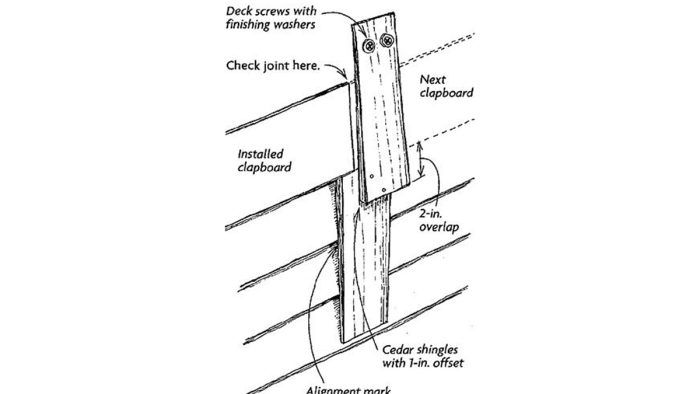
With simple site-made hangers, I can handle unwieldy lengths of clapboard all by myself. As shown in the drawing, my little siding aids are made of two clear cedar shingles, butts pointing toward one another, with a 1-in. offset. The offset allows me to check the fit of the abutting clapboards. I make several hangers for a job, and I scribe alignment marks on them to correspond with the overlap of the clapboards.
I place the hangers vertically on the wall, aligning the marks with the bottom edges of the last course of clapboards. I attach the hangers with two short deck screws run through finishing washers. Using two screws will keep a hanger from pivoting and jamming as I position a clapboard on the house.
I install a clapboard from below, lifting it until the bottom of the clapboard reaches the lip formed by the butt of the bottom shingle. At that point, the springiness of the shingle pops the hanger under the clapboard, holding it in place. Now I’m free to slide the clapboard as needed to determine cut marks. To remove a clapboard, I just give it an outward twist at the top edge. This springs the shingle away from the wall, allowing me to drop the clapboard out of the hanger from any distance on the wall.
— Chris Ellis; Brewster, MA. Edited by Charles Miller.
From Fine Homebuilding #124
RELATED STORIES
Got a Tip?
Do you have any great tips like this one on hanging clapboard by yourself? Share your methods, tricks, and jigs with other readers. Tag them @FineHomebuilding on social, email them to us at [email protected], or upload them to FineHomebuilding.com/reader-tips. We’ll pay for any we publish.


