FHB Logo Facebook LinkedIn Email Pinterest Twitter X Instagram Tiktok YouTube Plus Icon Close Icon Navigation Search Icon Navigation Search Icon Arrow Down Icon Video Guide Icon Article Guide Icon Modal Close Icon Guide Search Icon Skip to content
Subscribe
Log In
  • How-To
  • Design
  • Tools & Materials
  • Restoration
  • Videos
  • Blogs
  • Forum
  • Magazine
  • Members
  • FHB House
  • Podcast
Log In
Q&A Spotlight

Retrofitting Skylights in a Truss Roof

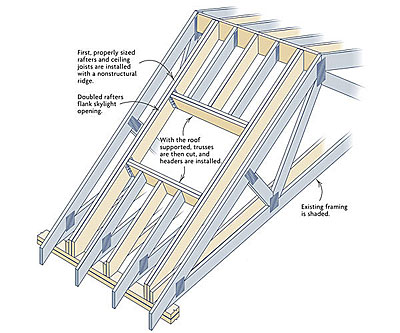
Don't cut any roof trusses until you get most of the new framing in place.

By Mike Guertin Issue 132
  • X
  • facebook
  • linkedin
  • pinterest
  • email
  • add to favorites Log in or Sign up to save your favorite articles

Q:

I’m having a new roof put on the house this summer. We want to put skylights in a few locations. The roof trusses are 2 ft. o. c., but we’d like to install a 4-ft. square skylight in one location. I’d like to install the skylights myself just before the roofing contractor installs the roofing, but I am not sure how to cut out a section of one truss without affecting the integrity of the roof structure. Can you help?

David Graham, Naramata, None

A:

Contributing editor and builder Mike Guertin, from East Greenwich, Rhode Island, replies: Reroofing is a great time to install skylights. However, a truss roof can make skylight installation a lot more problematic. Building codes prohibit any field modification (notching or cutting) of roof trusses.That’s because once you cut into any part of a roof truss, you can’t trust its integrity. So you really should check with your local building inspector before proceeding. But the easiest way I’ve found to retrofit a wide skylight without re-engineering the trusses is to reframe the roof around the skylight opening with dimensional lumber just as you would in a stick-built roof.

First, you have to plan the location for the skylight. Because 4-ft. skylights are sized to fit pretty closely between roof framing spaced 24 in. o. c., you may have to cut through one or two roof trusses to frame out the opening. I actually prefer to locate skylights so that their sides fall in the middle of truss bays and not alongside existing trusses. This strategy gives a little more room for slipping in the new rafters and ceiling joists.

Next, calculate the size of the rafters and ceiling joists that will support the roof where you cut the trusses. I use building codebooks or span tables to determine rafter size and spacing. Before you get too far into the tables, measure the distance between the inside edge of the top wall plate and the underside of the roof sheathing. This amount is the limiting height you will have to work with when selecting an appropriate rafter size.

You should not extend the heel cut on the rafters too far beyond the inside edge of the top plate.Usually, roof-truss height at the top plate limits the rafter sizing to 2x8s or 2x6s. Ceiling joists can be a little taller. Selecting a premium species such as Douglas fir or a premium grade such as select structural might be necessary to get away with 2×6 rafters on longer spans.

If you can’t support the roof properly, I suggest going with two 2-ft. skylights or leaving a truss exposed in the skylight shaft. But let’s assume you can size the rafters and ceiling joists and move on to the next step of cutting and installing them.

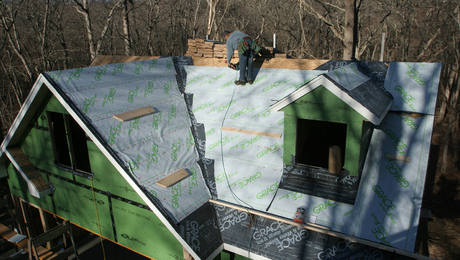
If possible, I remove several sheets of roof sheathing in the area where the new skylight will go, which gives you plenty of room to do the framing. If this option isn’t possible, the lumber can be slipped through small holes cut through the sheathing at the ridge, and the framing can be done from inside the roof cavity.

Cut enough rafters for both sides of the roof. Even though you’ll be putting the rough opening for the skylight only on one side, you need to reframe both sides of the roof. Double the rafters on each side of the rough opening, and prepare headers and cripple rafters.

Don’t cut any roof trusses until you get most of the new framing in place.Without getting too involved in describing the logistics, slide in the rafters, and install them first. When the rafters are in position, hop out on the roof and drive nails through the roof sheathing into the rafters wherever you can.

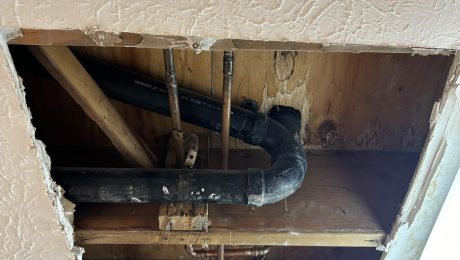
Next, install the ceiling joists. Then prepare a ridge board that will fit between the roof trusses that will remain intact after you cut the trusses for the skylight opening.Using a reciprocating saw, cut out sections of the top chord of the one or two trusses in the way so that you can slip the ridge board in place. A metal-cutting blade will be necessary to cut through the truss plates at the top of the trusses. By the way, this ridge is not structural. It’s merely there to help to transfer opposing rafter forces.

With the ridge in place, the rafters are supporting the roof, and you can cut out sections of roof trusses in the way of the new skylight opening. The rest of the truss can remain. In fact, some parts of the truss have to remain to support the soffit and fascia.

Next, determine the exact location of the ceiling opening for the skylight, and frame in the headers and joists. Mark out the skylight opening on the underside of the roof sheathing, and cut the top chords of the trusses just short enough to allow you to install the headers and the cripple rafters. Be sure to secure all rafter/header connections with metal connectors. Do the same for the remaining segments of the roof-truss chords. Then frame up the skylight shaft. If you’re not ready to reroof, schedule the final cut in the roof sheathing and skylight installation just before the new roof is installed.

Fine Homebuilding Recommended Products

Fine Homebuilding receives a commission for items purchased through links on this site, including Amazon Associates and other affiliate advertising programs.

Peel & Stick Underlayment

Often required by code, this durable, slip resistant, self-sealing, and self-adhered roofing underlayment is easy to install and ensures maximum protection along roof eaves, rakes, and valleys.
Buy at Amazon

Flashing Boot Repair

Prolonged exposure to the sun and weather can compromise the rubber gasket on standard vent flashing. Use this to quickly and permanently fix failed seals or to help protect the gasket in new-construction applications.
Buy at Amazon

Flashing Boot

Adequately seal vulnerable vent penetrations through the roof with this galvanized flashing and flexible rubber collar.
Buy at Amazon

Sign up for eletters today and get the latest how-to from Fine Homebuilding, plus special offers.

Signing you up...

This site is protected by reCAPTCHA and the Google Privacy Policy and Terms of Service apply.
See all newsletters
See all newsletters
×

Get home building tips, offers, and expert advice in your inbox

Signing you up...

This site is protected by reCAPTCHA and the Google Privacy Policy and Terms of Service apply.
See all newsletters
See all newsletters

New Feature

Fine Homebuilding Forums

Ask questions, offer advice, and share your work

  • X
  • facebook
  • linkedin
  • pinterest
  • email
  • add to favorites Log in or Sign up to save your favorite articles

Log in or create an account to post a comment.

Sign up Log in

Become a member and get full access to FineHomebuilding.com

More Q&A Spotlight

View All
  • Leveling Foundation Walls
  • Tips on Ceiling Repair
  • Fixing Rotted Windowsills
  • Replace Rotten Boards in a Roof Overhang
View All

Up Next

Video Shorts

Featured Story

Podcast Episode 684: Masonry Heaters, Whole-House Ventilation, and Porch Flooring

Listeners write in about fireplaces and ask questions about whole-house ventilation, traditional porch flooring, and gutter sealants.

Featured Video

Builder’s Advocate: An Interview With Viewrail

Learn more about affordable, modern floating stairs, from design to manufacturing to installation.

Related Stories

  • A More Resilient Roof
  • Step Up Your Stair-Gauge Game
  • Better Plumb Cuts on Hips or Valleys
  • Pool Noodle Ladder Protection

Discussion Forum

Recent Posts and Replies

  • |
  • |
  • |
  • |
  • |
  • |
View More Create Post

Highlights

Fine Homebuilding All Access
Fine Homebuilding Podcast
Tool Tech
Plus, get an extra 20% off with code GIFT20

Video

View All Videos
  • FHB Podcast Segment: A Double Roof Discussion
  • FHB Podcast Segment: Control Condensation With Exterior Insulation
  • FHB Podcast Segment: An Impressive Home Renovation
  • FHB Podcast Segment: Roof-Deck Insulation
View All

Roofs

View All Roofs Articles
  • Podcast Episode 662: Roof Venting, Roof Leaks, and High-Performance Framing
  • Finding the Roof Leak
  • Cedar-Roof Shingling Guide
View All Roofs Articles

Fine Homebuilding Magazine

  • Issue 331 - June 2025
    • A More Resilient Roof
    • Tool Test: You Need a Drywall Sander
    • Ducted vs. Ductless Heat Pumps
  • Issue 330 - April/May 2025
    • Deck Details for Durability
    • FAQs on HPWHs
    • 10 Tips for a Long-Lasting Paint Job
  • Issue 329 - Feb/Mar 2025
    • Smart Foundation for a Small Addition
    • A Kominka Comes West
    • Making Small Kitchens Work
  • Issue 328 - Dec/Jan 2024
    • How a Pro Replaces Columns
    • Passive House 3.0
    • Tool Test: Compact Line Lasers
  • Issue 327 - November 2024
    • Repairing Damaged Walls and Ceilings
    • Plumbing Protection
    • Talking Shop

Fine Home Building

Newsletter Sign-up

  • Fine Homebuilding

    Home building tips, offers, and expert advice in your inbox.

  • Green Building Advisor

    Building science and energy efficiency advice, plus special offers, in your inbox.

  • Old House Journal

    Repair, renovation, and restoration tips, plus special offers, in your inbox.

Signing you up...

This site is protected by reCAPTCHA and the Google Privacy Policy and Terms of Service apply.
See all newsletters

Follow

  • Fine Homebuilding

    Dig into cutting-edge approaches and decades of proven solutions with total access to our experts and tradespeople.

    Start Free Trial Now
    • Facebook
    • Instagram
    • X
    • LinkedIn
  • GBA Prime

    Get instant access to the latest developments in green building, research, and reports from the field.

    Start Free Trial Now
    • Facebook
    • YouTube
  • Old House Journal

    Learn how to restore, repair, update, and decorate your home.

    Subscribe Now
    • Facebook
    • Instagram
    • X

Membership & Magazine

  • Online Archive
  • Start Free Trial
  • Magazine Subscription
  • Magazine Renewal
  • Gift a Subscription
  • Customer Support
  • Privacy Preferences
  • About
  • Contact
  • Advertise
  • Careers
  • Terms of Use
  • Site Map
  • Do not sell or share my information
  • Privacy Policy
  • Accessibility
  • California Privacy Rights

© 2025 Active Interest Media. All rights reserved.

Fine Homebuilding receives a commission for items purchased through links on this site, including Amazon Associates and other affiliate advertising programs.

  • Home Group
  • Antique Trader
  • Arts & Crafts Homes
  • Bank Note Reporter
  • Cabin Life
  • Cuisine at Home
  • Fine Gardening
  • Fine Woodworking
  • Green Building Advisor
  • Garden Gate
  • Horticulture
  • Keep Craft Alive
  • Log Home Living
  • Military Trader/Vehicles
  • Numismatic News
  • Numismaster
  • Old Cars Weekly
  • Old House Journal
  • Period Homes
  • Popular Woodworking
  • Script
  • ShopNotes
  • Sports Collectors Digest
  • Threads
  • Timber Home Living
  • Traditional Building
  • Woodsmith
  • World Coin News
  • Writer's Digest
Active Interest Media logo
X
X
This is a dialog window which overlays the main content of the page. The modal window is a 'site map' of the most critical areas of the site. Pressing the Escape (ESC) button will close the modal and bring you back to where you were on the page.

Main Menu

  • How-To
  • Design
  • Tools & Materials
  • Video
  • Blogs
  • Forum
  • Project Guides
  • Reader Projects
  • Magazine
  • Members
  • FHB House

Podcasts

  • FHB Podcast
  • ProTalk

Webinars

  • Upcoming and On-Demand

Podcasts

  • FHB Podcast
  • ProTalk

Webinars

  • Upcoming and On-Demand

Popular Topics

  • Kitchens
  • Business
  • Bedrooms
  • Roofs
  • Architecture and Design
  • Green Building
  • Decks
  • Framing
  • Safety
  • Remodeling
  • Bathrooms
  • Windows
  • Tilework
  • Ceilings
  • HVAC

Magazine

  • Current Issue
  • Past Issues
  • Magazine Index
  • Subscribe
  • Online Archive
  • Author Guidelines

All Access

  • Member Home
  • Start Free Trial
  • Gift Membership

Online Learning

  • Courses
  • Project Guides
  • Reader Projects
  • Podcast

More

  • FHB Ambassadors
  • FHB House
  • Customer Support

Account

  • Log In
  • Join

Newsletter

Get home building tips, offers, and expert advice in your inbox

Signing you up...

This site is protected by reCAPTCHA and the Google Privacy Policy and Terms of Service apply.
See all newsletters
See all newsletters

Follow

  • X
  • YouTube
  • instagram
  • facebook
  • pinterest
  • Tiktok

Join All Access

Become a member and get instant access to thousands of videos, how-tos, tool reviews, and design features.

Start Your Free Trial

Subscribe

FHB Magazine

Start your subscription today and save up to 81%

Subscribe

We hope you’ve enjoyed your free articles. To keep reading, become a member today.

Get complete site access to expert advice, how-to videos, Code Check, and more, plus the print magazine.

Start your FREE trial

Already a member? Log in

Privacy Policy Update

We use cookies, pixels, script and other tracking technologies to analyze and improve our service, to improve and personalize content, and for advertising to you. We also share information about your use of our site with third-party social media, advertising and analytics partners. You can view our Privacy Policy here and our Terms of Use here.

Cookies

Analytics

These cookies help us track site metrics to improve our sites and provide a better user experience.

Advertising/Social Media

These cookies are used to serve advertisements aligned with your interests.

Essential

These cookies are required to provide basic functions like page navigation and access to secure areas of the website.

Delete My Data

Delete all cookies and associated data