Retrofitting Skylights in a Truss Roof
Don't cut any roof trusses until you get most of the new framing in place.
Q:
I’m having a new roof put on the house this summer. We want to put skylights in a few locations. The roof trusses are 2 ft. o. c., but we’d like to install a 4-ft. square skylight in one location. I’d like to install the skylights myself just before the roofing contractor installs the roofing, but I am not sure how to cut out a section of one truss without affecting the integrity of the roof structure. Can you help?
David Graham, Naramata, None
A:
Contributing editor and builder Mike Guertin, from East Greenwich, Rhode Island, replies: Reroofing is a great time to install skylights. However, a truss roof can make skylight installation a lot more problematic. Building codes prohibit any field modification (notching or cutting) of roof trusses.That’s because once you cut into any part of a roof truss, you can’t trust its integrity. So you really should check with your local building inspector before proceeding. But the easiest way I’ve found to retrofit a wide skylight without re-engineering the trusses is to reframe the roof around the skylight opening with dimensional lumber just as you would in a stick-built roof.
First, you have to plan the location for the skylight. Because 4-ft. skylights are sized to fit pretty closely between roof framing spaced 24 in. o. c., you may have to cut through one or two roof trusses to frame out the opening. I actually prefer to locate skylights so that their sides fall in the middle of truss bays and not alongside existing trusses. This strategy gives a little more room for slipping in the new rafters and ceiling joists.
Next, calculate the size of the rafters and ceiling joists that will support the roof where you cut the trusses. I use building codebooks or span tables to determine rafter size and spacing. Before you get too far into the tables, measure the distance between the inside edge of the top wall plate and the underside of the roof sheathing. This amount is the limiting height you will have to work with when selecting an appropriate rafter size.
You should not extend the heel cut on the rafters too far beyond the inside edge of the top plate.Usually, roof-truss height at the top plate limits the rafter sizing to 2x8s or 2x6s. Ceiling joists can be a little taller. Selecting a premium species such as Douglas fir or a premium grade such as select structural might be necessary to get away with 2×6 rafters on longer spans.
If you can’t support the roof properly, I suggest going with two 2-ft. skylights or leaving a truss exposed in the skylight shaft. But let’s assume you can size the rafters and ceiling joists and move on to the next step of cutting and installing them.
If possible, I remove several sheets of roof sheathing in the area where the new skylight will go, which gives you plenty of room to do the framing. If this option isn’t possible, the lumber can be slipped through small holes cut through the sheathing at the ridge, and the framing can be done from inside the roof cavity.
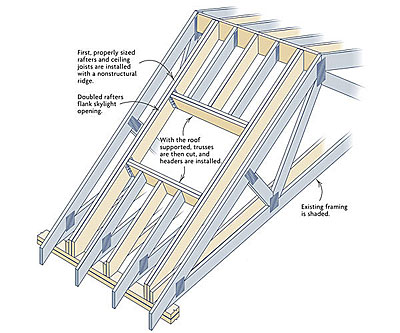
Cut enough rafters for both sides of the roof. Even though you’ll be putting the rough opening for the skylight only on one side, you need to reframe both sides of the roof. Double the rafters on each side of the rough opening, and prepare headers and cripple rafters.
Don’t cut any roof trusses until you get most of the new framing in place.Without getting too involved in describing the logistics, slide in the rafters, and install them first. When the rafters are in position, hop out on the roof and drive nails through the roof sheathing into the rafters wherever you can.
Next, install the ceiling joists. Then prepare a ridge board that will fit between the roof trusses that will remain intact after you cut the trusses for the skylight opening.Using a reciprocating saw, cut out sections of the top chord of the one or two trusses in the way so that you can slip the ridge board in place. A metal-cutting blade will be necessary to cut through the truss plates at the top of the trusses. By the way, this ridge is not structural. It’s merely there to help to transfer opposing rafter forces.
With the ridge in place, the rafters are supporting the roof, and you can cut out sections of roof trusses in the way of the new skylight opening. The rest of the truss can remain. In fact, some parts of the truss have to remain to support the soffit and fascia.
Next, determine the exact location of the ceiling opening for the skylight, and frame in the headers and joists. Mark out the skylight opening on the underside of the roof sheathing, and cut the top chords of the trusses just short enough to allow you to install the headers and the cripple rafters. Be sure to secure all rafter/header connections with metal connectors. Do the same for the remaining segments of the roof-truss chords. Then frame up the skylight shaft. If you’re not ready to reroof, schedule the final cut in the roof sheathing and skylight installation just before the new roof is installed.
Fine Homebuilding Recommended Products
Fine Homebuilding receives a commission for items purchased through links on this site, including Amazon Associates and other affiliate advertising programs.
Roof Jacks
Flashing Boot Repair
Ladder Stand Off
