Building a Lazy-Susan Cabinet
Revolving shelves on heavy-duty carousel hardware make the most of a kitchen corner.
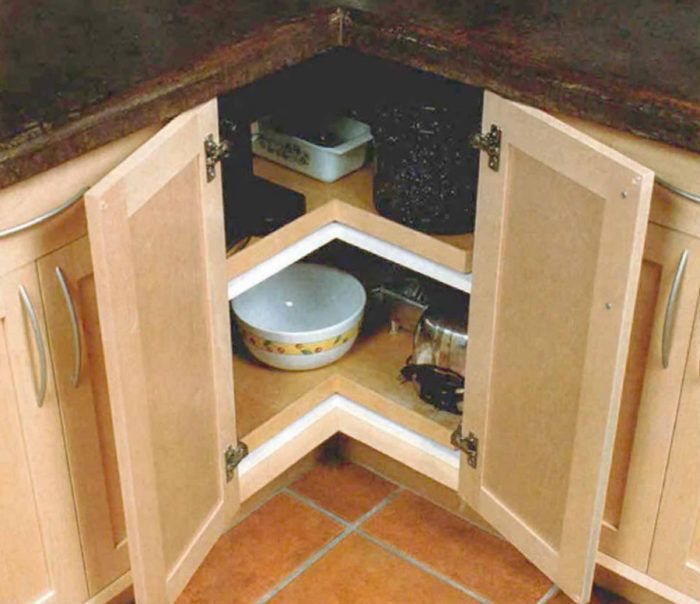
Synopsis: This article explains how to build a lazy-Susan corner cabinet for the kitchen with melamine, plywood, solid-wood banding and sturdy ball-bearing hardware. The result, while relatively inexpensive, outperforms much of what’s commercially available and can be sized to fit any kitchen layout.
I have no idea who dreamed up the lazy Susan, but I bet a Hoosier had something to do with it. Indiana, after all, is the birthplace of the famed Hoosier cabinet, and Indiana is where I came across a lazy-Susan corner cabinet for the first time. I had just started working as a cabinetmaker, and I landed a kitchen remodeling job that included the removal of every cabinet but one, a corner cabinet that housed two lazy Susans. It was a primitive affair that probably had been built on site, but the owner loved it.
Made of standard lumberyard plywood, the cabinet took up a 36-in. sq. space with a cutout in the corner. Both the bottom and center shelves supported 32-in. rounds of plywood that revolved on low-profile bearings. Even though I’ve upgraded the materials and hardware, and added solid-wood edging to the carousels, my lazy Susan cabinets are virtually the same. There wasn’t much in that design to improve.
These cabinets hold a lot, and the 1,000-lb. capacity of the bearings means they work smoothly, even when the carousels are full of appliances or canned food. These cabinets eliminate wasted space in a corner, and they feature doors that open out of the way for easy access. Although I can buy factory-made lazy Susans, I think there are advantages to making these cabinets myself. My carousels are more attractive, operate more smoothly and are a lot stronger than those flimsy trays revolving around a center pole. I can make mine any size. The 12-in. bearings of galvanized steel I use are inexpensive (about $7 each) and readily available from woodworking-supply dealers and catalogs.
Start by cutting out pieces for the cabinet box
Although I stick with 3/4-in. melamine for the cabinet box, I use 3/4-in. hardwood plywood for the carousel pieces because it’s less likely to chip. To cut melamine cabinet pieces to size on a table saw, I use a Freud LU98, an 80-tooth blade with a triple-chip grind. For ripping plywood, I use a thin-kerf rip blade. I don’t get fancy with joinery on these cabinets. A simple dado joint cut on the table saw works fine. I use zero-clearance table-saw inserts with all these blades.
After squaring and cutting the top, the bottom and the shelf panels, I mark out 90° corner cuts on each piece. I start these cuts on a table saw, but I’m careful not to cut too far and finish the cuts with a jigsaw. Bosch makes a 4-in., 10-tpi jigsaw blade (model T101BR) with its teeth facing down instead of up as in a standard blade. It reduces splintering in wood and chipping in melamine.
To eliminate wasted interior space in the back of the cabinet and to make installation easier, I cut a 10-in. piece off the top, bottom and shelf pieces. This cut is easily done on the table saw with the points up against the fence.
For more photos and details on building a lazy-Susan cabinet, click the View PDF button below.


