Q:
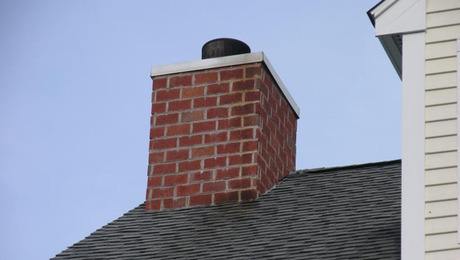
The engineers at our office have an ongoing debate about what causes the horizontal crack commonly found around the tops of brick masonry chimneys. Some argue that it’s related to temperature-induced differential movement while I maintain that the crack is caused by differential settlement in the chimney materials. I’ve actually seen such a crack in a new chimney that has never been used. What is your theory, and what is the best corrective or preventive action?
John Turner, P. E., Goffstown, NH
A:
Richard T. Kreh Sr., author of Building with Masonry (The Taunton Press, 1998), replies: In my years as a mason, I’ve occasionally come across the cracks you describe, and almost always, they occur on chimneys that serve fireplaces. Although it would be difficult to find a single cause for every instance of this cracking, there are a few conclusions my experience and research have led me to.
To begin with, all masonry materials have different coefficients of thermal expansion. A typical brick chimney is made of brick, mortar and flue liners, all of which expand and contract at slightly different rates with changes in temperature.When the chimney is in use and the materials heat at different rates, differential movement can occur that is capable of causing cracks to form along a horizontal mortar joint.
On the other hand, settling cracks occur either because the chimney was not built on a proper footing or because voids or gaps were left between layers of material as the chimney was built. If these gaps collapse or if the footing moves under the weight of the chimney, cracks can show up, but it’s unlikely that they will be in the form of a horizontal crack around the top of the chimney.
To prevent cracks from differential movement, flue tiles should always be installed with a 1-in. airspace between the tile and the chimney brick. This airspace is fine until you get to the top of the chimney, where the chimney has to be sealed around the flue to prevent moisture from entering.
To seal the top of the chimney, I insert a few small brick wedges in the airspace between the top brick courses and the flue tile, but not so that there is a solid mass against the flue. I then form a sloped mortar wash on top of the brick and up to flue tile. (See “Repairing a chimney cap,” FHB #97, pp. 18, 20.)
You mentioned that you’d seen cracks in an unused chimney. There could be several explanations for this problem. First, someone might have built a test fire to check the draw before the mortar had cured properly, causing the chimney to crack.
Another explanation is that water or moisture from washing down the masonry may have penetrated the brickwork. Frost or freezing could then cause expansion, creating a crack in the chimney. Still another reason might be moisture introduced where the mortar wash has shrunk away from the flue tile.
To prevent any water from entering the chimney around the top edge where the flue tile exits the sloped wash, rake out the mortar 1/4 in. to 1/2 in. deep. Then caulk the joint with a high-temperature silicone sealant, which is available at masonrysupply stores.
If a crack has already occurred, the best corrective action is first to make sure no water is entering the chimney. If the crack encircles the entire top of the chimney, I recommend tearing the brickwork down to the crack and rebuilding the chimney.
If the crack runs only part of the way around the chimney, cut out the cracked mortar joint with a masonry-joint chisel to a depth of 3/8 in. to 1/2 in. Then fill the joint with a masonry caulk that matches the color of the mortar joint, which again is available at most masonry-supply centers. I recommend caulking the joint instead of repointing the joint with mortar because caulk will stay more flexible if differential movement recurs.
For more information about volume change and the effects of movement in masonry work, contact the Brick Industry Association (11490 Commerce Park Drive, Reston,VA 22091; 703-620-0010). Ask them to send you Technical Note No. 8 Revised (available for a small fee).


