Shingling Guide
This simple trick makes it easy to install wood shingles like a pro.
A few years ago, I attended a seminar sponsored by a cedar-shingle manufacturer. The local rep showed a film of a real professional installing shingles. This guy was nailing so fast that the entire room burst out laughing. Like the other builders attending this event, I claim roofing as only part of my repertoire, and that level of skill just isn’t in the cards for me.
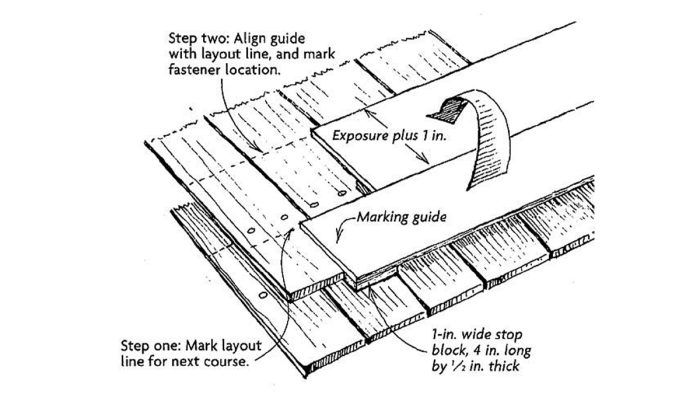
On those occasions when I do install wood shingles, I set the courses to a pencil line that I mark using a simple guide made out of a 4-ft. to 5-ft, length of 1/4-in. plywood. To make the guide, I first rip the piece of plywood to a width equal to the exposure of the shingles, plus 1 in. I affix stop blocks to the underside of the plywood at each end. As shown in the drawing, they are 1 in. wide, 4 in. long and 1/2 in. thick.
To use the guide, I position it so that the stop blocks catch the butts of the previous course of shingles. Then I draw a line along the top of the guide to locate the butts of the next course. Next, I move the guide up and lay its bottom edge along this line and mark another line along the top of the guide.
Of course, the shingles cover this line as they’re laid down, but the guide provides a reference line on the leading edge. That, and the nails in the previous shingle, are enough to eliminate any hesitation when nailing. To make sure none of the shingles wanders off layout, I snap a chalkline every few courses as a control.
— Arne Waldstein, Great Barrington, MA. Edited by Charles Miller.
From Fine Homebuilding #138
RELATED STORIES
Got a Tip?
Do you have any great tips like this one on making a wood shingle guide? Share your methods, tricks, and jigs with other readers. Tag them @FineHomebuilding on social, email them to us at [email protected], or upload them to FineHomebuilding.com/reader-tips. We’ll pay for any we publish.
Fine Homebuilding Recommended Products
Fine Homebuilding receives a commission for items purchased through links on this site, including Amazon Associates and other affiliate advertising programs.
Shingle Ripper
Flashing Boot
Hook Blade Roofing Knife
