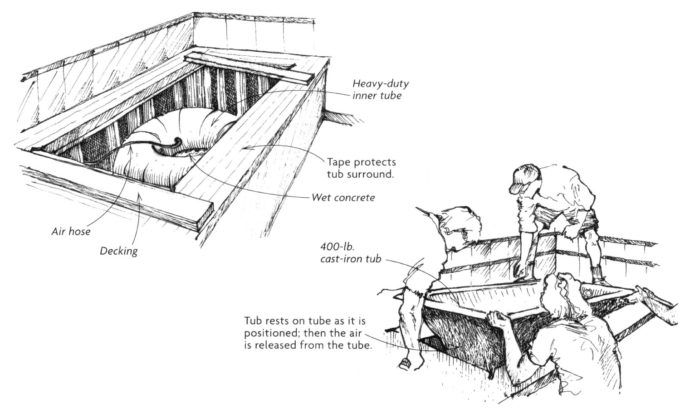
On a recent job, we had to place a 400-lb. cast-iron tub into a tiled tub surround on the second floor of a house. To lessen the chance of crushed fingers and hurt backs, we used some tried-and-true techniques, along with a method brand new to us.
We delivered the tub to the second floor with a crane and set it on a deck. We then rolled it on some steel pipe into the house. From there, we used a piano dolly to move it next to the tub opening. We taped off the tub surround to protect it from being scratched. Then we placed two pieces of scrap decking across the tub opening.
Here’s the new part. As shown in the drawing, we placed a 24-in. dia. heavy-duty inner tube from a hay baler on the subfloor in the center of the tub surround. We hooked up an air hose to the tube’s valve stem and ran the hose through the wall behind the tub. There, we hooked the hose to a splitter, with the leg of the Y going to the compressor and the other branch of the Y going to a hose with a blow gun we had in the bathroom.
We inflated the tube, then mixed a bag of concrete and poured it into the middle of the tube. We used the concrete, which we mixed pretty wet, to create a solid base for the tub to sit on and to conduct heat from the hydronic floor to the tub.
When installation time came, five guys hoisted the tub onto the two pieces of decking. Then we lifted one end of the tub, removing the deck board under it, and lowered that end of the tub onto the tube. Next, we lifted the other end, removed its board and set the tub fully on the tube. We were concerned that the tub might quickly flatten the tube or that the tub might roll to the side. Neither thing happened. The setup was very stable.
We also were worried that once we started to let air out of the tube, the tub might come down too fast, leaving the wrong reveal around the edges of the surround. That didn’t happen, either. The tub came down so slowly that I uncoupled the blow gun and used my thumb to control the air release. By the way, the compressor was turned off at this point.
We pulled the tape just before the tub settled onto the surround. Then we all stood in the tub to press it into the concrete. No hurt backs, no broken fingers. And yes, the tube and its hose are still under the tub.
Mike Nathan, Hailey, IN













View Comments
Now that is an excellent tip/process. Great post.
Please think of this as a respectful question, not a snarky comment. I have owned and installed tubs made of a variety of materials. Cast iron would not be among the materials that I would consider installing for myself. I am not sure what my top choice would be if I were in the market, but I will say that my inexpensive fiberglas tub is 31 years old and has received daily use by me for the past 13 years. All things considered, it looks very nice. At work, the cast iron tubs that I remove from service are usually replaced by something other than cast iron. And, the ones that I remove are usually very unsightly. On the other hand, the acrylic tubs that I remove are typically about 25 to 30 years old and they look great. The reason they are being removed is to make way for large showers made of tile. Thankfully, I will be retired before the industry starts making a living demolishing all of the tile being installed today. So, finally, what is the upside of cast iron that makes it worth the effort and cost?
I'm with boyonabridge. What is the advantage of cast iron? It robs heat from a bath, is merciless to move, and does not age well , especially if there is iron in the water.
One advantage of cast iron is that it ISN"T plastic.
Actually, cast iron retains heat much better than acrylic. The cast iron does indeed absorb heat from the water, but then keeps the water warm. All the sites I have seen say cast iron is better than acrylic for keeping the bath water warm. That is without insulation. If you insulate the acrylic tub, that helps with heat retention, but a cast iron tub could be insulated as well.