Airtight Attic Access
Hot air rises. And where does it go? It could be going right out the attic access in your house.

Synopsis: If not insulated and air-sealed properly, attic hatches can represent the single largest source of heat loss in a home. Here are the readily available materials and simple techniques that the author uses to construct an attractive, airtight, and well-insulated attic access.
I have been building airtight, energy-efficient homes for more than ten years. Before that, I built homes I thought were energy-efficient. Because I didn’t make them airtight, though, I wasn’t addressing half of the equation. Making a house airtight means closing the holes between conditioned spaces, such as the living room, and unconditioned spaces, such as the outdoors. I attack big holes first and work my way down until I reach the point of diminishing returns.
The single biggest, leakiest hole in most houses is the attic access
Often, attic accesses are no more than a piece of painted plywood on a couple of cleats. Most homeowners and builders don’t recognize how much conditioned air escapes through an attic access. The access is in the ceiling, probably in a closet, and no one notices the draft. Or they rarely connect the cold drafts on the first floor of the house with the attic access upstairs. However, this hole in the highest part of the ceiling can allow a tremendous amount of heated air to escape into the attic, creating a convection-driven stack effect just like the draft in a chimney. This heated air is replaced by cold outside air, which you might notice as a draft that enters below the front door.
In less than an hour, using just a few materials, some of which ordinarily would end up in the scrap pile, I can build an energy efficient, somewhat attractive attic access. It also doubles as a dam to prevent insulation from falling back down into the house whenever the hatch is opened.
Build a shaft from sheathing scraps
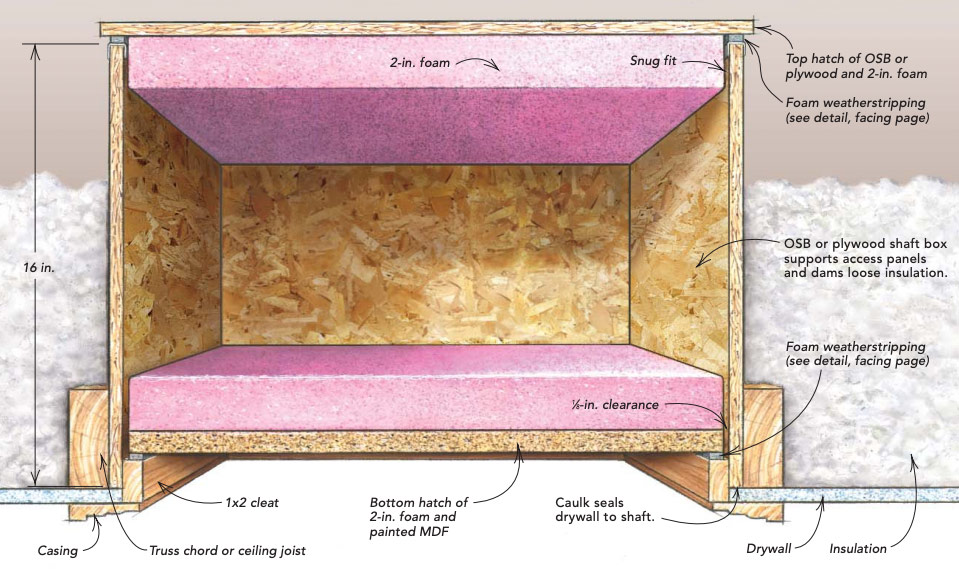
I start by making a shaft box that acts as an insulation dam and that supports the hatches. In new construction, I size the shaft box to fit between roof trusses, usually 22 1⁄2 in. wide and about 33 in. long. A couple of 2x4s nailed between the trusses provide nailing for drywall and for the shaft. I make the sides at least 16 in. tall to hold back the attic insulation. For remodelling projects, I size the shaft to fit the existing opening to the attic. If possible, I enlarge small openings to provide easier attic access.
There’s no need to make the shaft out of anything fancy, just as long as it’s solid. I usually can find several pieces of 1⁄2-in. oriented strand board (OSB) or plywood sheathing in the scrap pile that need only to have the edges dressed up and to be cut to size. Even though the shaft fits between framing members, I like to screw the corners together. A little panel adhesive in the joints keeps them tight for a better air seal.
I set the shaft into the rough opening and slide it up until the bottom is flush with the lower edge of the ceiling framing. It then can be screwed or nailed in place.
Fine Homebuilding Recommended Products
Fine Homebuilding receives a commission for items purchased through links on this site, including Amazon Associates and other affiliate advertising programs.

Nitrile Work Gloves

Loctite Foamboard Adhesive

Great Stuff Foam Cleaner
