Venting a Downdraft Range
Careful planning and precise layout keep the smoke out of your eyes.
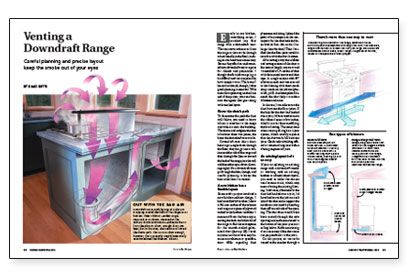
Synopsis: A step-by-step guide to planning the layout and sizing and installing the ductwork for the ventilation system of a downdraft range, including considerations for both new and replacement installations.
Early in my kitchen remodeling career, I installed my first range with a downdraft vent. The vent moves exhaust air from the range to the outside through a duct (usually in the floor), making an overhead vent unnecessary. Because they afford an unobstructed view, downdraft vents are great for islands and peninsulas. I thought the first job was going to be difficult and was surprised by how simple it was. The lesson I learned on that job, though, is that good planning is essential. With meticulous planning on the front end of the project, you can eliminate the agony that goes along with careless layout.
Know the duct’s path
To determine the path the duct will follow, you need to know where it attaches to the range and where it exits the building. The shorter and straighter the duct is between these two points, the better the downdraft vent works.
Downdraft-vent ducts don’t have to go straight down through the floor; they can go into a cabinet on either side of the range and then through the floor or toward the back of the range, into the wall and then either up or down. Most downdraft vents go through the floor, though, and careful planning to locate the hole in the floor is essential.
A new kitchen has a flexible layout
Because this project involved a new kitchen-cabinet design, I had some flexibility when I drew a full-size outline of the cabinets and range on a piece of plywood tacked to the kitchen’s subfloor. I measured from the lines representing the back and sidewalls of the range to find the center point for the smooth-walled galvanized duct. I took my time on this critical step because manufacturers’ specifications differ regarding duct placement and sizing. I placed the point of my compass on the center point for the duct hole and inscribed an 8-in. dia. circle (1 in. larger than the duct). Then I verified that the floor joists wouldn’t interfere with the duct location.
After cutting away the subfloor and cutting sections of the duct to the correct length, my crew and I assembled a 5-ft. section of duct with sheet-metal screws and duct tape. A straight section with 90° elbows on each end was secured to the framing with sheet-metal straps made on the job site. Insulation placed beneath the duct helps to reduce vibration and noise.
In this case, I was able to run the duct between the floor joists. If the hole for the duct had landed over a joist, I’d have tried to move the cabinet layout a few inches, which is easier than modifying the floor framing. The same is true when venting through an I-joist system, which usually requires that the ductwork fall between joists. Check with a building official or structural engineer before altering engineered joists.
For more photos, drawings, and details, click the View PDF button below:
Fine Homebuilding Recommended Products
Fine Homebuilding receives a commission for items purchased through links on this site, including Amazon Associates and other affiliate advertising programs.

The New Carbon Architecture: Building to Cool the Climate

A Field Guide to American Houses

Code Check 10th Edition: An Illustrated Guide to Building a Safe House







View Comments
Am I seeing correctly that the vent was located right below a window and, if so, is that location code compliant? Thanks.