Preventing Moisture Problems in Bathrooms
A poorly designed bathroom is no better than a leaky roof; an experienced bath designer tells where the worst problems occur and how to prevent them.
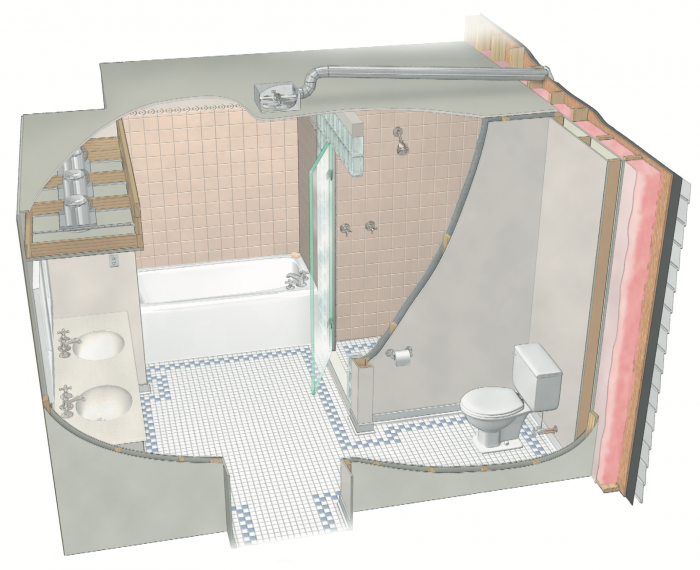
Synopsis: A kitchen designer offers strategies for controlling moisture in a bathroom, including both airborne water vapor and splashes from tubs, showers, toilets, and sinks. The article includes construction details and recommendations for materials and designs that will help keep water in its place.
As a veteran kitchen and bath designer, I’ve created my share of glamorous bathrooms, complete with oversize showers, giant soaking tubs, whirlpools, saunas and the like. I wish I could say that all of my clients come to me for the bathroom of their dreams; sadly, a lot of them show up at my door after water leaks and humidity have rendered the bath of their dreams unusable. Today’s bathrooms unleash copious amounts of moisture, all of which must be carefully controlled, or the results can be devastating (can you say mold?).
Although I’m glad to have the business, I want my work to last, so I’m always alert to improvements in products, design and construction that address these issues. Following are a few of the strategies that I use to ensure that none of my dream baths ever become someone else’s nightmare.
Use the proper wall assembly for the climate
Today’s tight construction methods yield big dividends in terms of comfort and energy efficiency, but they don’t dry out like the drafty walls of old. To prevent trapped moisture, exterior bathroom walls must be designed carefully. In certain climates, a properly installed vapor barrier can be a valuable part of that design.
Assuming all other aspects of moisture control are handled correctly, the main influence on the location of the vapor barrier is climate. Moisture tends to migrate from areas of greater (or warmer) concentrations into areas of lesser (or colder) concentrations. In a heating climate, such as New England where I work, a vapor barrier is placed on the interior of wood-frame walls and ceilings, and permeable exterior sheathings are installed to allow any moisture that gets into the wall cavity to dry to the exterior. In a cooling climate, however, the opposite might be true. Wall assemblies in general and vapor barriers in particular are controversial subjects. Consult a building science expert in your area to find out what might work best for you.
Leave no draft unsealed
Because most moisture that enters framing cavities is airborne, air leaks present significant opportunities for moisture to build up behind walls or under floors. Common spots for drafts include rough-ins for electrical, plumbing or mechanical systems; drains for tubs and showers; and cutouts for recessed lights. My policy is that any penetrations in the floor, wall or ceiling must be sealed with polyurethane foam, silicone sealant or some other appropriate material. My subcontractors make sure that any holes they cut in the subfloor are large enough to allow for at least 1 ⁄4-in. thickness of flexible sealant around the pipes.
Recessed lighting presents another draft problem. Conventional fixtures are way too porous for use in a bathroom. To avoid filling the space above with moisture, recessed fixtures located in insulated ceilings must be airtight and carry the IC-rating, which indicates that they are designed to be covered with insulation. A better solution is to place recessed lights within soffits or dropped ceilings. From my designer’s standpoint, a well-framed soffit creates interesting sightlines and avoids any penetration into unheated spaces.
For more photos and details on how to keep moisture out of your bathroom, click the View PDF button below.
