Ultimate Cheapskate Kitchen
A no-frills fix-up creates a bright, efficient workspace for less than $1,800 in fixtures, materials and appliances.
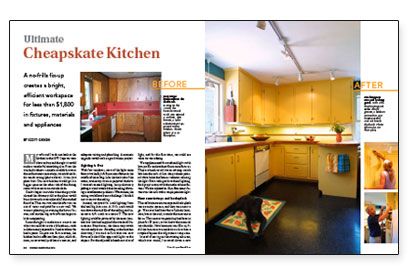
Synopsis: This article describes how the author gave his kitchen a facelift spending less than $2000, focusing on improved lighting, new countertops, new paint and hardware for the cabinets, and new vinyl tile flooring.
My wife and I took one look at the kitchen in the 1975 Cape we were about to buy and thought it would make a wonderful something else. From the site-built cabinets stained a muddy brown to the red laminate countertops, we could see little worth saving. It was just plain beat. Our new kitchen would go in a bigger space on the other side of the dining room with access to an outside deck.
Doubts began to intrude when the guy who cleaned the chimney told us the place would burn down unless we replaced all the cracked flue tiles. That was two months after we ran out of water and paid for a new well. We weren’t planning on owning the house forever, and another big cash infusion began to look unappealing.
Susan thought it made more sense to see what we could do in our old kitchen — with as little money as possible. I had to admit she had a point. Despite our first reaction, the kitchen had an efficient floor plan, solid cabinets, no structural problems to correct, and adequate wiring and plumbing. A cosmetic upgrade would make a good winter project.
Lighting is first
With few windows, most of the light came from a two-bulb, 4-ft. fluorescent fixture in the middle of the ceiling. Like the dark side of the moon, countertops were in perpetual shadow. I wanted recessed lighting, but preliminary poking around revealed that the ceiling’s framing created location problems. What’s more, the wiring would have been a challenge. I decided not to tear out the ceiling.
Instead, we opted for track lighting from the local big-box store. A 10-ft. track would run down the middle of the ceiling and intersect a 4-ft. track to create a T. The new lighting could be powered by the same junction box that had supplied the overhead fluorescent. Even better, the three-way switch was already there. Standing in the kitchen doorway, I worried at first that our new fixtures looked like approach lights at the airport. But the adjustable heads cast a lot of light, and for the first time, we could see what we were doing.
We supplemented the overhead lights with low-profile undercabinet fluorescent fixtures. They are hard-wired into an existing switch box near the sink. A 2-in. deep valance painted white hides the fixtures without reducing the light. Even with good overhead lighting, food prep is easier with the undercabinet fixtures. We also replaced an 18-in. fluorescent fixture over the sink with a simple pendant light.
New countertops and backsplash
The red laminate countertops and backsplash were a major eyesore, and they were next to go. We never had been fans of plastic laminate, but in the end, it made the most sense for us. The counter we peeled up had been in place for 25 years, so we knew the material was durable. New laminate was $2 a sq. ft. All the laminate we needed cost less than a couple of square feet of granite or soapstone.
For more photos, drawings, and details, click the View PDF button below:
