How to Get a Good-Looking Layout with Laminated Shingles
To avoid unintentional patterns, randomize the offset distance between shingles in successive courses as much as possible.
Q:
My cousin had laminated shingles installed on his home in northern Minnesota. The installed shingles have a wavy pattern, and the laminated layers seem to be the same from shingle to shingle. Instead of a random pattern, the laminations line up from course to course to look like tigerstriping on the roof. The manufacturer says there’s nothing wrong with the shingles, and the contractor says there’s nothing wrong with the installation. So how can this problem be avoided?
Wally Wilke, Blooming Prairie , MN
A:
Mike Guertin, author of Roofing With Asphalt Shingles, replies: My initial reaction is that there probably is nothing wrong with the waviness of the shingles. Laminated shingles often are bent along the centerline because of the bundling method, which gives them a “wave” until they have a chance to heat up in the sun repeatedly and flatten out. On my house, the laminated shingles took a year to flatten out. But the repeating pattern of the laminated cutouts is unusual.
My guess is that the tiger-striping may be partly because the installer didn’t follow the manufacturer’s instructions for starter-shingle size, which is included for most brands of laminated shingles. The starter-shingle pattern for laminated shingles is different than three-tab shingles, which stagger the shingle courses 6 in. apart to get the keys to line up.
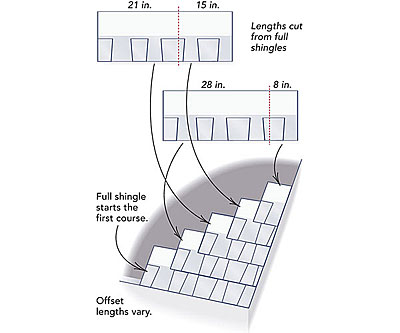
Most manufacturers recommend a modified pyramid pattern with the starters cut from two shingles: a 21-in. length and a 15-in. length from one 3-ft. shingle, and 28-in. and 8-in. lengths from the other. The first course starts with a full 36-in. shingle; the next with the 28-in. piece for an 8-in. offset; then the 21-in. piece for a 7-in. offset; then the 15-in. piece for a 6-in. offset; and last the 8-in. piece for a 6-in. offset. They also say you can use any cutoff larger than 6 in. as a starter, provided you keep a 4-in. minimum offset between shingle joints in successive horizontal courses.
But even if the installer followed the starter instructions, a pattern may develop depending on how the manufacturer’s dies cut the shingles. To avoid problems with a pattern showing up in what’s supposed to be a randomly shingled roof, the key is to randomize the offset distance between shingles in successive courses as much as possible.
I use the recommended starter cuts for the first five or so courses and run the courses to the other end of the roof. I collect the cutoff pieces and use them to make the next starter pyramid. If there aren’t enough usable cutoff pieces for starters, I cut full shingles and continue with the next five courses. I try to pay close attention to the laminated cutouts and skip shingles in a bundle if I notice a pattern developing. I’ve also found that mixing shingles from different bundles into each horizontal shingle course helps.
Fine Homebuilding Recommended Products
Fine Homebuilding receives a commission for items purchased through links on this site, including Amazon Associates and other affiliate advertising programs.

Hook Blade Roofing Knife
Flashing Boot

Shingle Ripper


