Plumbing Under a Concrete Floor
Layout is critical when the pipes are cast in stone.

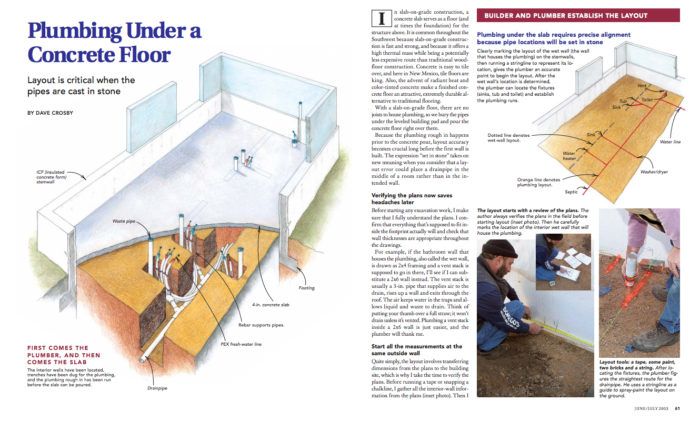
Synopsis: With a slab-on-grade foundation, there are no floor joists in which to run plumbing pipes. Everything must be buried in the dirt prior to pouring the concrete. This article details how to locate the pipes accurately, pitch them correctly, and backfill the excavation so the slab wont crack.
In slab-on-grade construction, a concrete slab serves as a floor (and at times the foundation) for the structure above. It is common throughout the Southwest because slab-on-grade construction is fast and strong, and because it offers a high thermal mass while being a potentially less expensive route than traditional woodfloor construction. Concrete is easy to tile over, and here in New Mexico, tile floors are king. Also, the advent of radiant heat and color-tinted concrete make a finished concrete floor an attractive, extremely durable alternative to traditional flooring.
With a slab-on-grade floor, there are no joists to house plumbing, so we bury the pipes under the leveled building pad and pour the concrete floor right over them.
Because the plumbing rough in happens prior to the concrete pour, layout accuracy becomes crucial long before the first wall is built. The expression “set in stone” takes on new meaning when you consider that a layout error could place a drainpipe in the middle of a room rather than in the intended wall.
Verifying the plans now saves headaches later
Before starting any excavation work, I make sure that I fully understand the plans. I confirm that everything that’s supposed to fit inside the footprint actually will and check that wall thicknesses are appropriate throughout the drawings.
For example, if the bathroom wall that houses the plumbing, also called the wet wall, is drawn as 2×4 framing and a vent stack is supposed to go in there, I’ll see if I can substitute a 2×6 wall instead. The vent stack is usually a 3-in. pipe that supplies air to the drain, rises up a wall and exits through the roof. The air keeps water in the traps and allows liquid and waste to drain. Think of putting your thumb over a full straw; it won’t drain unless it’s vented. Plumbing a vent stack inside a 2×6 wall is just easier, and the plumber will thank me.
Start all the measurements at the same outside wall
Quite simply, the layout involves transferring dimensions from the plans to the building site, which is why I take the time to verify the plans. Before running a tape or snapping a chalkline, I gather all the interior-wall information from the plans. Then I begin the layout. For this layout, I measured from the north stemwall (the concrete wall that forms the perimeter of the slab), having verified that it is square to the other walls and runs parallel to the bathroom’s wet wall. All my measurements were taken from the north wall, also called the common point. Because all the measurements originate from one point, it’s easier to verify them later.
For more photos, illustrations, and details, click the View PDF button below:


