FHB Logo Facebook LinkedIn Email Pinterest Twitter X Instagram Tiktok YouTube Plus Icon Close Icon Navigation Search Icon Navigation Search Icon Arrow Down Icon Video Guide Icon Article Guide Icon Modal Close Icon Guide Search Icon Skip to content
Subscribe
Log In
  • How-To
  • Design
  • Tools & Materials
  • Restoration
  • Videos
  • Blogs
  • Forum
  • Magazine
  • Members
  • FHB House
  • Podcast
Log In
How-To

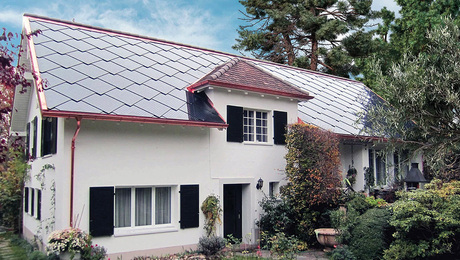
Keep a Dormer Addition Clean and Dry

A well-planned construction sequence contains the debris and keeps the rain out of the house.

By Nicholas Pitz Issue 158
  • X
  • facebook
  • linkedin
  • pinterest
  • email
  • add to favorites Log in or Sign up to save your favorite articles

Synopsis: A veteran remodeling contractor walks readers through a recent dormer addition, explaining how he choreographed the process to minimized mess, rain damage and other inconveniences for the owners. He outlines his construction sequence and offers tips for any remodel.


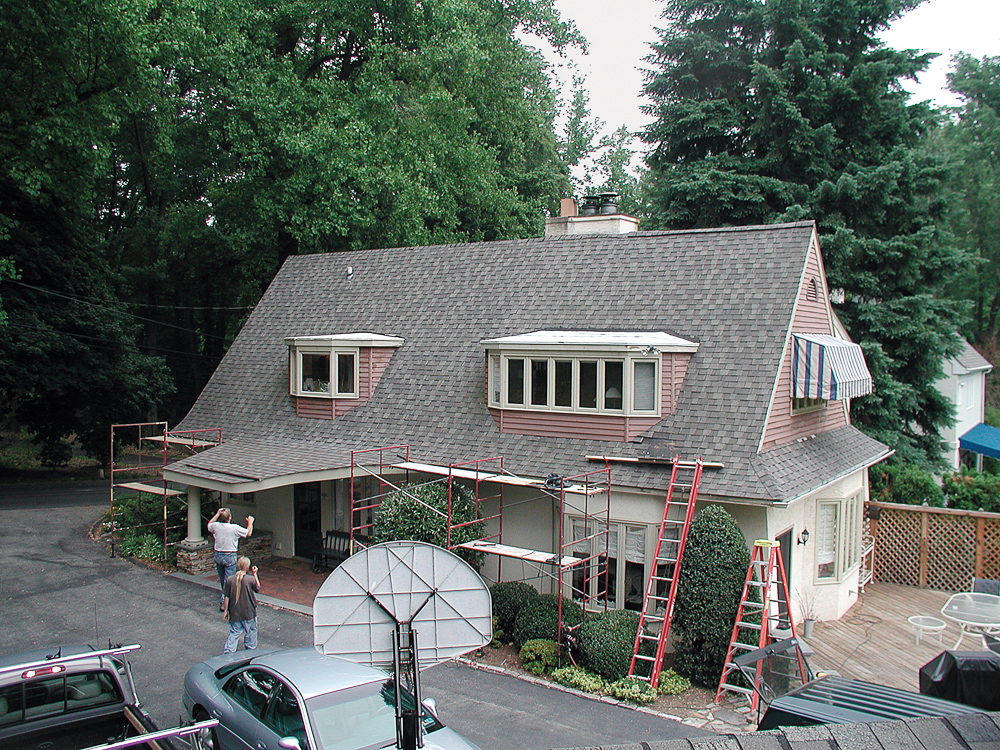
Retrofitting a shed dormer in an occupied house can be a disruptive project. But with careful planning, intrusions such as a constant parade of workers and demolition debris can be kept out of the house. And although there’s always some time when the roof is open or a wall is missing, avoiding weather damage is straightforward: Just expect pouring rain every night, and plan accordingly.

First, build the new roof

The work on this house involved replacing two small existing dormers with a large shed dormer, and the job affected almost every upstairs room. To ensure that the project was weathertight, we’d build the new dormer’s roof first, but we needed room for demolition and reconstruction under it.

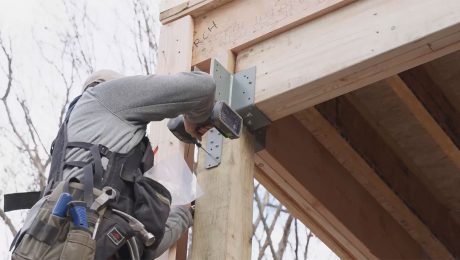
We began by framing the dormer’s outside wall with four posts and a long header. This approach meant we could frame the dormer roof while cutting only four small holes in the original roof. Then, after we built the new roof and removed the old dormers, we could fill in the studs and the window framing.

We marked the locations of the wall posts to correspond with where we wanted the interior partitions to fall. Then we cut out small sections of roof with a reciprocating saw to give us access to the top plate of the existing wall and installed the first corner post. When this post was carefully braced and plumbed, we used a water level to calculate the height of the other corner post to ensure that the roof was level. Once this second post was positioned and plumbed, we strung a line between the two end posts and set the remaining posts to that height, making sure the load was transferred directly to a stud below.

With the posts braced and in place, we installed the headers. At the end of the day, we covered the holes in the roof made by the new posts with aluminum flashing and plastic sheeting.

Tear out only what can be rebuilt that day

small dormers removed
The small dormers had to go. The original house lacked space upstairs, so a big shed dormer was needed. To minimize disruption for the folks living in the house, access to the work zone was via ladders and scaffolds, not through the house.

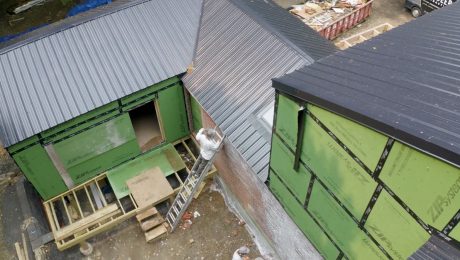
We framed the new dormer’s roof in two sections over two days. We calculated where the new dormer rafters would intersect with the oldest section of roof, cut a 2-ft.-wide section, and removed it. This approach gave us access to the attic without having to go through the house, and also provided light and ventilation to the attic where we would be working.

After the new rafters were securely in place, the sheathing and the #30 felt were installed. The next day, we repeated the performance for the rest of the dormer roof. We now had a reasonably weathertight lid on the work area and could begin the demolition process. To keep out rain, we protected the work site with tarps, which were layered like roofing shingles and held fast with furring strips.

Keep the work site separate from the house

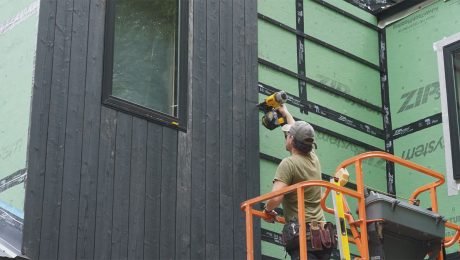
The interior of the dormer was divided into four areas: master bedroom, closet, the daughter’s bathroom, and her closet. It was important to complete the master bedroom quickly, so we built the front wall, sheathed it, installed the window, and had it drywalled and trimmed before some of the other sections were even started. By finishing this room first, the owners got their bedroom back quickly.

We were careful to isolate the workspace from the rest of the house. Two small existing closets were turned into walk-in closets. Before we commenced with serious demolition of either closet, we reframed the door openings, drywalled over them, and taped the seams, planning to cut out the doorways after the dirty work was done. Having the living side of the wall closed acts as a barrier against construction while allowing the electricians and plumbers to do their work on the other side.

Even the small amount of drywall we did on the living side of the wall meant dust. We took the usual precautions. A plastic runner protected the upstairs carpet. To contain airborne dust, I tacked tarps across doorways, placed a box fan in a window as an exhaust, and vacuumed at the end of each workday. On the other side, we completed almost all the work before we cut through to install the new doors and trim.

Because the bathroom door wasn’t being moved, we taped it shut and put a sheet of foam insulation over it for protection. The bathroom then was gutted and rebuilt.

No muss, no fuss

Much of this job revolved around not making a mess. We planned the placement of the Dumpster so that we could build a plywood chute to it for debris removal, but kept it out of the way of deliveries. We were working directly over the driveway, and we made sure we swept up carefully every night.

The bathroom’s outside wall was left unframed as an access to the second floor, and consequently, little traffic went through the house. The dormer was finished toward that opening, and the day before the tile was installed in the bathroom, we finished framing the rough opening and hanging the drywall, then installed the window and trim. The tilesetter’s wet saw was set up on the scaffold outside, and his helper spent the day getting a tan and passing cut tiles through the window.

Every remodeling project is an intrusive ordeal for the homeowner. The single most important aspect of our remodeling strategy was that my clients appreciated the efforts we took to protect their home and privacy.

Staying ahead of the weather

To keep out rain, build the new roof before removing the old one.

The small dormers had to go. The original house lacked space upstairs, so a big shed dormer was needed. To minimize disruption for the folks living in the house, access to the work zone was via ladders and scaffolds, not through the house.
Flashing is slipped under the shingles, bent and canted at an angle to divert water around the post. Heavy plastic sheeting (6-mil poly) is slid under the flashing, wrapped around the post, and tacked down with roofing nails. Duct tape seals the poly to the posts.

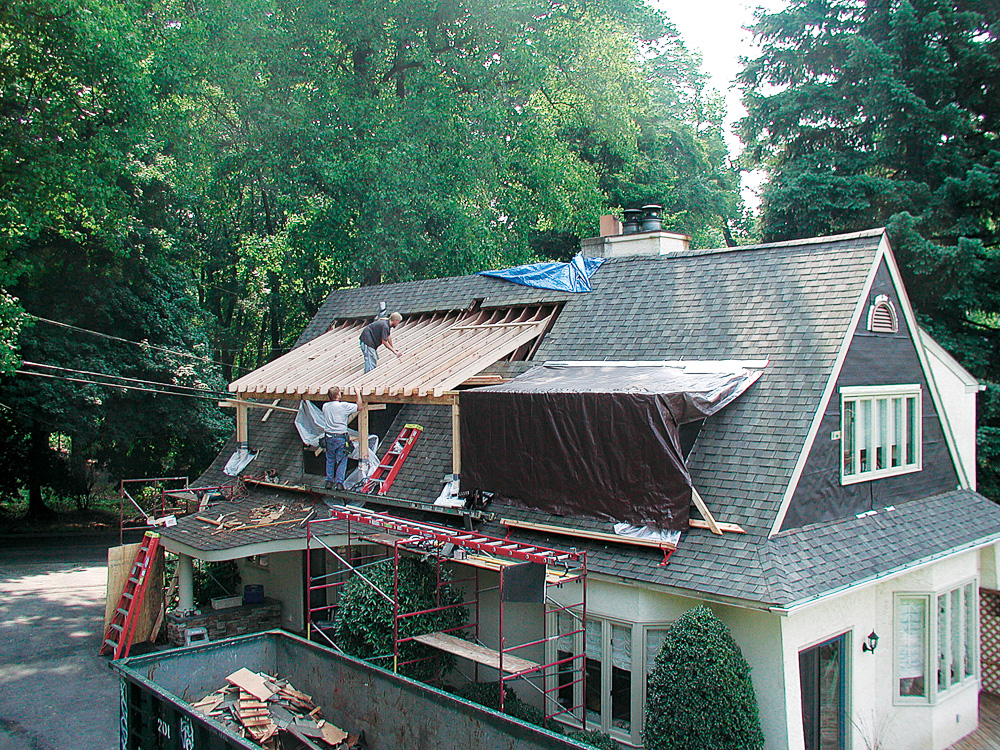
Supporting the new dormer roof with one long header and four posts meant cutting only four small holes in the old roof. Setting and temporarily flashing the posts was the first day’s work. Half of the dormer’s new roof was framed and then sheathed the next day, and all the openings were flashed and tarped against the wind and rain. The dormer’s roof was completed and sheathed, and #30 felt paper kept out the rain.

Keeping a project neat

To protect the house from dust and debris, the occupied space was sealed with drywall and plastic. Also, the debris was removed (and new materials brought in) through the new dormer windows.

keeping a project neat

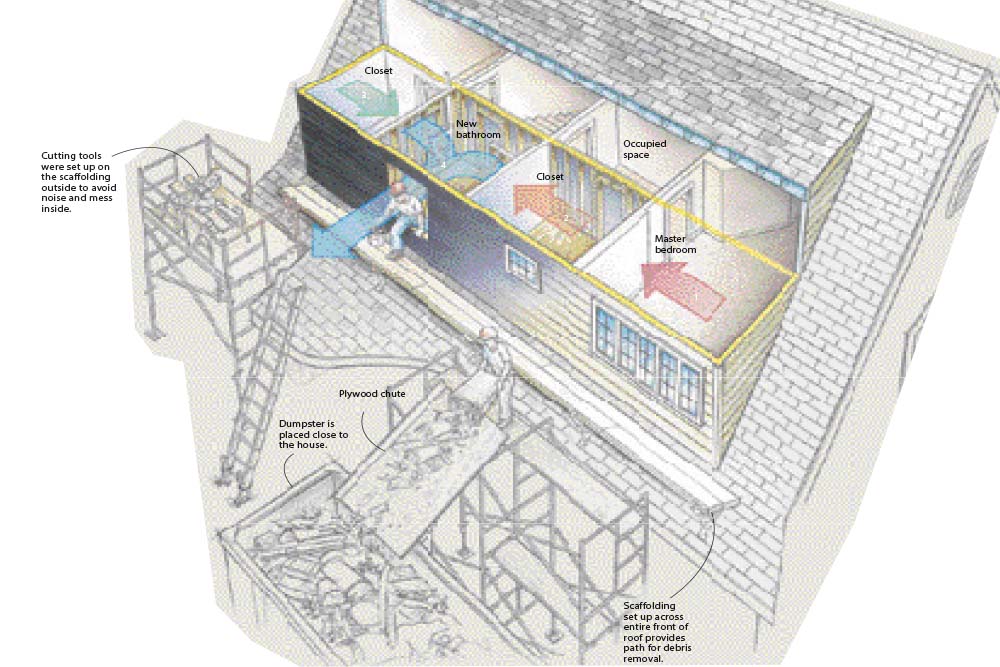
Construction sequence minimizes disruption (reference drawing above):

  1. (Master bedroom) Evicting the owners from their bedroom was the most intrusive part of the renovation, so this room was finished first. The outside walls here were completed and the trim in place before demolition started elsewhere.
  2. (Closet-orange) The new closet wall was framed and drywalled (including the doorway) on the occupied side, creating a solid barrier to construction fallout. Plastic sheeting would not have sealed the walls nearly as well.
  3. (Closet-green) This closet was finished quickly. The bathroom would take the most time and require the most schedule-juggling, which is why it was planned to be done last.
  4. (New bathroom) Toward the end of the project, the window opening in the bathroom’s outside wall was the only access to the work area. The job was finished working toward this opening, with the window installed and the bathroom paint and trim finished just before the new work was opened to the rest of the house.

Tips for any remodel

  • Minimize traffic through the house.
  • Scrupulously seal off the living space from the work zone.
  • Use a window fan in the work zone to exhaust dust and fumes.
  • Take extra precautions to protect the stuff that stays. If the floor stays, for instance, cover it with plywood (and tape the seams) rather than rely on a tarp.
  • Clean up the work zone at the end of every day.
  • To keep peace in the house, consider hiring a cleaning service halfway through.

Photos by Nicholas Pitz. Drawing by Don Mannes


Related stories:

  • Four Steps to Flash a Dormer
  • Adding a Dormer Opens Up a Cramped Bathroom
  • Framing a Dramatic Dormer

From Fine Homebuilding #158

For more photos, illustrations, and details, click the View PDF button below:

Fine Homebuilding Recommended Products

Fine Homebuilding receives a commission for items purchased through links on this site, including Amazon Associates and other affiliate advertising programs.

All New Bathroom Ideas that Work

Everyone wants their bathrooms to be beautiful, but few know the challenge of arranging all the fixtures, storage, and convenience of a great bathroom into one of the smallest space in our homes. This book has hundreds of ideas to inspire you.
Buy at Amazon

Hook Blade Roofing Knife

Cutting asphalt shingles is made faster, easier, and safer when using a hook-blade. Suitable for any standard utility knife, these are a must-have on any roofing project.
Buy at Amazon

Roofing Gun

This lightweight, pneumatic roofing nailer is capable of driving ¾-in to 1¾-in coil roofing nails and has a depth adjustment wheel to dial in nailing depth on the various shingle types you're likely to encounter.
Buy at Amazon

Sign up for eletters today and get the latest how-to from Fine Homebuilding, plus special offers.

Signing you up...

This site is protected by reCAPTCHA and the Google Privacy Policy and Terms of Service apply.
See all newsletters
See all newsletters
×

Get home building tips, offers, and expert advice in your inbox

Signing you up...

This site is protected by reCAPTCHA and the Google Privacy Policy and Terms of Service apply.
See all newsletters
See all newsletters
View PDF

New Feature

Fine Homebuilding Forums

Ask questions, offer advice, and share your work

  • X
  • facebook
  • linkedin
  • pinterest
  • email
  • add to favorites Log in or Sign up to save your favorite articles

Log in or create an account to post a comment.

Sign up Log in

Become a member and get full access to FineHomebuilding.com

Up Next

Video Shorts

Featured Story

Tools and Gear for the Moms Who Get it Done

From work boots to power tools, these favorite picks make perfect gifts for moms and women who build.

Featured Video

Video: Build a Fireplace, Brick by Brick

Watch mason Mike Mehaffey construct a traditional-style fireplace that burns well and meets current building codes.

Related Stories

  • FHB Podcast Segment: Repairing an Old Home While Maintaining Its Integrity
  • Beat the Heat: Cool Innovations
  • FHB Podcast Segment: Designing and Building an Efficient Slab-On-Grade Home
  • FHB Podcast Segment: Do You Need HVAC Ducts in Every Room?

Discussion Forum

Recent Posts and Replies

  • |
  • |
  • |
  • |
  • |
  • |
View More Create Post

Highlights

Fine Homebuilding All Access
Fine Homebuilding Podcast
Tool Tech
Plus, get an extra 20% off with code GIFT20

Video

View All Videos
  • Adding Windows, Siding, and a Brick Lime-Wash Coating
  • Control Layers for a Remodel
  • Replacing Old Shingles with a New Metal Roof
  • Framing a Second Story on an Existing House
View All

Roofs

View All Roofs Articles
  • Podcast Episode 662: Roof Venting, Roof Leaks, and High-Performance Framing
  • Finding the Roof Leak
  • Cedar-Roof Shingling Guide
  • Rafter Strength After Removing and Replacing Solar Panels
View All Roofs Articles

Fine Homebuilding Magazine

  • Issue 331 - June 2025
    • A More Resilient Roof
    • Tool Test: You Need a Drywall Sander
    • Ducted vs. Ductless Heat Pumps
  • Issue 330 - April/May 2025
    • Deck Details for Durability
    • FAQs on HPWHs
    • 10 Tips for a Long-Lasting Paint Job
  • Issue 329 - Feb/Mar 2025
    • Smart Foundation for a Small Addition
    • A Kominka Comes West
    • Making Small Kitchens Work
  • Issue 328 - Dec/Jan 2024
    • How a Pro Replaces Columns
    • Passive House 3.0
    • Tool Test: Compact Line Lasers
  • Issue 327 - November 2024
    • Repairing Damaged Walls and Ceilings
    • Plumbing Protection
    • Talking Shop

Fine Home Building

Newsletter Sign-up

  • Fine Homebuilding

    Home building tips, offers, and expert advice in your inbox.

  • Green Building Advisor

    Building science and energy efficiency advice, plus special offers, in your inbox.

  • Old House Journal

    Repair, renovation, and restoration tips, plus special offers, in your inbox.

Signing you up...

This site is protected by reCAPTCHA and the Google Privacy Policy and Terms of Service apply.
See all newsletters

Follow

  • Fine Homebuilding

    Dig into cutting-edge approaches and decades of proven solutions with total access to our experts and tradespeople.

    Start Free Trial Now
    • Facebook
    • Instagram
    • X
    • LinkedIn
  • GBA Prime

    Get instant access to the latest developments in green building, research, and reports from the field.

    Start Free Trial Now
    • Facebook
    • YouTube
  • Old House Journal

    Learn how to restore, repair, update, and decorate your home.

    Subscribe Now
    • Facebook
    • Instagram
    • X

Membership & Magazine

  • Online Archive
  • Start Free Trial
  • Magazine Subscription
  • Magazine Renewal
  • Gift a Subscription
  • Customer Support
  • Privacy Preferences
  • About
  • Contact
  • Advertise
  • Careers
  • Terms of Use
  • Site Map
  • Do not sell or share my information
  • Privacy Policy
  • Accessibility
  • California Privacy Rights

© 2025 Active Interest Media. All rights reserved.

Fine Homebuilding receives a commission for items purchased through links on this site, including Amazon Associates and other affiliate advertising programs.

  • Home Group
  • Antique Trader
  • Arts & Crafts Homes
  • Bank Note Reporter
  • Cabin Life
  • Cuisine at Home
  • Fine Gardening
  • Fine Woodworking
  • Green Building Advisor
  • Garden Gate
  • Horticulture
  • Keep Craft Alive
  • Log Home Living
  • Military Trader/Vehicles
  • Numismatic News
  • Numismaster
  • Old Cars Weekly
  • Old House Journal
  • Period Homes
  • Popular Woodworking
  • Script
  • ShopNotes
  • Sports Collectors Digest
  • Threads
  • Timber Home Living
  • Traditional Building
  • Woodsmith
  • World Coin News
  • Writer's Digest
Active Interest Media logo
X
X
This is a dialog window which overlays the main content of the page. The modal window is a 'site map' of the most critical areas of the site. Pressing the Escape (ESC) button will close the modal and bring you back to where you were on the page.

Main Menu

  • How-To
  • Design
  • Tools & Materials
  • Video
  • Blogs
  • Forum
  • Project Guides
  • Reader Projects
  • Magazine
  • Members
  • FHB House

Podcasts

  • FHB Podcast
  • ProTalk

Webinars

  • Upcoming and On-Demand

Podcasts

  • FHB Podcast
  • ProTalk

Webinars

  • Upcoming and On-Demand

Popular Topics

  • Kitchens
  • Business
  • Bedrooms
  • Roofs
  • Architecture and Design
  • Green Building
  • Decks
  • Framing
  • Safety
  • Remodeling
  • Bathrooms
  • Windows
  • Tilework
  • Ceilings
  • HVAC

Magazine

  • Current Issue
  • Past Issues
  • Magazine Index
  • Subscribe
  • Online Archive
  • Author Guidelines

All Access

  • Member Home
  • Start Free Trial
  • Gift Membership

Online Learning

  • Courses
  • Project Guides
  • Reader Projects
  • Podcast

More

  • FHB Ambassadors
  • FHB House
  • Customer Support

Account

  • Log In
  • Join

Newsletter

Get home building tips, offers, and expert advice in your inbox

Signing you up...

This site is protected by reCAPTCHA and the Google Privacy Policy and Terms of Service apply.
See all newsletters
See all newsletters

Follow

  • X
  • YouTube
  • instagram
  • facebook
  • pinterest
  • Tiktok

Join All Access

Become a member and get instant access to thousands of videos, how-tos, tool reviews, and design features.

Start Your Free Trial

Subscribe

FHB Magazine

Start your subscription today and save up to 81%

Subscribe

We hope you’ve enjoyed your free articles. To keep reading, become a member today.

Get complete site access to expert advice, how-to videos, Code Check, and more, plus the print magazine.

Start your FREE trial

Already a member? Log in

Privacy Policy Update

We use cookies, pixels, script and other tracking technologies to analyze and improve our service, to improve and personalize content, and for advertising to you. We also share information about your use of our site with third-party social media, advertising and analytics partners. You can view our Privacy Policy here and our Terms of Use here.

Cookies

Analytics

These cookies help us track site metrics to improve our sites and provide a better user experience.

Advertising/Social Media

These cookies are used to serve advertisements aligned with your interests.

Essential

These cookies are required to provide basic functions like page navigation and access to secure areas of the website.

Delete My Data

Delete all cookies and associated data