Many people in this part of Canada do not have pressure-balance shower valves (the kind that prevent scalding). So I often am called to replace single-handle shower valves with the pressure-balance type. The local retailers all told me that I should open up the wall to gain enough room to make the swap, but I really wanted to avoid that mess. Here’s how I solved the problem.
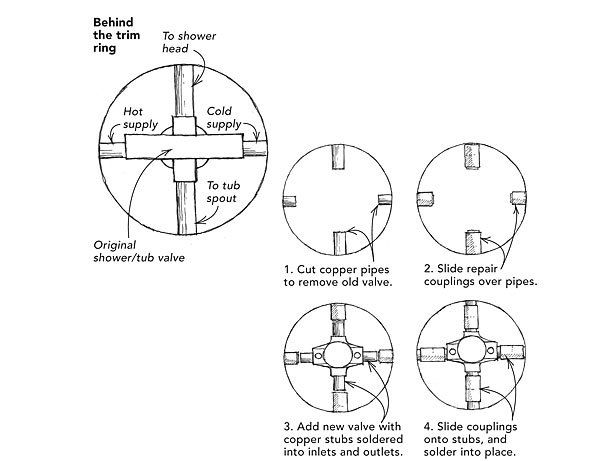
I removed the existing trim ring and used my reciprocating saw to cut the four pipes going into the valve, as in the drawing. I then carefully measured the new valve and soldered four small pipe stubs into its body. At this point, the new valve and its pipe stubs fit exactly into the space left by the old valve.
The key to hooking up the new valve is a quartet of repair couplings. This type of coupling lacks the dimple at the halfway point in the fitting, which acts as a depth stop. Without the dimple, you can slide the coupling flush with the end of the pipe. By the way, if you can’t find repair couplings, use standard ones and grind off the dimples with a Dremel tool.
I cleaned and fluxed all the pipes and fittings, slid the couplings over their pipes, and inserted the new valve. Then I slid the couplings over the stubs and soldered the whole thing. Install the trim ring and knob, and the job is done — one hour from start to finish, with no drywall to repair or tile to replace. Just make sure that you can buy valves of similar sizes before you try this.
Andrew Phillips, Carp, None


