A Fast, Accurate Way to Make Mortised Stairs
A step-by-step process to build stronger stairs.

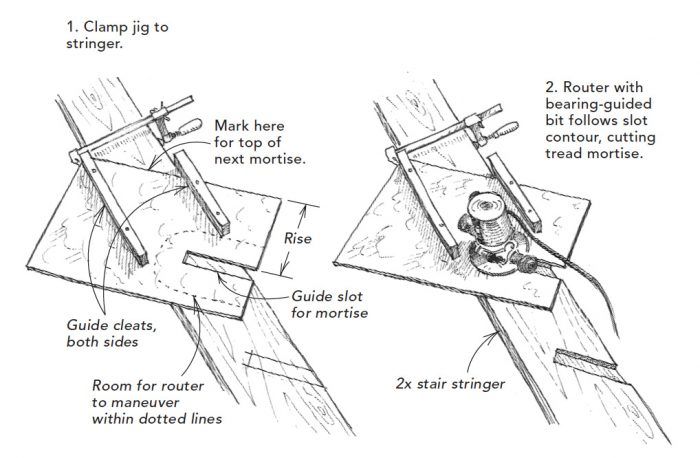
The typical approach to stair-building is to cut bird’s-mouth notches in a pair of stringers, then affix the treads to the tops of the bird’s mouths. A far-stronger method is to cut mortises in the sides of the stringers to accommodate the treads. The drawings below illustrate the jig I use to lay out and cut mortised stringers quickly.
First, on a piece of 1/2-in. plywood, lay out the stair’s rise and run. As shown in drawing #1, the plywood should be big enough to work as both a router template and as a layout tool for the next mortise.
Next, cut a slot in the plywood deep enough to accommodate the depth of the treads. The slot’s width should equal the thickness of the treads, plus a tiny bit of wiggle room. Align the plywood jig on the stringer, and affix a pair of guide cleats to each side of the jig. The cleats register the jig on the stringer and give you purchase to clamp the jig.
Clamp the jig to the stringer, and use a router with a bearing-guided bit to cut a 3/4-in.-deep mortise (drawing 2). Make more than one pass to cut the full depth. Before moving the jig, draw a line across its top edge to mark the edge of the next mortise. Cleats on both sides allow you to flip the jig and rout the other stringer.
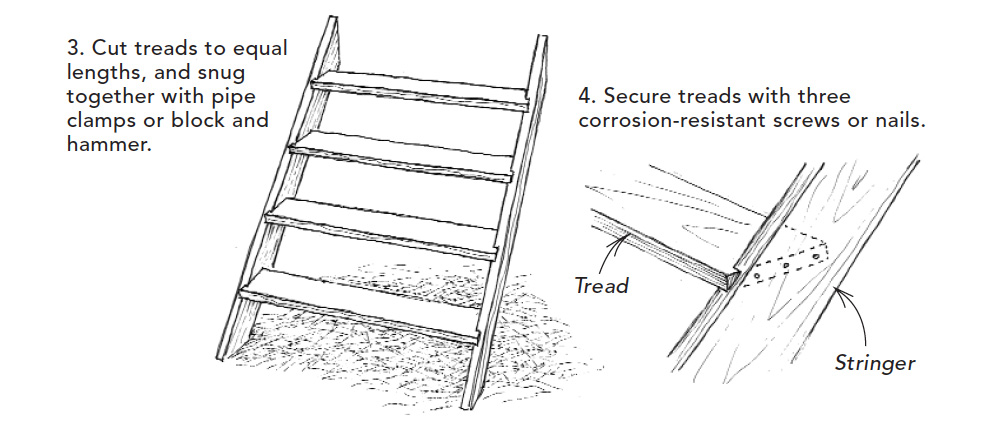
Cut all the treads to equal lengths (drawing 3). Set one end of the first tread in the first mortise of one stringer. Bring the other stringer to it, and set the tread in its first mortise. Continue from one end to the other, getting all the treads started in their mortises. Pipe clamps can come in handy at this point for drawing the opposing stringers toward one another. The fits should not be so snug that you have to pound things together, and not be so loose that the assembly will rack.
You can nail the stringers to the treads, but I prefer screws (drawing 4). They offer a little insurance against the stringers’ warping and pulling the nails out of the end grain. If the stairs are going to be used outdoors, be sure the screws are corrosion resistant.
If open risers such as these don’t suit your needs, nail a riser to the back of each tread. Or nail a 1/4-in. plywood panel to the back of the stringers. The panel has an auto-return feature: things kicked off the steps come sliding out at the bottom.
—Richard Washburn, Penobscot, ME
Edited and Illustrated by Charles Miller
From Fine Homebuilding #162


View Comments
This article has obviously been cut from its original content with some of the drawings omitted. Is there any chance it can be fixed up?
Those of us who regularly view these tips have concluded they are on auto-pilot. They frequently omit important drawings, and our complaints about it in the comments never receive any response.
I agree with tobinsdad. It's disgraceful, and indicates what's happening under the new Taunton ownership.
Pathetic. The lack of oversight on your tips is deplorable. Where are the drawings mentioned in the tip?
Also, this is not how to cut slots for stairs, which usually have a tapered slot for the tread and riser which allows for a wedge behind them to keep them tight.
Really? Does anybody actually work at FHB? If so do any of them actually know what the subject is? How is this a 'tip'? Where are the other 3 drawings referenced in the article?!? I understand that your on-line stuff is really all about advertising space as that seems to be made abundantly clear. However, advertisers will be trying to reach an audience and if there are no SUBSCRIBERS then there will be no marketing. Come on FHB, at least provide a link to the FULL article!! Get real, please!
Agreed. Missing key drawings. No editorial oversight from your end means no subscription renewal from my end. If Taunton doesn’t care enough to keep up the content, it’s simply not worth paying for. I’ve lost faith in you, because this is not the first time this has happened or been pointed out yet you do Zero about it. I’m canceling my subscriptions as 100% of what you offer is available by a simple internet search. Too bad you can’t keep up with technology.
Most of the time I can manage with a missing drawing, but that depends on how well the text describes the tip. Sorry to say that's hit or miss as well.
Absolutely terrible that these articles have been edited,may have to look for better resource sites, big shame after being a loyal FHB reader since issue #1