Curved Deck Stairs
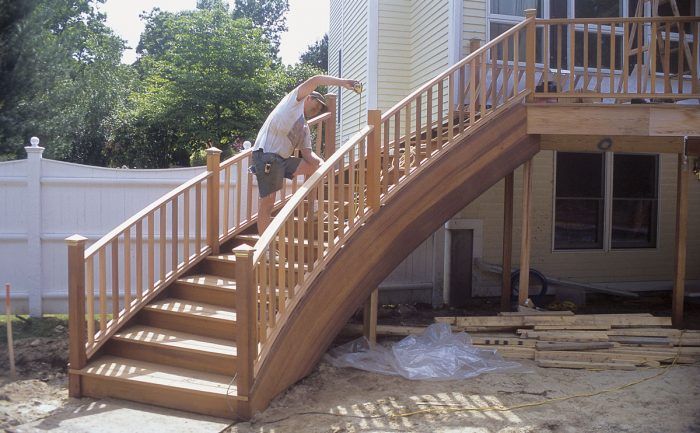
A temporary form and laminated plywood stringers make building these stairs easier than you might think.

Synopsis: Veteran builder Mike Guertin shares his solution for building freestanding curved stairs without the benefit of supporting walls. Detailed pictorials and illustrations reveal the simplicity behind this rarely seen adjunct, and the author covers every detail, from finding the stair radius, to dressing the frame with cedar trim.
When I designed a multilevel curved deck for clients, I didn’t consider adding curved stairs. I’d never built a set of freestanding curved stairs and wasn’t ready to offer that option. But while I was away on vacation, the design plans changed, and my brother Bruce framed the deck. When I returned home from my trip, I learned that Bruce had volunteered curved stairs and that I was responsible for building them. I guess it was payback for having taken two months off.
I’d previously built curved interior stairs that relied on the surrounding walls to support the treads and risers; but exterior deck stairs would have to rely on open stringers. Curved stringers require a form, and I didn’t know where to start to calculate the geometry. After a day of swearing at my brother under my breath, an idea popped into my head that seemed too simple to work. And it wouldn’t require any more math than a simple rise-run calculation for common stringers.
My plan was to lay out and frame temporary curved walls like those on an enclosed set of curved stairs. Using the walls as both a form and a layout instrument, I could build and cut precise, curved laminated plywood stringers in place.
The plan worked better than I imagined. The rough stairs took less than three days to lay out and build. The system worked so well that I plan to adapt it to build freestanding interior curved stairs in the future. It also can be used to build stairs in a shop or garage that are later moved to a site.
A plywood floor defines the stairs
My first step in this process was to establish the stair radius. I covered the ground directly below the stair location with a monolithic sheet of plywood made from two layers cross-lapped at the seams; one edge was butted against and secured to the deck posts. Next, I determined the axis by driving a stake into the ground, parallel to the deck face. Now I could hook a measuring tape onto the stake and draw arcs for the inner and outer edges of the stairs. The tread widths were marked next. I knew the approximate stair run and calculated 7-in. rise, so starting beneath the deck edge, I stepped off fourteen 15-in. marks on the outer arc, then snapped chalklines between the axis point and the marks. After making a mirror image of the template, I transferred the tread marks to it, raised it in place, and built the stud wall.
For more photos and details, click the View PDF button below:
Fine Homebuilding Recommended Products
Fine Homebuilding receives a commission for items purchased through links on this site, including Amazon Associates and other affiliate advertising programs.

Cepco BoWrench Decking Tool

QuikDrive PRO300s

FastenMaster Screw Bolt Fastening System


