
Invisible Drywall Seams
Create perfect walls with minimal mess, effort, and frustration.
Synopsis: Myron Ferguson, author of Drywall: Professional Techniques for Great Results, shares his secrets for easy, seam-free walls. With the proper tools and materials used in the right sequence, even the inside corners of this universally dreaded job will be a breeze. Learn how to choose the right taping knife, trowel, drywall tape, and joint compound, and learn how to different approaches you should take when dealing with butt seams, horizontal seams, and inside corners. Finally, read Ferguson’s methods for applying tape coats, fill coats, and finish coats, and discover useful tips such as adding water to your compound for that final coat.
Arguably the most dramatic change in the construction of a house or an addition is when the walls go from bare 2x4s to being covered with drywall. With those first sheets on the walls, spaces that before had been just framed ideas suddenly become rooms. Heck, the rooms even sound different with the drywall up.
But hanging drywall is just the first step. Before the walls can be finished, every seam where sheets meet has to be taped and covered with compound, a task that has caused anxiety in many a builder and adventurous homeowner.
I’ve been working with drywall for more than two decades now; I’ve even taught classes in creating perfect drywall seams. With the proper tools and materials used in the right sequence, your seams will seem to vanish. What was once a source of anguish and frustration becomes a source of pride and accomplishment. You even may start to enjoy working with drywall as much as I do.
Tools, Tape, and Compounds
I use a 6-in. taping knife to spread the compound and bed the tape. For subsequent coats, I’ll switch to a 12-in. knife or a 14-in. drywall trowel, which has a slight bow to help cover seams. I also use the trowel or the wide knife to hold extra compound, but many people prefer to use a drywall pan.
Most of the time I use paper drywall tape. It’s a must for corners (because it’s creased), and I think it’s stronger than mesh tape. Mesh tape has the advantage of being self-adhesive, but I typically use it only on flat, tapered seams, never in corners.
All-purpose joint compound can be used in all phases of drywall finishing, but I switch to lightweight compound for final coats because it’s easier to sand. If I’m in a hurry, I use setting compound, which comes as a powder, hardens quickly, and shrinks less. The downside is that you can’t sand the stuff.
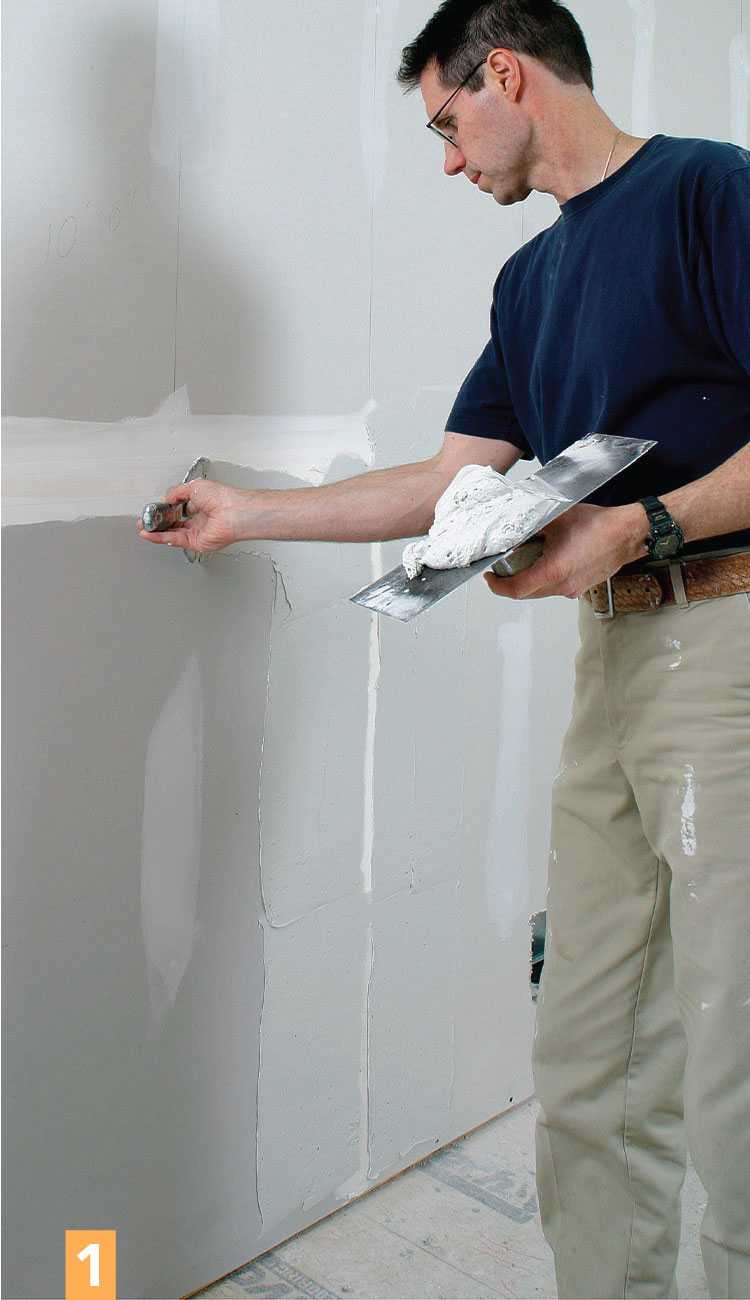
Tape Coat
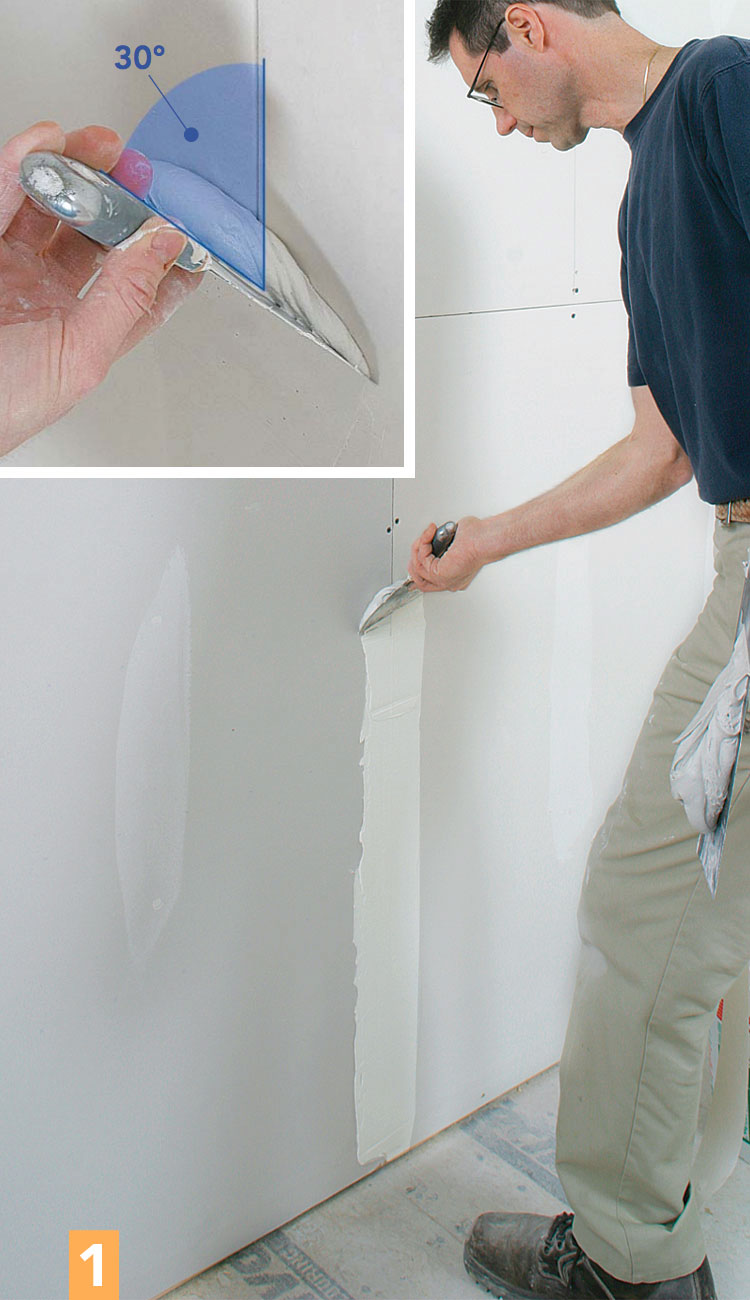
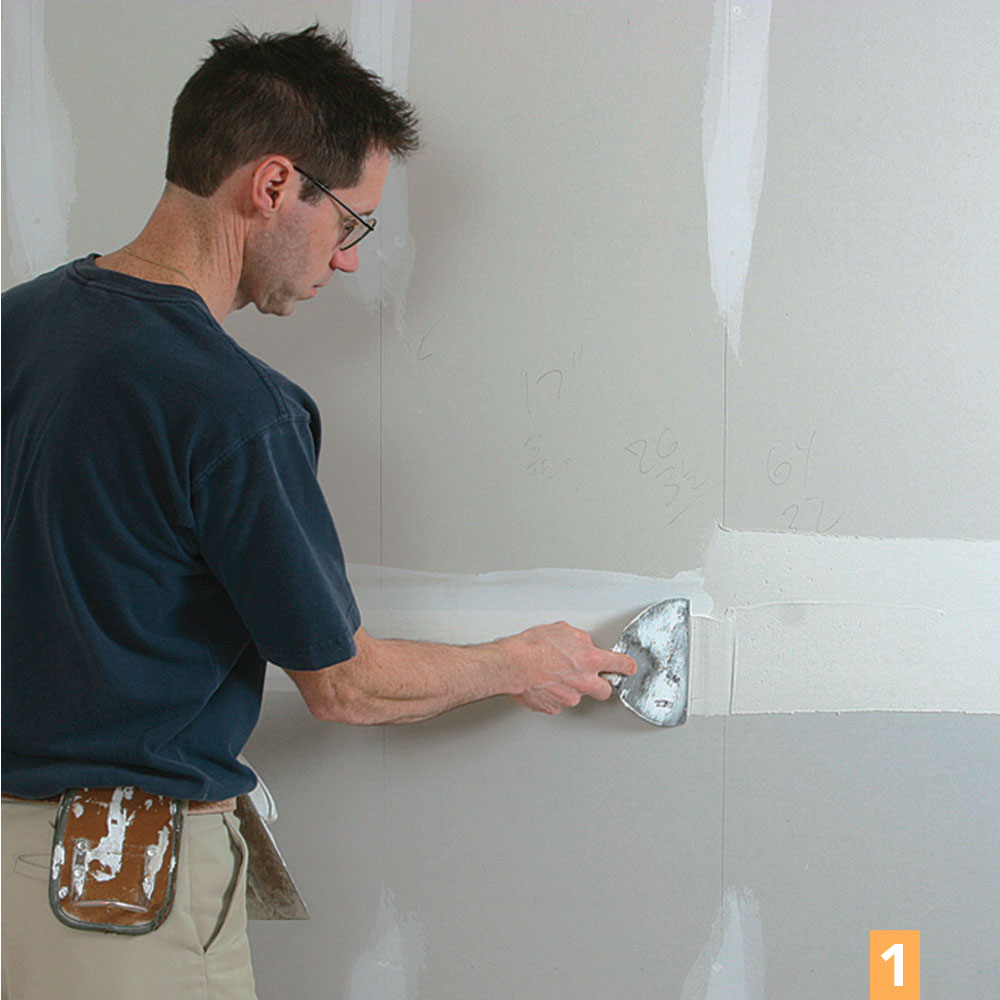
Butt seams are taped first
Most drywallers try to keep butt seams (where the non tapered ends of two drywall sheets meet on a wall or ceiling) to a minimum. When taping a room, I begin with these seams. Although there are alternative ways of butting two sheets of drywall, you often have to deal with a conventional butt seam where the ends of the drywall land on a framing member. For these seams, use paper tape that is bedded in a 1/8-in.-thick coat of all-purpose joint compound.
 |
 |
 |
Spread the compound with a 6-in. taping knife (1) slightly wider than the paper tape, holding the knife at about a 30º angle. Next, center the tape on the seam (2), pressing it lightly into place every foot or so while keeping it taut. To embed the tape in the compound, hold the tape in place with the corner of a trowel (3). Starting in the middle of the seam, pull up firmly with the taping knife held almost perpendicular to the wall. As you go, excess compound will squeeze out. Then embed the lower part of the seam and smooth out the compound on each side.
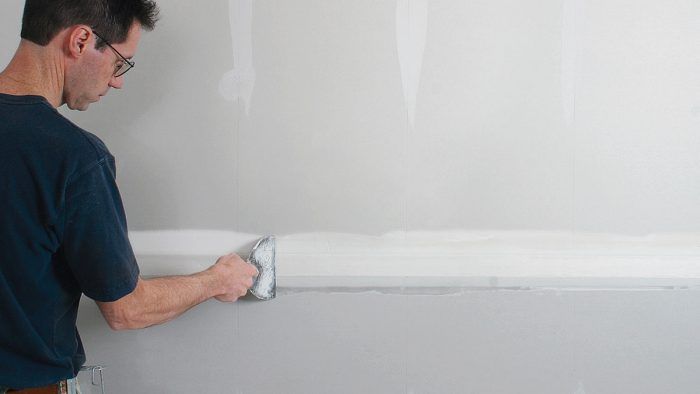
Tapered horizontal seams come next

Horizontal seams in drywall are where two tapered edges meet to create a depression that hides the tape and compound. I treat them similarly to butt seams. First, spread compound along the entire seam, and then run a single length of tape from corner to corner, or to a door or window. To embed the tape, hold it in place with the trowel. Work from the middle of the seam, applying enough pressure to deflect the knife slightly and squeeze out the excess compound. Then work in the opposite direction to embed the rest of the seam.
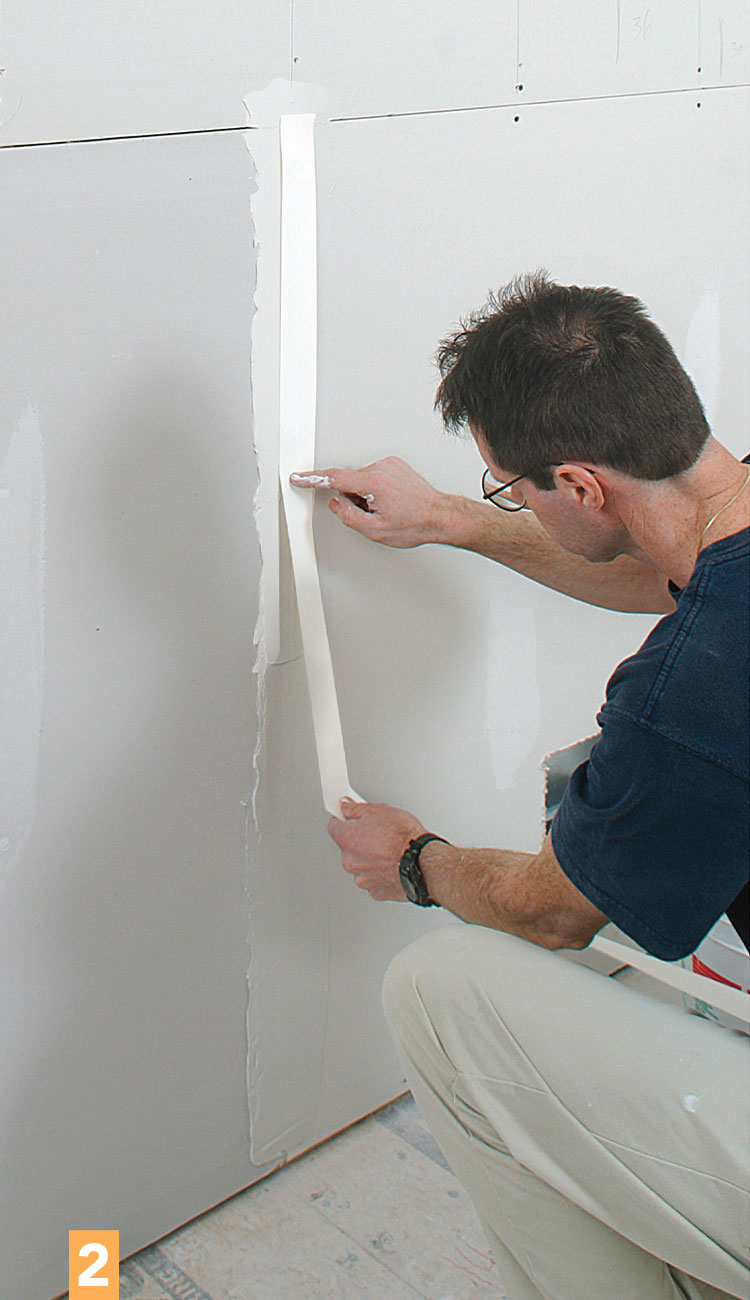
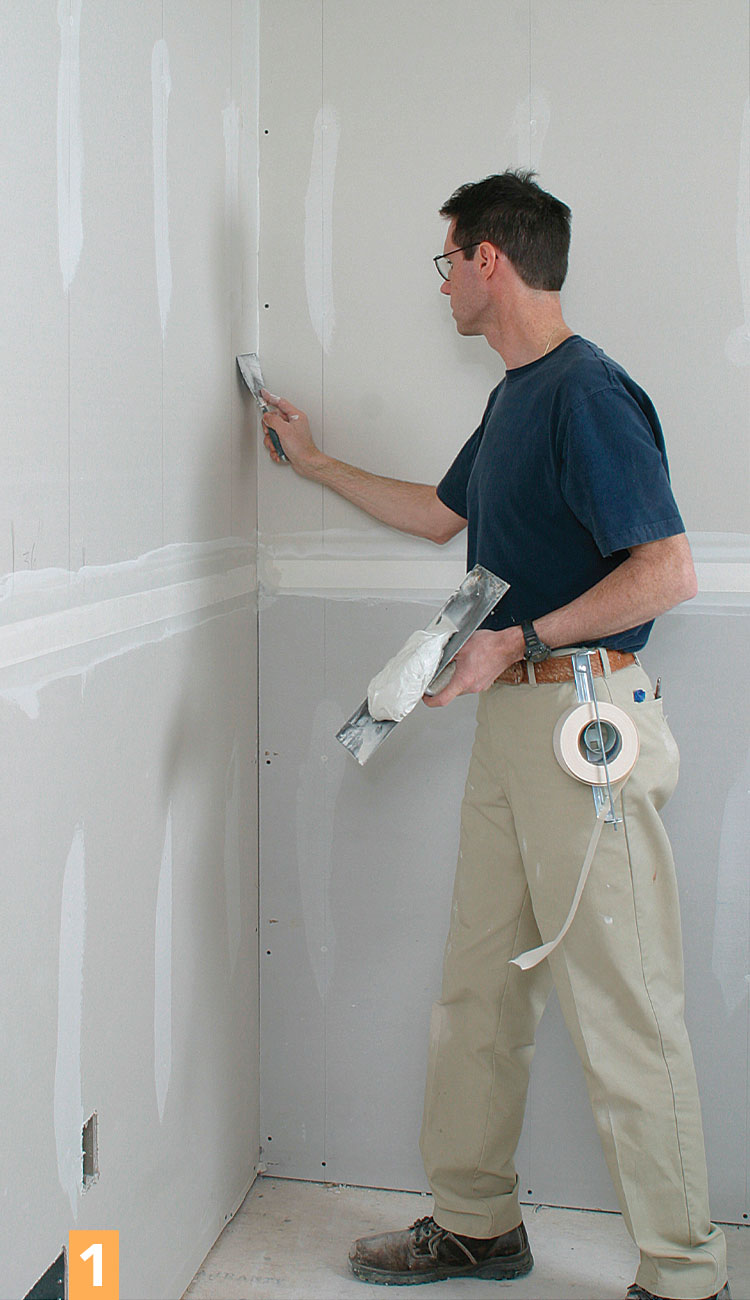
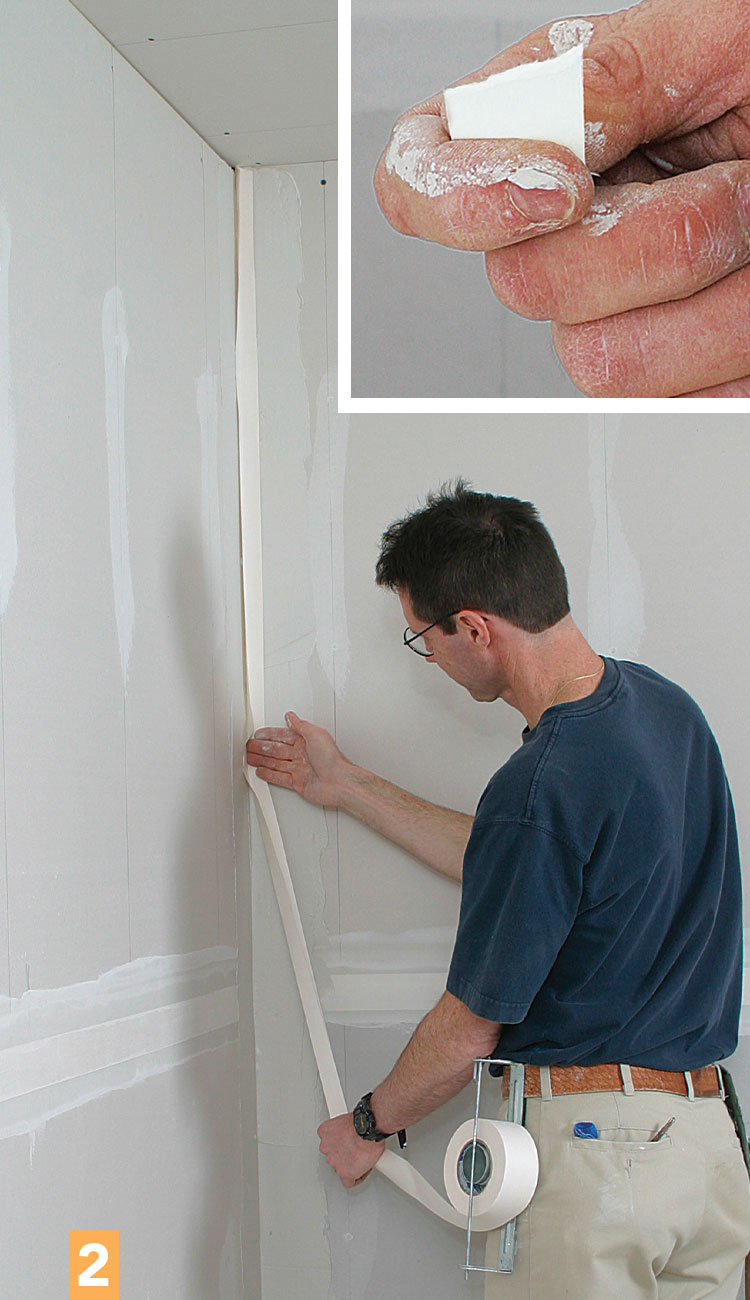
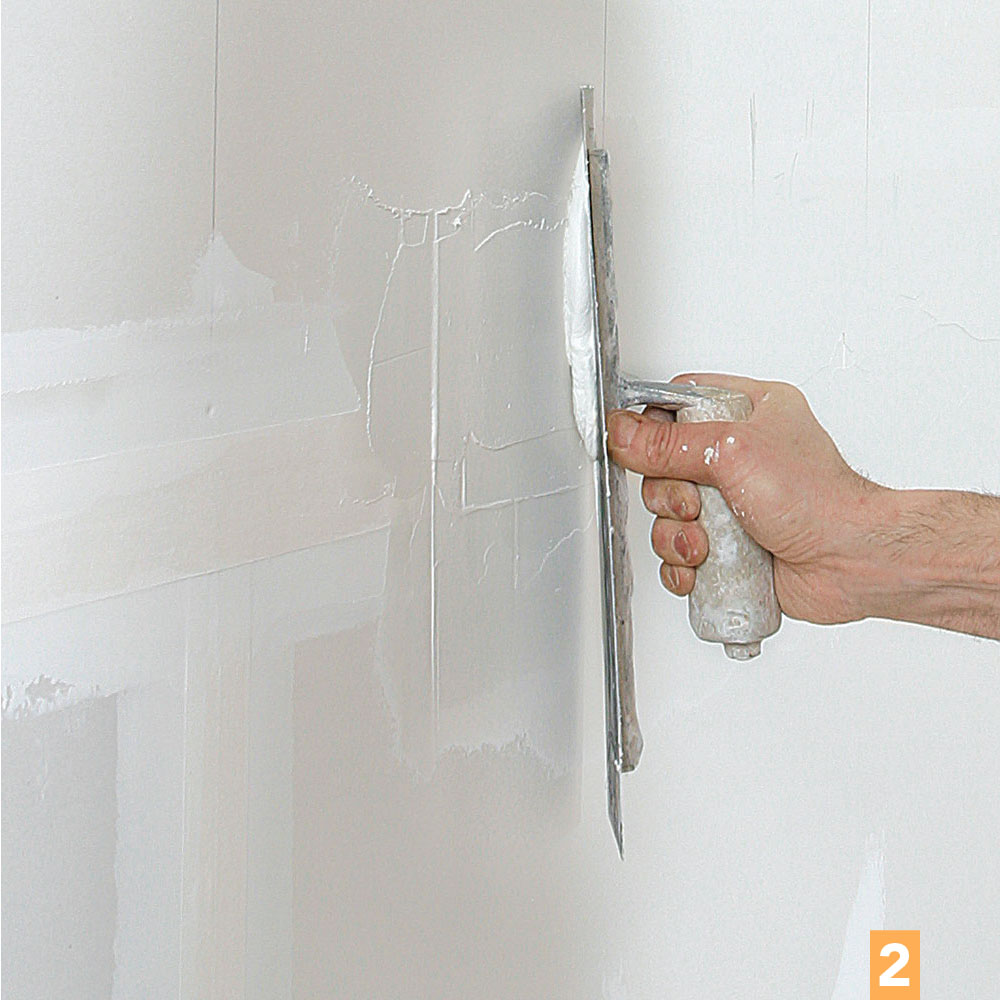
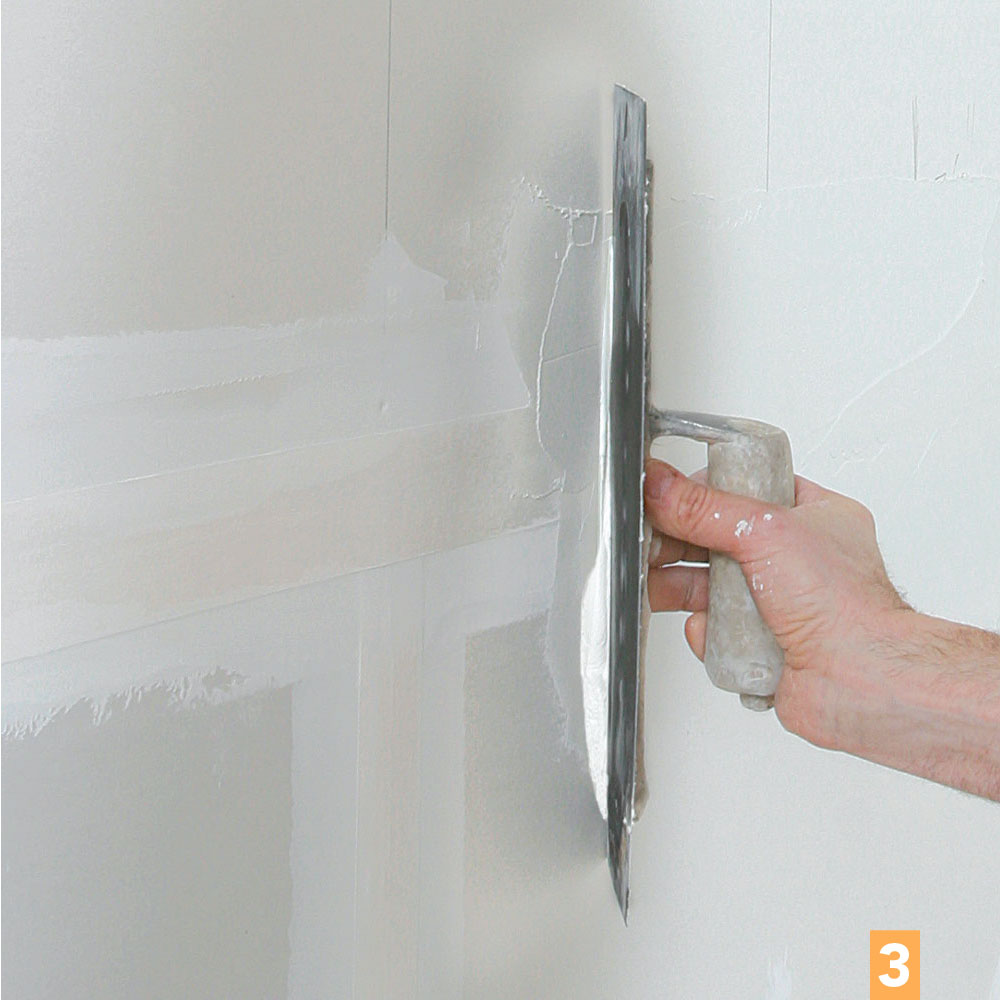
Tape inside corners last
 |
 |
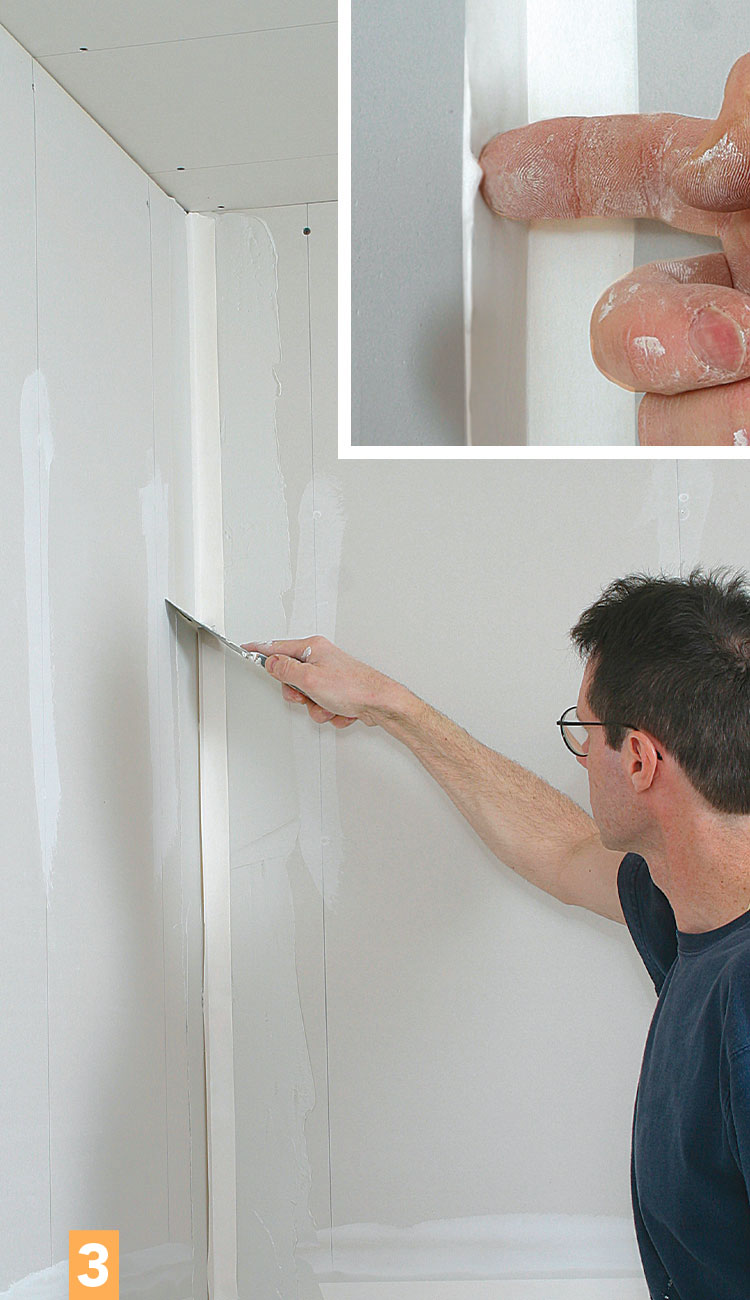 |
Coat the first inside corner (1), starting on the side where the drywall goes through to the framing. Then go back and coat the adjacent side to fill any gaps at the corner seam. Before placing the tape, crease it along the center and tear it at a slight angle to form a point that fits into the corner (inset in photo 2). Then crease the rest of the tape, and press the tape lightly into the compound (2). Using a 6-in. taping knife, embed the tape one side at a time (3), gradually increasing the pressure on the knife with successive passes. To make sure enough compound has been removed from the corner, press your finger into the tape. If the tape pushes in, you need to take off more compound (inset in photo 3). This test works for horizontal seams as well.
Fill Coat
Start with the horizontal seams
I usually don’t sand between the first and second coats. But before applying the second coat of compound, I knock off any noticeable ridges or chunks of dried compound with the 6-in. taping knife.
 |
 |
 |
The second coat fills the horizontal tapered seams (1), leaving them slightly crowned to allow for shrinkage and sanding. Spread the compound slightly wider than the previous coat using a 6-in. taping knife. With a 14-in. trowel, feather the edges with a pass over the top (2), a second pass over the bottom (3), and a final pass over the middle (4). Additional passes may be needed to smooth the seam with the desired crown.
Fill in beside butt seams next
 |
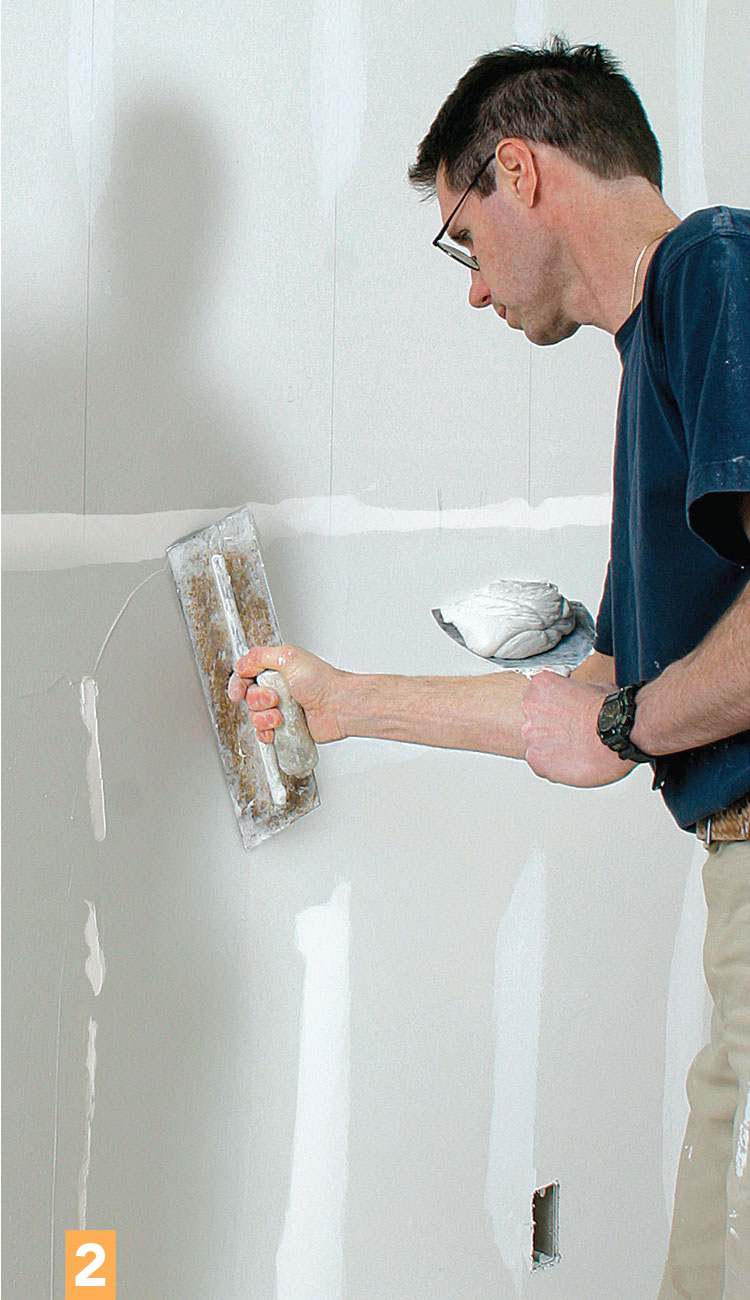 |
 |
The butt seam is the most difficult seam to conceal. Taping leaves this seam slightly higher than the plane of the drywall. Spread compound in a 10-in.-wide band on each side of the seam, and blend the compound into the seam above (1). The trick is to fill in both sides without adding much over the seam itself. Then feather each side with a 14-in. trowel (2), using the taped center as a screed point. A sweeping motion blends the compound into the wet tapered seam above. Finally, with a 6-in. taping knife, smooth the center of the butt seam (3).
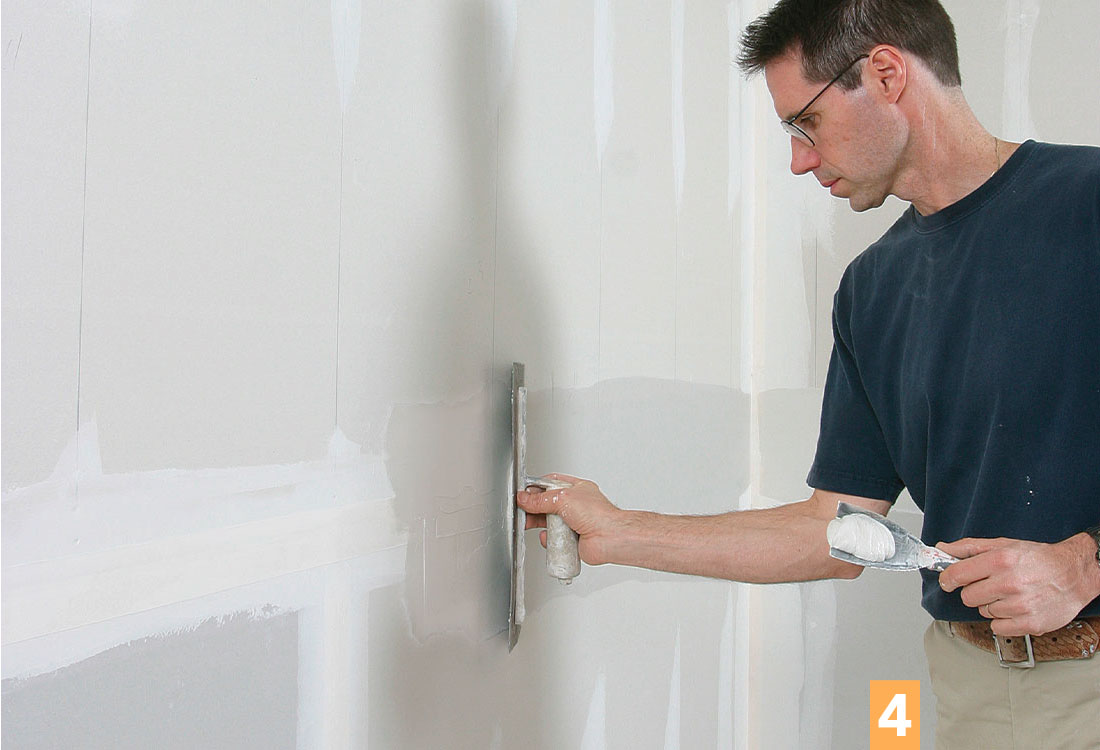
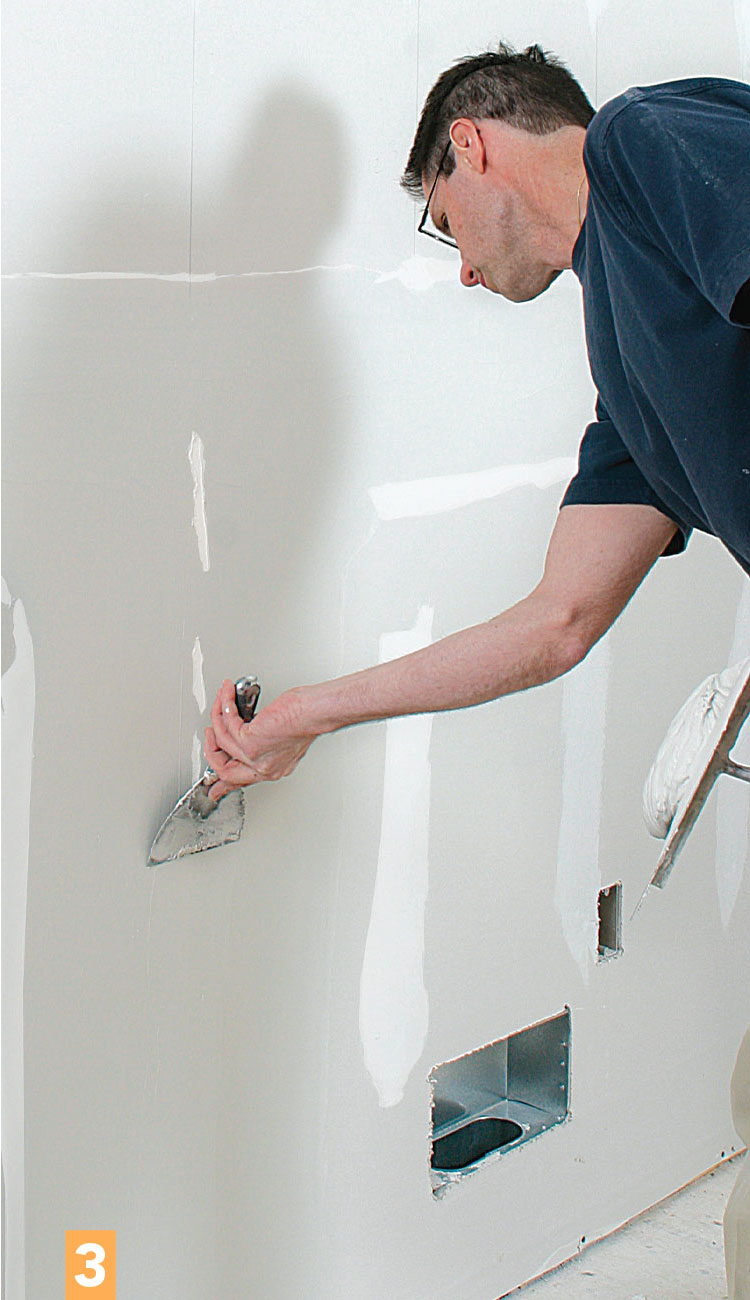
Coat inside corners one side at a time
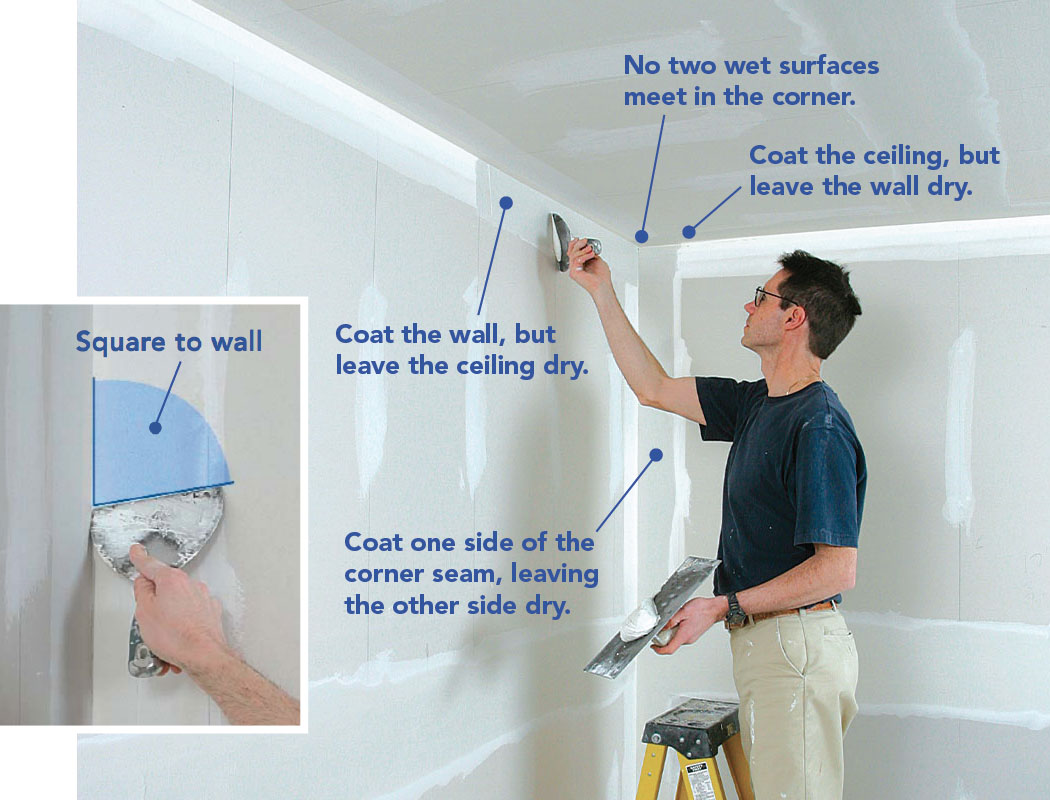
Because they’re easy to conceal, corners receive only two coats of compound. So coat one side at a time with a thin layer, just enough to cover the tape completely. When removing the compound, keep the knife edge roughly square to the adjacent wall so that compound doesn’t build up on the adjacent surface (inset photo). Where a corner intersects a wet horizontal seam, lighten pressure on the knife to blend the two together. Alternate sides so that no wet edge intersects another at the corner. Adjacent sides are coated at the final coat.
Finish Coat
Make the seams vanish
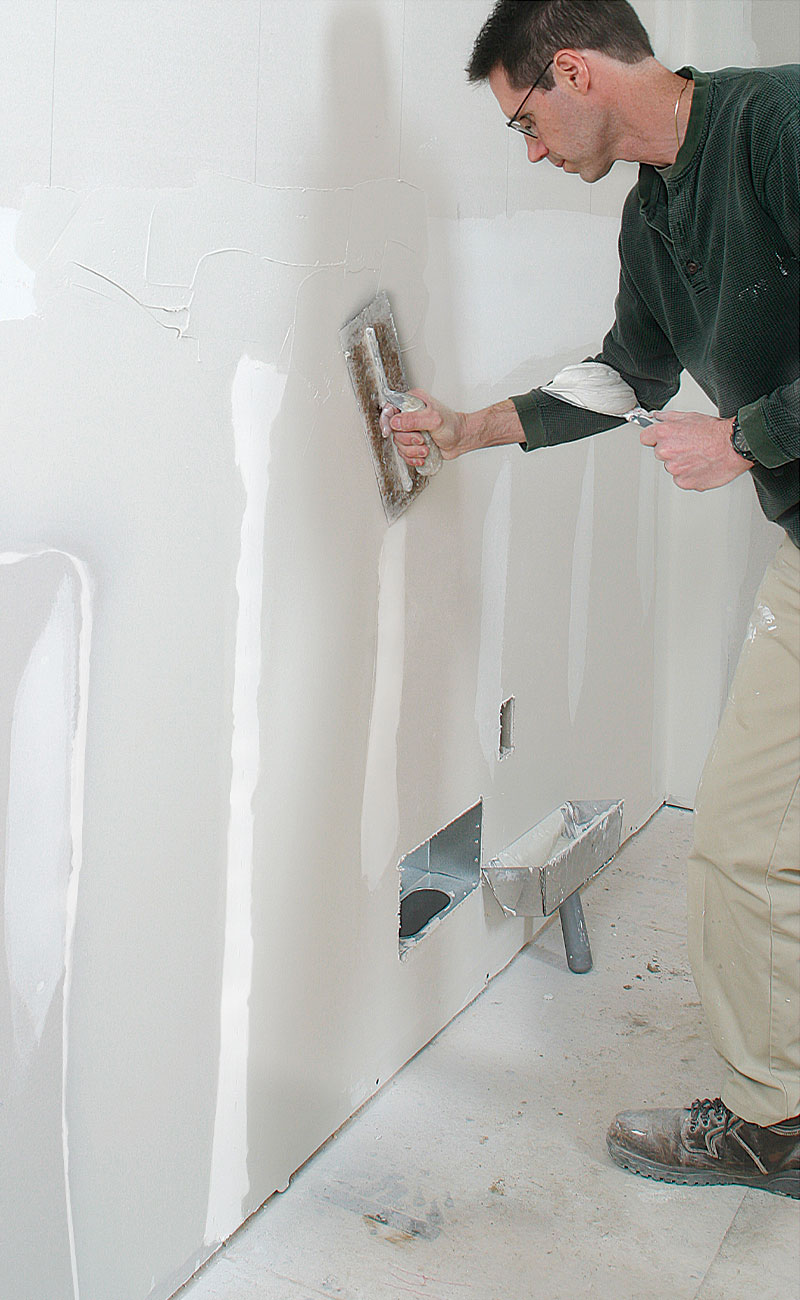
Before the final coat of compound, sand the seams lightly with a pole sander and 120-grit sandpaper to remove any ridges or tool marks. After sanding, fill a drywall pan with thinned compound and use a 12-in. taping knife to spread it slightly wider than the previous coat. Cover the entire seam, and then feather the edges, working out from the corners toward the center of the room. For the final coat on butt seams, I use a straightedge to check how much I need to fill. Butt
seams occasionally require additional coats to blend them into the wall. For the final coat, widen the compounded area on both sides of the center, but keep the center dry. To blend the butt seam into the horizontal seam above, skim off the excess compound with a 14-in. trowel in an arcing motion. Finally, coat the remaining sides of the inside corners using a 6-in. taping knife, just as you did with the second coat.
Add water for the finish coat
Two cups of clean water added to 5 gal. of all-purpose joint compound thin it for the final coat. Mix it thoroughly with a mechanical mixer. The thinned compound is looser, but should not run off a trowel, and it stays workable longer as compound is applied and removed during the final coat.
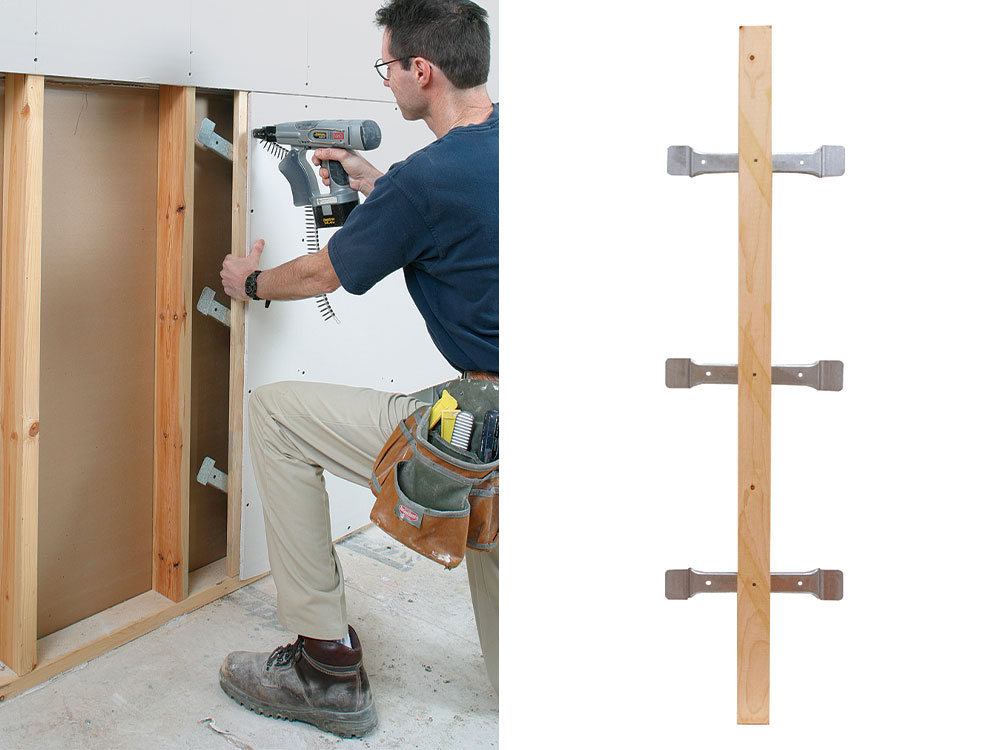
A better butt seam
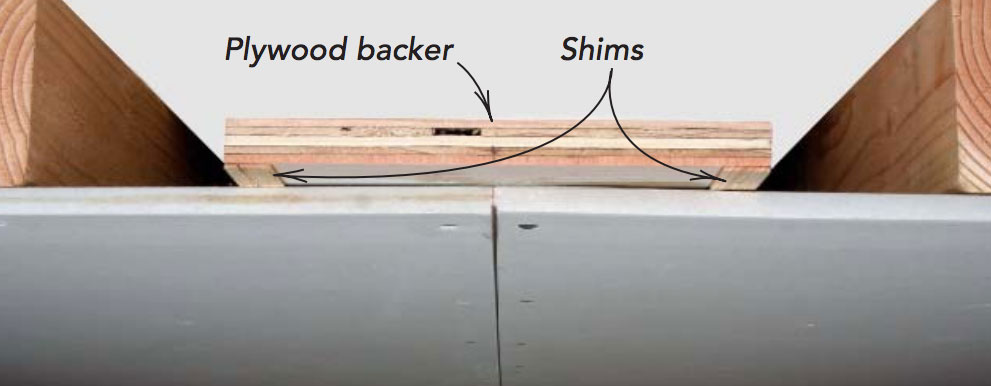
To avoid the hassle and turn a butt seam into a tapered seam, end the sheets between the framing members. A simple plywood backer pulls the ends in slightly so that they can be taped and filled to the level of the drywall (photo right). Gadgets such as the Butt Hanger (888-292-1002; wilcotools.com) are inexpensive ($6.75 each) and do the job just as well (photos below).
For more photos and instructions on creating invisible drywall seams, click the View PDF button below.
