Accurate Diagonal Tile Cuts
Learn how to cut tile like a pro using an easy-to-assemble jig.
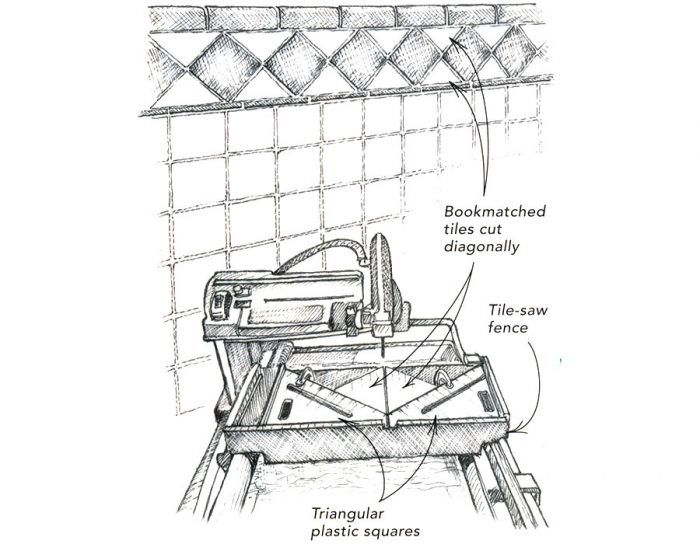
For a recent bathroom remodel, my client requested a horizontal row of square, dark tiles oriented vertically, like diamonds, as a decorative border. As shown in the drawing, two rows of white triangular tiles flank the diamonds.
The challenge: Cutting the white tiles at a 45° angle, as accurately as possible, into two equal portions. Any error would create an installation nightmare because any error would be doubled. If I cut a piece 1/16-in. off center, for example, one side would be 1/8-in. bigger than the other.
Making the Jig
To cut precisely but efficiently, I rigged up the jig shown in the foreground of the drawing. My first step was to buy two inexpensive triangular plastic squares ($3 each). Next, I made two identical cuts on the squares. To do this, I hooked the fence of the square over the right side of the sliding table on my tile saw, making sure that the other side of the square butted against the fence of the saw.
With each square in this position, I made the cuts with the tile saw. Because the blade on the tile saw is designed to grind through ceramic material and not the composite material of the squares, I made these cuts in several passes, taking off a little each time. When done, both squares were cut precisely the same, with the cut running parallel to the fence of the square.
Next, I clamped one of these cut squares on the sliding table to the right of the sawblade. As before, I hooked the fence of the square over the right edge of the sliding table and butted the edge of the square against the fence of the saw. I used a 1-in. C-clamp threaded through one of the holes in the sliding table to hold the square in place. In this position, the cut edge just kissed the right side of the sawblade.
After clamping down the first square, I used another 1-in. C-clamp to affix the other square to the left of the sawblade. But first I had to cut away half of the fence on the square so that it would lie flat on the table. I used a coping saw followed by a belt sander for this task.
After sliding the edge of the square against the fence of the saw and positioning it so that the cut end just kissed the left side of the sawblade, I clamped it to the table. The space between the two squares equaled the width of the kerf created by the sawblade.
When using the jig, I slid a tile into the V-shaped space formed by the two plastic squares. As the drawing shows, this space held the tile at a 45° angle, with the corner of the tile in line with the sawblade. After a few trial-and-error cuts and minute adjustments to the position of the square on the left, I achieved precise, uniform results. I was able to cut the 100 triangular pieces that I needed in about 20 minutes.
— John Carroll; Durham, NC
From Fine Homebuilding #169
RELATED STORIES
Got a Tip?
Do you have any great tips like this one on how cute tile at a perfect 45 degree angle? Share your methods, tricks, and jigs with other readers. Tag them @FineHomebuilding on social, email them to us at [email protected], or upload them to FineHomebuilding.com/reader-tips. We’ll pay for any we publish.











View Comments
great information. How did the corners work out as the spacing on the squares changed as you worked your way across the rear wall of the shower?
I did something similar when I was cutting 12 inch tiles into triangles. What I did was take some scrap pieces of wood and a piece of 1/4 plywood. I laid out two strips of wood making a 90 degree corner on top of the plywood. The point of the corner would be pointed toward my saw fence. Butt the tile into this corner and then align the center of the tile to the saw blade center. Then just use the jig you made to hold the tile as you cut it. Worked perfectly.