A Durable Garage Floor Finish
This excerpt from the Taunton book Garage Solutions shows how to apply a tough epoxy coating to this high-traffic area for a clean, durable and light-filled garage.
This excerpt from Taunton’s Garage Solutions shows how to toughen up this high-traffic area with an EPOXY COATING for a clean, durable & light-filled garage.
No matter what you do in your garage, from car repair to carpentry, a durable, good-looking floor can help any job go a bit easier. With a few easy steps, a handful of household tools, and some rented gear, you can coat a garage floor with a good-looking epoxy finish that will stand up to just about anything you can spill on it, drive over it, or stack on top if it. Plus, the floor will be easier to keep clean, and you’ll notice how the finish adds more light to your garage for greater safety and convenience.
Tools & Gear
Except for a few rented items, most of what you’ll need is probably in the garage already.
Oscillating fan. Even if you can facilitate cross-ventilation with doors or windows in the garage, have one of these handy to push the air around.
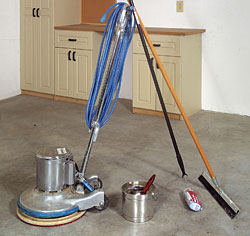
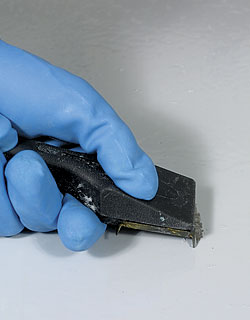
Masonry Tools. Use a cold chisel, pointed trowel, and float to repair any cracks in the floor.
Paint brushes and rollers. Use an epoxy-rated brush and a foam or sponge-type roller to apply the paint.
Floor buffer. Rent one of these with a bristle scrubber pad to apply the muriatic acid evenly and quickly.
Pressure washer. Rent or buy this tool and attach it to a nearby garden spigot to help remove dirt, debris, or surface stains and to flush away the acid after it’s applied.
Clean-up items. A mist attachment for your hose, a stiff-bristled push broom, and a floor squeegee will come in handy as you prepare the surface to accept the paint.
Watering can. You’ll need this to safely and properly apply the muriatic acid.
Garden hose. Use with a mister nozzle to dampen the floor surface prior to painting.
Safety First
Proper safety gear is a must for almost any project, but especially when you’re dealing with chemicals and solvents. Guard against irritation with adequate eye protection, a dust mask, rubber gloves, and boots. Wear long sleeves and pants.
What Can Go Wrong
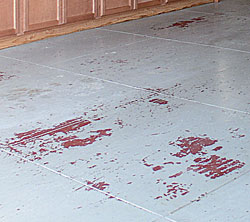
Standard concrete paint can be a great coating for a path, but it’s no good in the garage. Simply, it tends to lift up when you roll your rig over the floor, sticking to a hot tire by reactivating the chemicals in the paint like plastic wrap clings to a hot pot. An epoxy coating, by contrast, resists lift-up.
Cool Tool
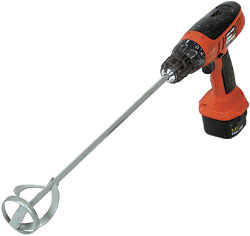
Get extra duty out of your electric drill by attaching a paint mixer bit for stirring up the two parts of your epoxy coating. Sold in various sizes to fit any handheld drill and long enough to mix a 5-gal. drum, the attachment features a design that blends the chemicals completely, helping ensure a mix that will adhere to the acid-etched surface and provide durable performance for years to come. Make sure to clean and dry the bit after use so you can use it on your next painting project.
What to Buy
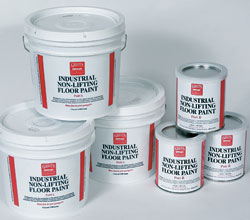
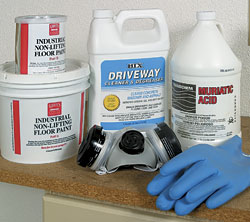
1. Non-lifting epoxy paint. A gallon of this two-part (A&B) paint with a factory-added gray or tan pigment covers about 260 sq. ft. (the size of the average two-car garage is about 575 sq. ft.). Make sure you have enough to apply two coats of relatively equal thickness. Consider adding quartz crystals after the first coat for a non-slip surface.
2. Muriatic acid. This industrial-strength hydrogen chloride gas, normally sold as a 30% concentrate in liquid form, will etch (or clean) the concrete surface of your garage floor in preparation for the epoxy finish. Buy only what you need (a gallon covers about 150 sq. ft.), carefully follow instructions on the container, and safely discard any leftovers, following the disposal directions on the acid container.
3. Cleansers. Have on hand some ammonia, either lacquer thinner or paint stripping compound, concrete spot cleaner, and tri-sodium phosphate (TSP)—along with rags and other cleaning tools—to get rid of lingering dirt, debris, paint drips, stains, and other elements that may hinder the paint from proper and lasting adhesion.
4. Patching concrete. Use this to repair small cracks to create a smooth, level surface for the coating.
Clean Sweep
Make your life a little easier by clearing your garage floor before you get started. Remove everything that isn’t a permanent fixture, including refrigerator-freezers, freestanding storage cabinets, sports equipment, and tool chests. Try to have at least 6 in. of clearance below any shelving or wall-mounted storage units so you can work under them as you sweep up dirt, patch concrete, wash with muriatic acid, rinse with water, and apply paint. In addition to a shiny new floor, you may end up with less clutter!
Prepare the Surface
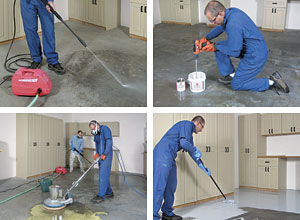
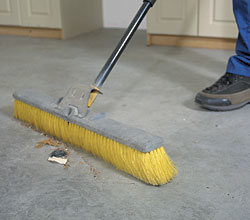
1. Put on the pressure. Give the garage floor a good sweeping with a stiff-bristled push broom, then power wash it to remove loose dirt, debris, and stains. With a wire brush, TSP, and water, remove stubborn stains, paint drips, and other surface blemishes. Chisel out any cracks 1⁄16 in. or larger, and repair them with a patching concrete. Finish the patches by floating the patching concrete along the edges so that they’re flush with the surface.
2. Test for and remove sealer. While wearing proper safety gear, dilute 1 part of muriatic acid with 1 part of water in a plastic cup according to the manufacturer’s directions, and pour the solution over a small area of the floor. If it does not bubble on contact, your floor is sealed and needs to be sanded before you etch the floor to allow proper epoxy adhesion. Flush the acid before it dries, usually within 10 minutes.
 Put on the pressure
 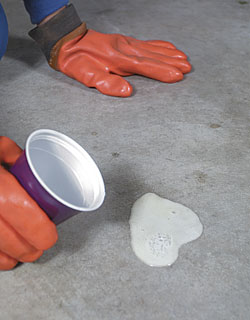 Test for and remove sealer
3. Etch the surface. Remove or protect any non-plastic surfaces from the acid, and put on your protective gear, making sure none of the skin on your arms or legs is exposed. In a watering can, add equal parts acid and water—adding the acid to the water so as not to splatter acid and damage the watering can. Apply the solution to an 8-ft.-square area and use the buffer to spread it evenly, working in two passes at right angles to each other. Treat the next 8-ft. section while your helper rinses off the acid layer before it dries.
4. Clean up for the coating. Use a stiff broom to apply ammonia to clean the entire area and neutralize any remaining acid, then rinse the surface with your pressure washer. Rinse the surface again if you see a dusty residue after the concrete dries. Use a squeegee to push any standing water or puddles out of the garage and onto the driveway.
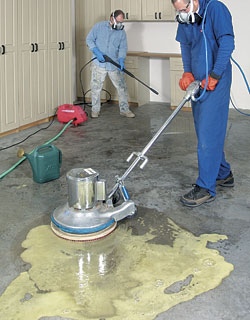 Etch the surface
 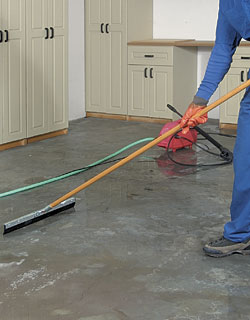 Clean up for the coating
Safety First
The chemicals you’re using can be eye-watering and noxious, so make sure you provide plenty of ventilation. Open all doors and windows to catch natural cross breezes, and set up oscillating fans to move the air around and push it to the outside.
Do It Right
The muriatic acid application is a two-person job: one to apply the acid, the other to follow close behind to make sure it’s flushed properly before it dries. Take care to avoid splashing yourself or your helper with acid solution. Plan ahead and try a few dry runs to get a rhythm going, and work together to power wash and mop up when you’re done.
Lingo
To “feather” or “float” an edge on paint or patching concrete means to blend it with an existing surface where the two materials meet so that there is no raised edge between them.
Mix & Apply the Epoxy
1. Mix it up. For best result, plan your project when the concrete floor surface temperature is at least 50°F, and keep the surface damp with a moist rag as you apply the paint. Before you blend the two parts (clearly marked A & B), use your drill and mixer bit to thoroughly stir Part A. Then pour Part B into Part A’s container and mix the two compounds to make paint of a honey-like consistency. Don’t mix more epoxy than you can use in a 2-hour period, and clean your mixer attachment immediately.
2. Spread it out. Use a brush to apply the first (or primer) coat of epoxy around the perimeter of the garage and feather it out 6 in. to 8 in. from the edges. Pour a quarter of the epoxy into a standard paint tray or in a line across the floor and use your roller to apply the epoxy in a crosshatch pattern over the main area. Once the entire floor is covered, allow it to dry (or cure) overnight. Press your gloved palm into the surface; if your handprint remains, wait a few more hours—but no longer than 48 hours since applying the primer coat—to apply the finish coat.
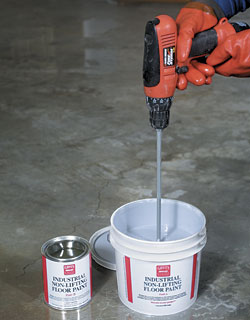 Mix it up
 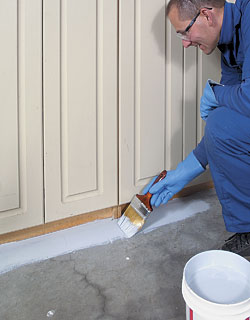 Spread it out
3. Prep for the finish. Once the first coat of epoxy is dry, sweep it off with a stiff bristle broom or use a paint scraper to remove any dust, dirt, or other debris before applying the finish coat. As with the first coat, mix enough epoxy as you can use in two hours or less (see Step 5, above). Dampen the surface of the concrete with a hose and a mister before you apply the paint.
4. Let it cure. Apply the finish coat using the same approach as you used for Step 6. Allow the surface to dry (or cure) for 48 hours before walking on it, and at least four days before putting your vehicles and gear back into the garage. During that time, thoroughly clean your tools. Dispose of any leftover epoxy compound or empty paint containers at your nearest hazardous materials collection center.
 Prep for the finish
 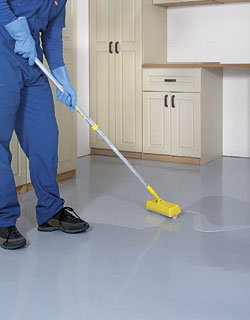 Let it cure
Upgrade
You can create a non-slip surface by adding a traction agent you mix into the epoxy itself. Another option is a layer of quartz-based crystals or granules over the first coat of paint before it cures. Wear spiked or cleated shoes when spreading the crystals (follow the manufacturer’s directions). The finish coat covers the quartz and leaves a textured surface with good traction, though it also will be a bit harder to sweep.
What Can Go Wrong
If you allow the first coat of epoxy to completely cure—typically longer than 48 hours—you’ll need a floor sander to abrade the surface so it will accept the finish coat and still adhere properly between the two layers.
Lingo
“Crosshatching” is an application technique. Within a selected area, spread the coating left to right, then front to back (or perpendicular) before moving on to the next section.
Tip
Do-it-yourselfers can find epoxy garage floor finishing systems as individual items or as a complete kit. The kit contains a heavy-duty cleaner, the two-part epoxy paint, quartz crystals for adding texture to the floor, plus directions.
Photos by: John Rickard


View Comments
“[Deleted]”