FHB Logo Facebook LinkedIn Email Pinterest Twitter X Instagram Tiktok YouTube Plus Icon Close Icon Navigation Search Icon Navigation Search Icon Arrow Down Icon Video Guide Icon Article Guide Icon Modal Close Icon Guide Search Icon Skip to content
Subscribe
Log In
  • How-To
  • Design
  • Tools & Materials
  • Restoration
  • Videos
  • Blogs
  • Forum
  • Magazine
  • Members
  • FHB House
  • Podcast
Log In

Fine Homebuilding Project Guides

Foundations and Masonry Work

Guide Home
  • Concrete & Masonry Basics
  • Building Foundations
  • Waterproofing Foundations
  • Retrofits and Add-ons
  • Masonry in the Landscape
  • Brick
How-To

A Fast Foundation for an Addition

Thanks to interlocking foam forms, you can form, pour, and insulate any small foundation in a single day.

By Rick Arnold Issue 170
  • X
  • facebook
  • linkedin
  • pinterest
  • email
  • add to favorites Log in or Sign up to save your favorite articles

Synopsis: Insulated concrete forms require no special tools, can be set up quickly and are accessible to do-it-yourselfers. A veteran concrete contractor takes us through the process of installing the forms and pouring the foundation for a family-room addition. Rebar installation and proper bracing are both discussed.


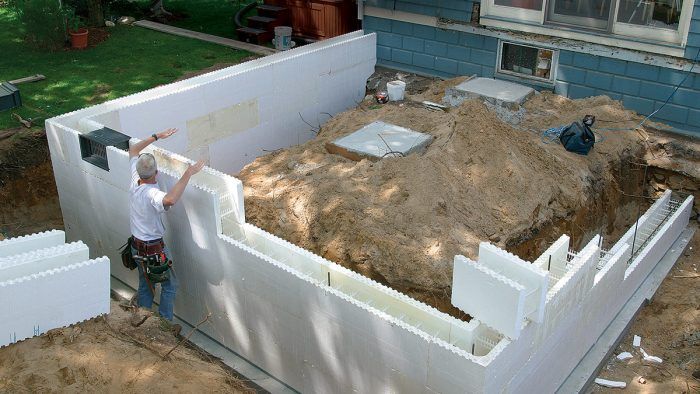
Four years ago, a builder asked me to form and pour a crawlspace foundation for a small addition using insulating concrete forms (ICFs). I had never worked with ICFs before. He was a good customer, though, so I rolled my eyes and agreed. I grabbed my friend and fellow contributing editor Mike Guertin, figuring we could muddle our way through just about anything. Less than two hours later, we were ready to pour, and I was sold.

Since then, I have used ICFs to form everything from full basements to two-story houses. Along the way, I’ve discovered many benefits of building with ICFs, but I especially like them for small-addition foundations, like the 18-ft. by 18-ft. foundation featured here, because they can be installed so quickly. In fact, I’ve talked contractors and homeowners through the process over the phone.

foundation with insulating concrete forms
Photo: Brian Pontolilo

Because ICFs are so easy to install, I can save a lot of money in labor by doing the job myself rather than paying a subcontractor. For instance, this job cost a bit more than $1400: $900 for the blocks, and about $550 for the 7-1/2 yd. of concrete. ICFs are available in several styles, each suited for different types of walls. I prefer the flat-wall type — even though it requires more concrete than other styles — because it emulates the more familiar poured-concrete wall.

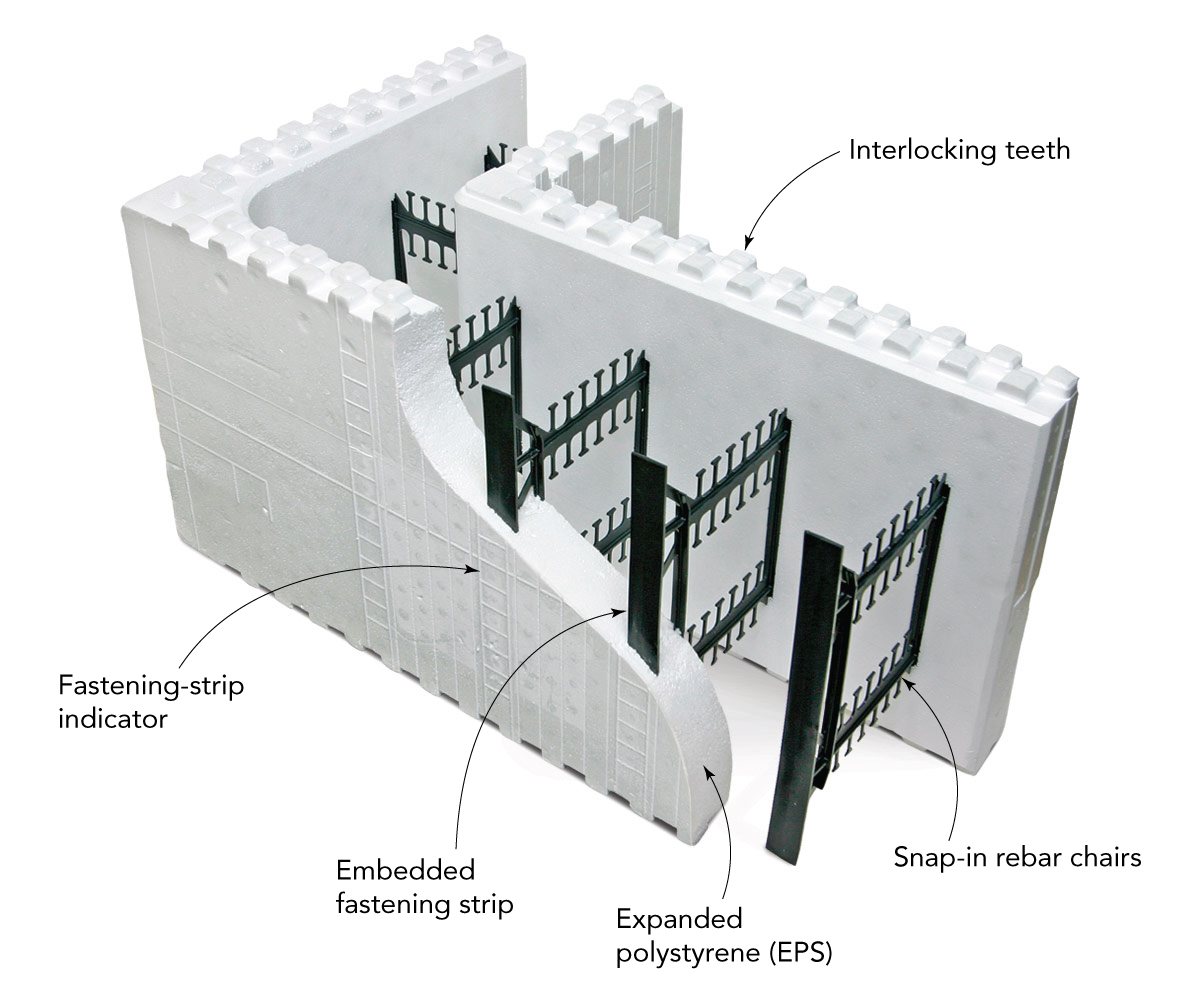
My ICF of choice is called iForm (www.rewardwalls.com). The best thing about this ICF system is that because there is no top or bottom, the blocks can be installed in any direction; even corner blocks can be flipped to fit a right or left corner.

To estimate the number of blocks needed for a job, I start by dividing the length of each wall by the length of a single block. When added together, this tells me how many blocks I need in each course. Next, I divide the required height of the wall by the height of one block; this tells me how many courses I will need. When multiplied together, these two numbers give me the total blocks needed. I also like to add one extra block for each side of the foundation in case I run into problems.

Establish a dead-level first course

fastening steel track with masonry nails
The first course is most important. Anchor the first course of ICF blocks by fastening steel track along the chalklines with 1-in. masonry nails spaced about 2 ft. to 3 ft. on center. I set the corners of each course first to eliminate any need to cut, and thereby weaken, this structurally vital part of the foundation.

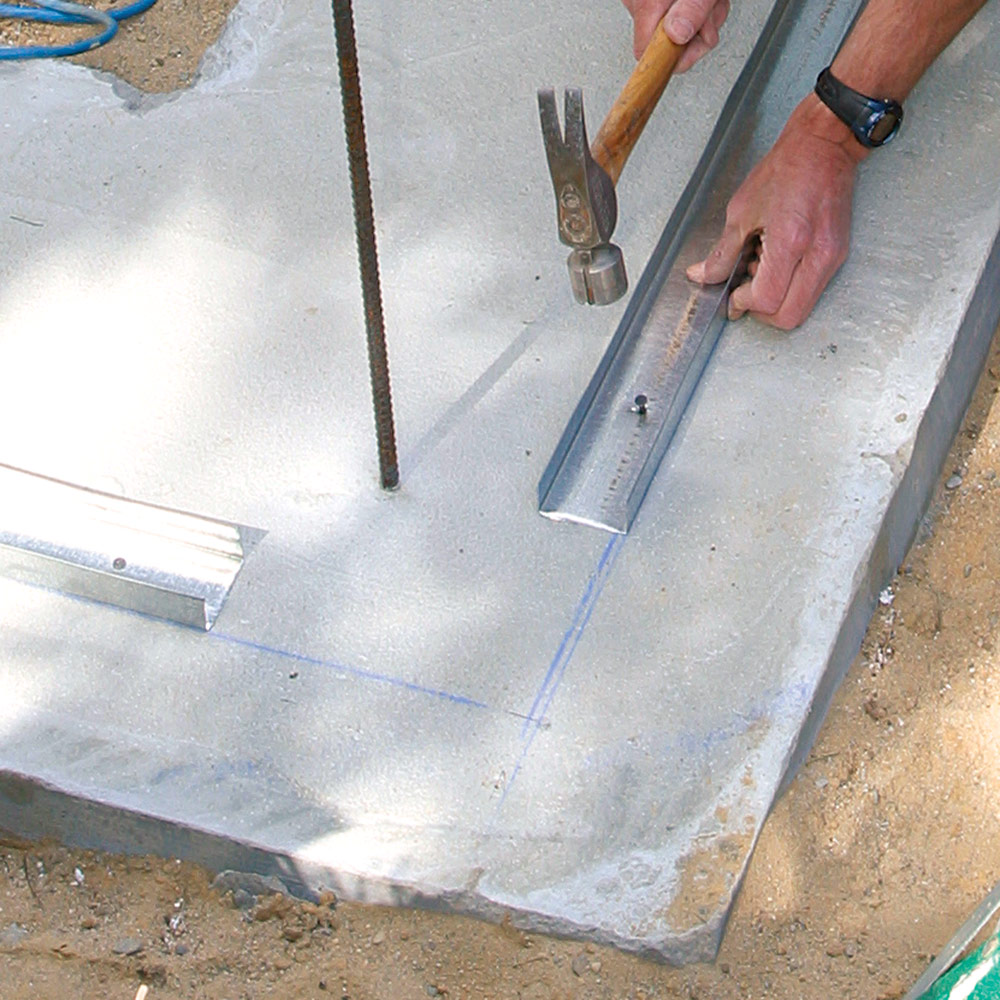
To start, I sweep the standard concrete footing clean and snap chalklines representing the outside perimeter of the foundation (see Forming and Pouring Footings, FHB #119). Next, I cut 2-1/2-in. light-gauge steel-stud track to length and fasten it along the chalklines with masonry nails. The metal track, which normally is sold as top and bottom plates for steel-stud wall systems, just happens to be the right width to hold the iForm blocks firmly in place.

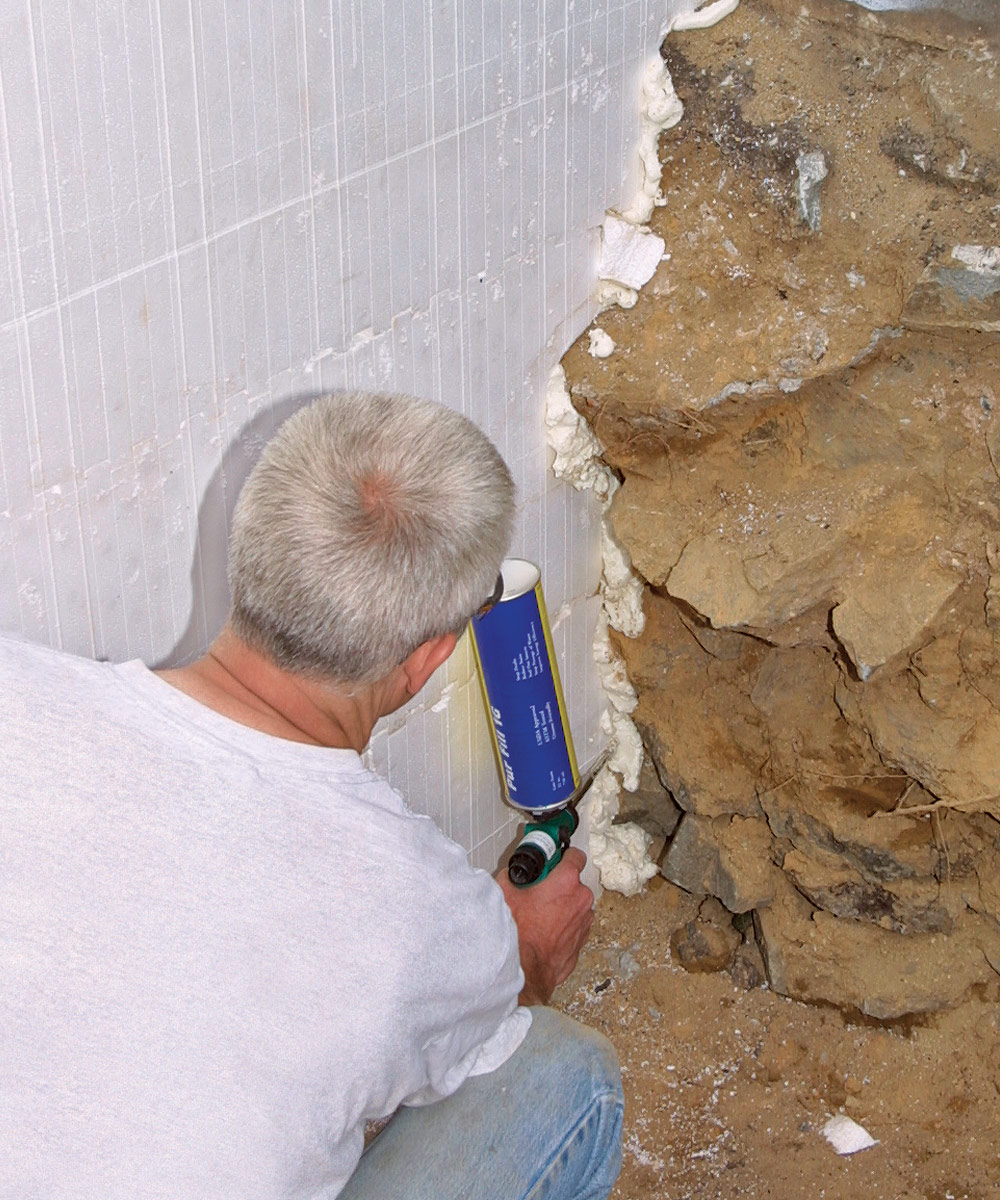
Before I start installing the blocks, I check the footing for level. The key to a quick, accurate installation is a dead-level first course. If the footing is more than 1/4 in. out of level, I have some adjusting to do. This can be done by trimming the bottom of the blocks or by lifting them with shims, and later filling in any gaps with expanding foam.

Because each block is 16 in. tall and the overall foundation height often isn’t a multiple of 16, I usually have to trim one course to get the correct finished height. If this is the case, I prefer to cut the bottom of the first course so that the top course is a full-height block. The blocks can be cut quickly to a uniform height on the tablesaw, using the rip fence as a guide.
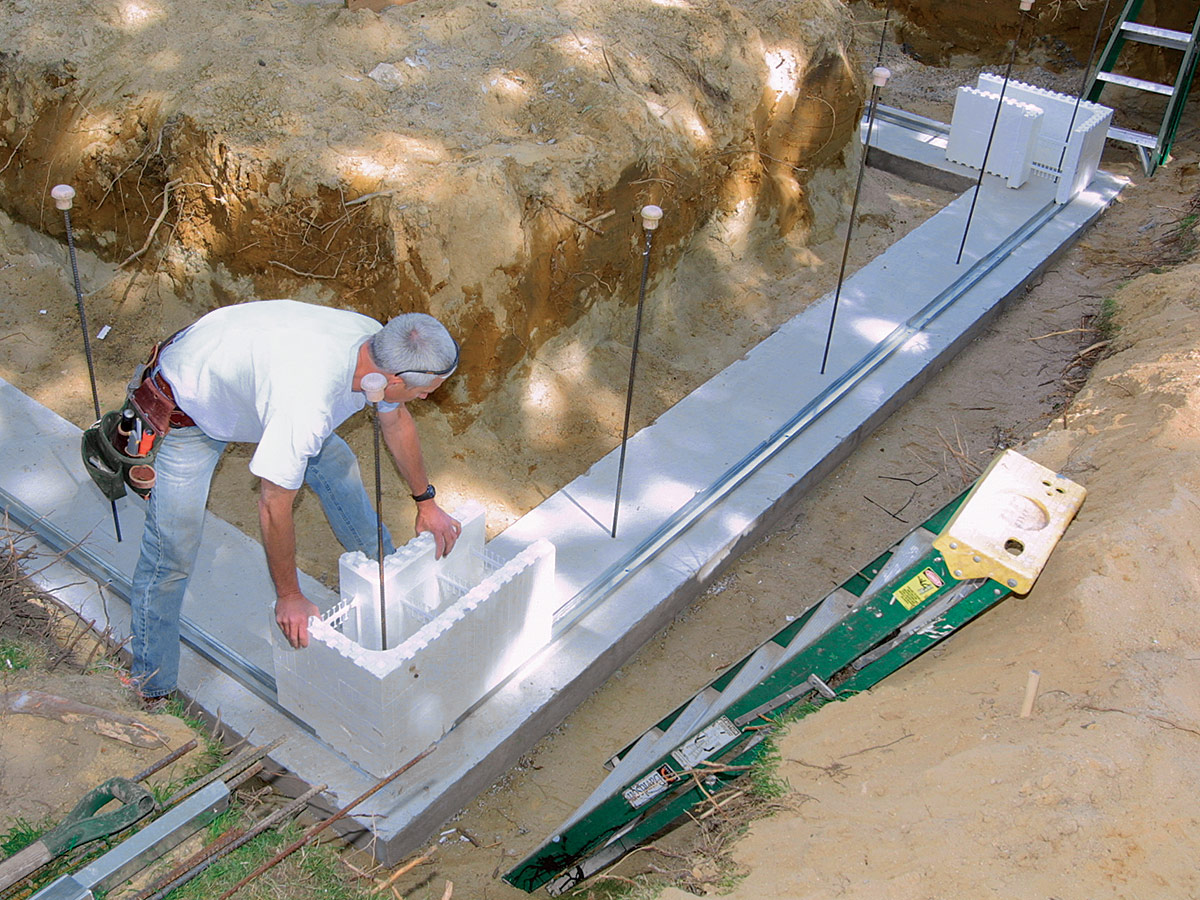
Corners come first

Because the corners are the weakest points in the foundation, they are the first blocks to be installed on each course. This ensures that I won’t have to compromise their strength by cutting them to fit the rest of the blocks. After I lay the corners, I fill in with straight blocks.

placing iForm block corner
Photo: Justin Fink

As I work my way out of each corner, I usually have to trim one block on each side of the foundation to get the right fit. The iForm blocks have vertical lines at 1-in. increments on the sides, so I can take my jigsaw and cut by eye, using the nearest inch line as a guide. It’s best to cut a little short rather than a little long; any extra length will push the corners out of square.

Block by block, I work my way toward the existing foundation. Butting the ICFs against a flat surface (poured concrete or concrete block) simply involves cutting the last blocks to the correct length and inserting rebar into the existing wall. But on this job, the existing foundation was fieldstone that had a very irregular surface. Thanks to the easy-working properties of the ICFs, I was able to scribe the blocks to fit against the old foundation. I didn’t need any rebar anchoring the new wall to the old because the rough fieldstone offers a strong bonding surface that poured-concrete and block walls do not.

Reinforce the forms with plastic and steel

securing corner block to straight block with zip tie
Zip ties secure the corners. Because the corners are the weakest points in the form assembly, it’s important to secure corner blocks to adjacent straight blocks with plastic zip ties.

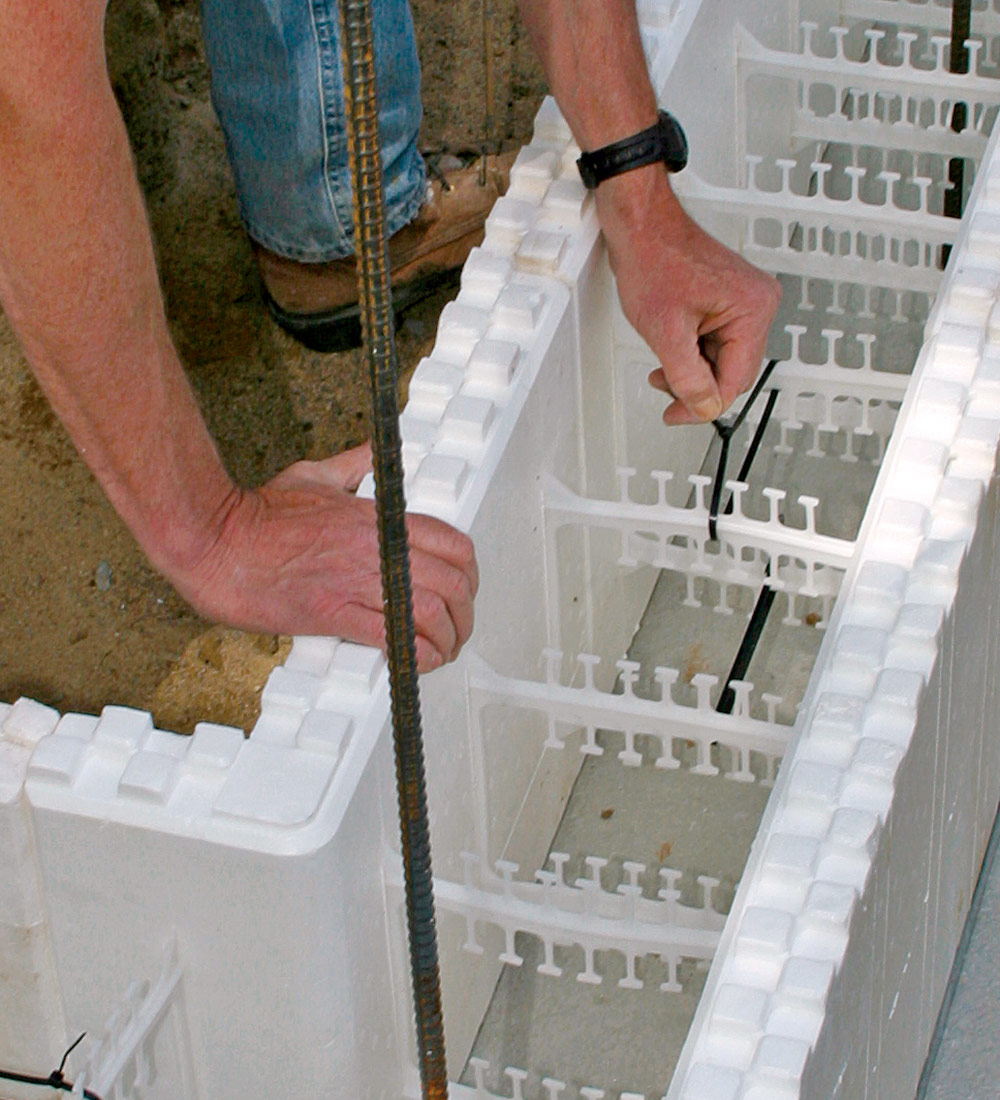
Once the first course is laid, I reinforce the corners by securing the corner blocks to adjacent straight blocks with zip ties. Available at any hardware store, zip ties are thin plastic straps used for bundling cables and wires. I also use zip ties to tie together the two blocks that form the vertical seam. Then I snap in a row of 1/2-in. rebar and overlap it by at least 18 in. in the corners. The rebar chairs of the block I use are formed to allow two pieces of rebar (up to 5/8 in. dia. each) to be snapped together, one on top of the other, eliminating the need for wire ties. That’s a real time-saver.

On the next course, I flip the corner blocks end for end so that the seams will stagger. I build up the corners pyramid style, making sure to attach the corner blocks to adjacent straight blocks with zip ties before stacking the next unit.

After measuring the diagonals of the foundation to make sure it’s still square, I lay the rest of the straight blocks in place, reinforce the vertical seams, and scribe the ends as before. Staggering the cut seams in successive courses is not an option because ICFs with interlocking teeth almost never line up correctly; therefore, one of the two rows of teeth would have to be cut off to get the forms to seat properly.

Rebar strengthens the concrete

Plastic zip ties and internal webbing hold vertical and horizontal rebar in place.

zip tie around rebar and through block
After the first course has been laid, slice the side of one block and loop a zip tie around the vertical rebar that extends from the footing. Pull the tail end of the zip tie through the slot so that it’s accessible from outside the form.
illustration of insulating concrete forms with rebar in center
Drawing: Dan Thornton

new vertical rebar being tied into forms
When I drop in another length of vertical rebar from above, it is carefully threaded into the looped zip tie, which then is pulled tight with a pair of pliers to tie the rebar together.


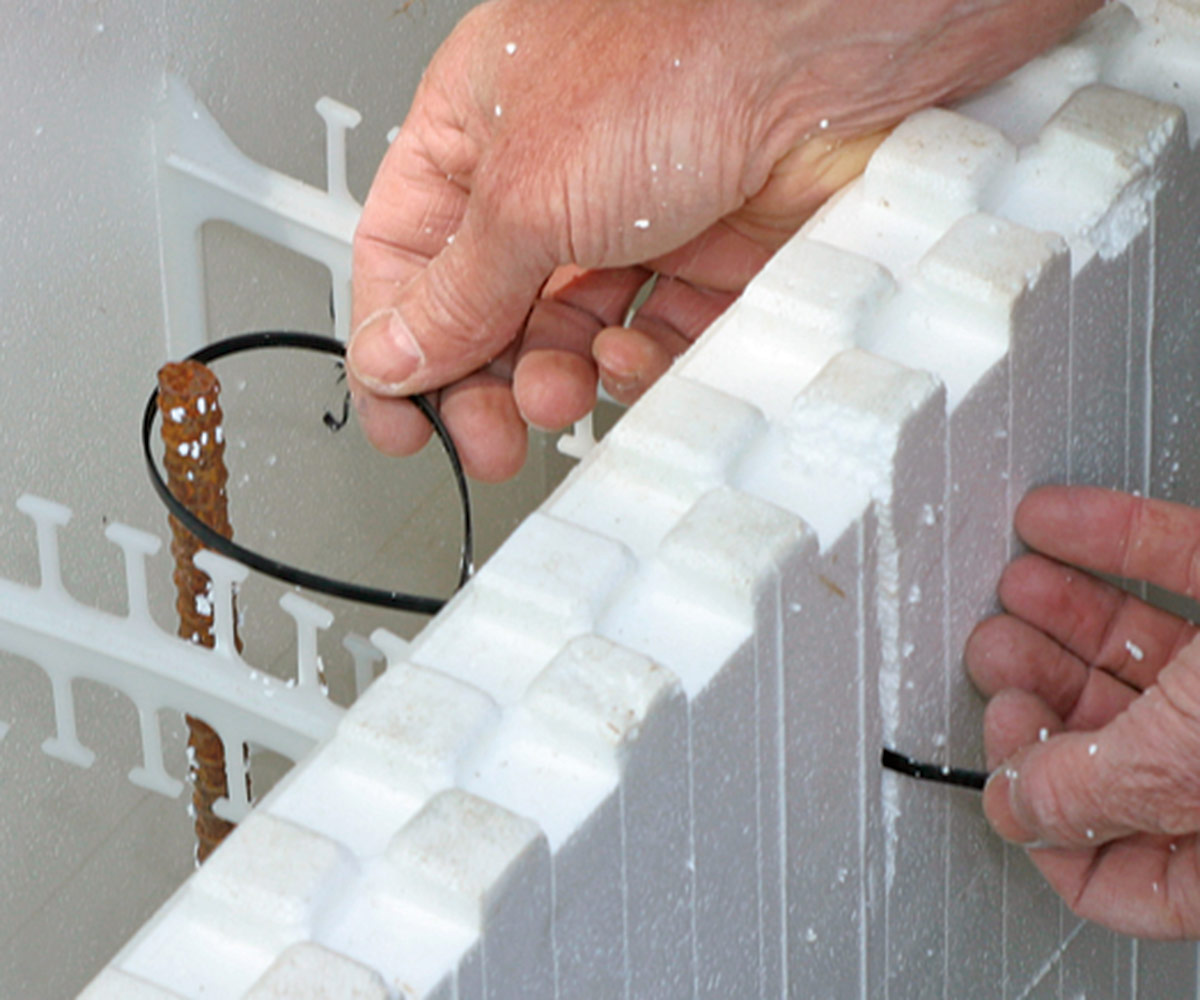
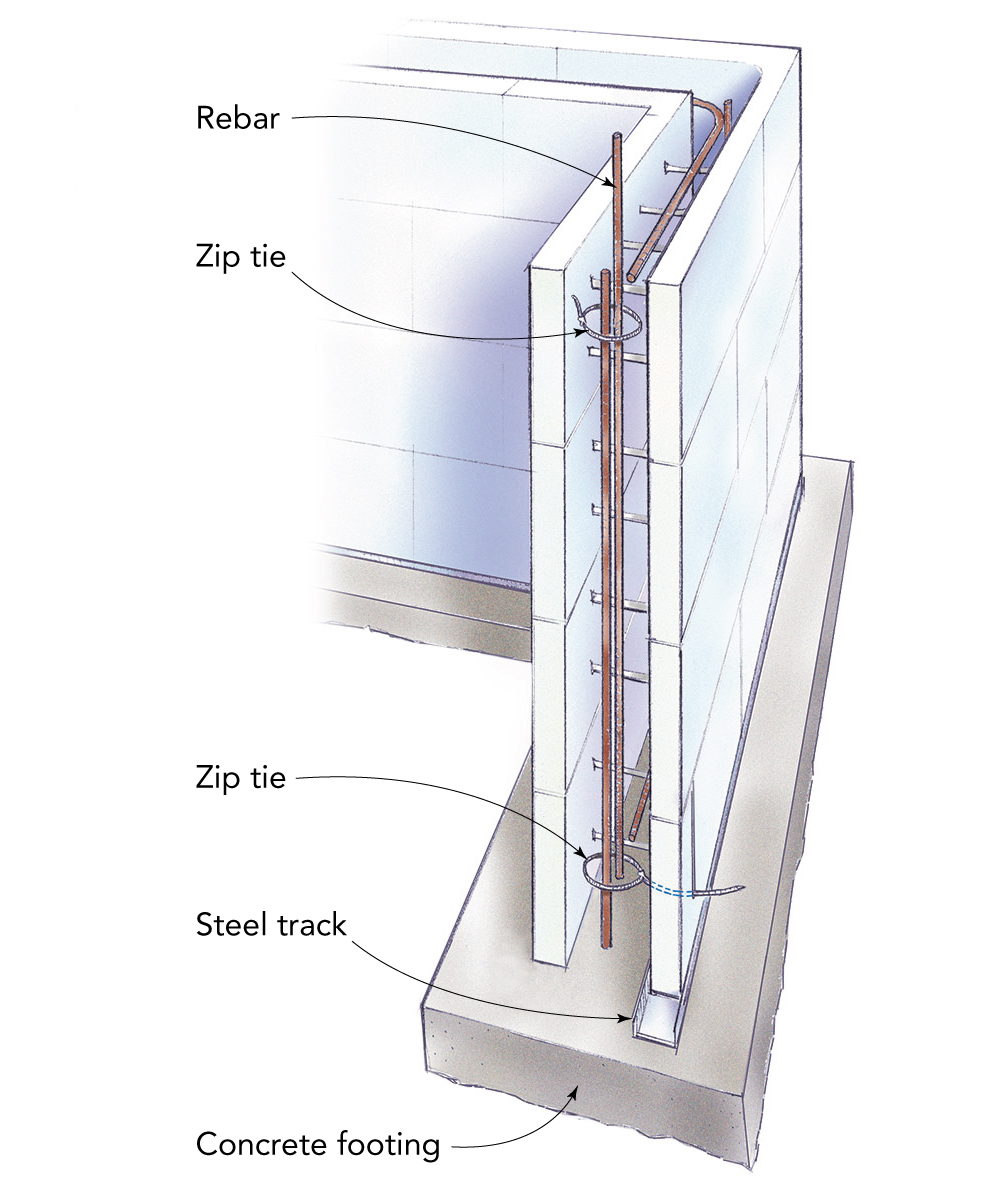
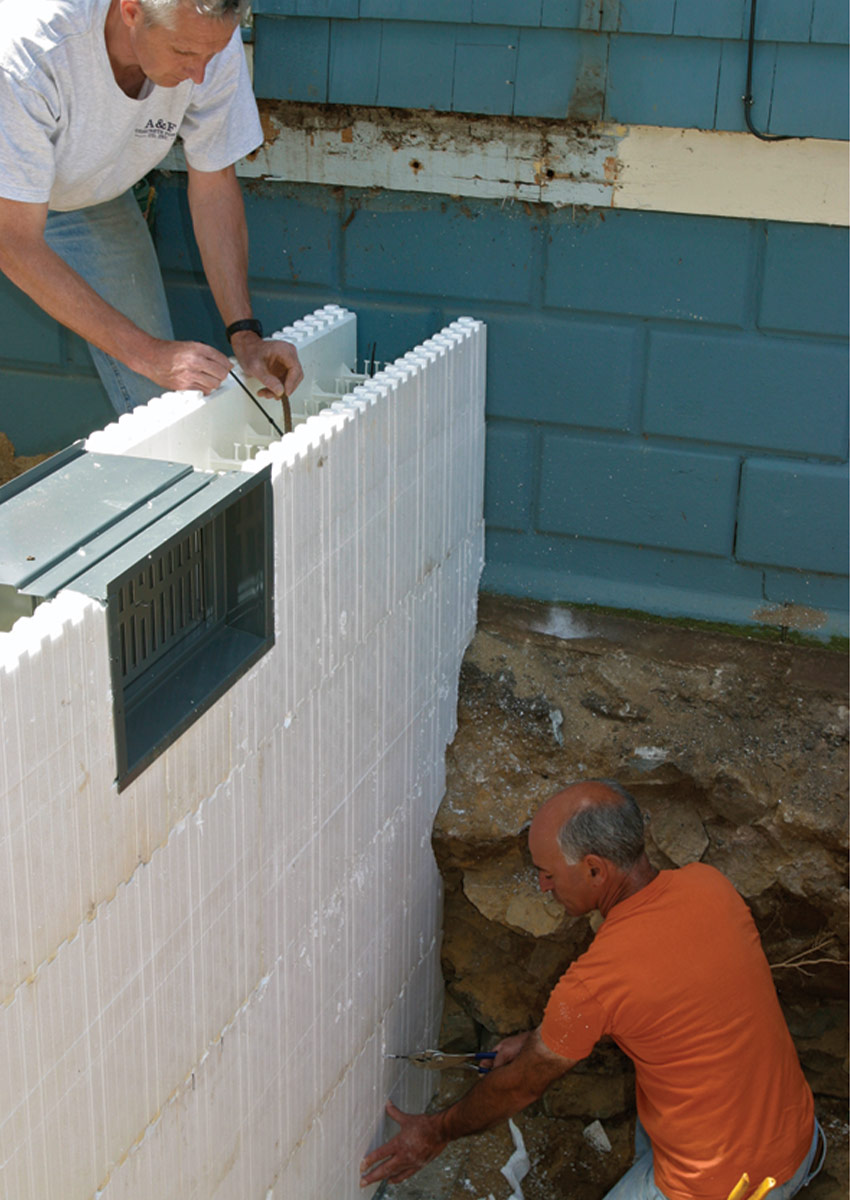
Handling vents and openings

To create a hole for crawlspace access, I build a permanent frame using pressure-treated lumber. The bottom of the frame is separated into two halves with a gap in the middle so that I can watch for voids underneath during the pour.

applying expanding foam to seal seam
Foam fills the gaps. Expanding foam can be used to seal seams, plug holes, and tighten rough scribe work. Photo: Justin Fink

When I use steel vents meant for poured-concrete walls, I run into two problems. The first is that traditional vents are made for 12-in.-wide walls, but the ICF walls I use are 13 in. wide. This means the vent has to be recessed an inch on the inside of the crawlspace. Also, there is no easy way to secure vents during the pour. I’ve managed to solve this problem by placing a heavy rock on top until the pour is finished.

attaching brace to corners
There’s no such thing as too much bracing. It may be overkill, but I always brace the corners securely to prevent the blocks from pushing away from the existing foundation. Photo: Justin Fink

Getting ready for the pour

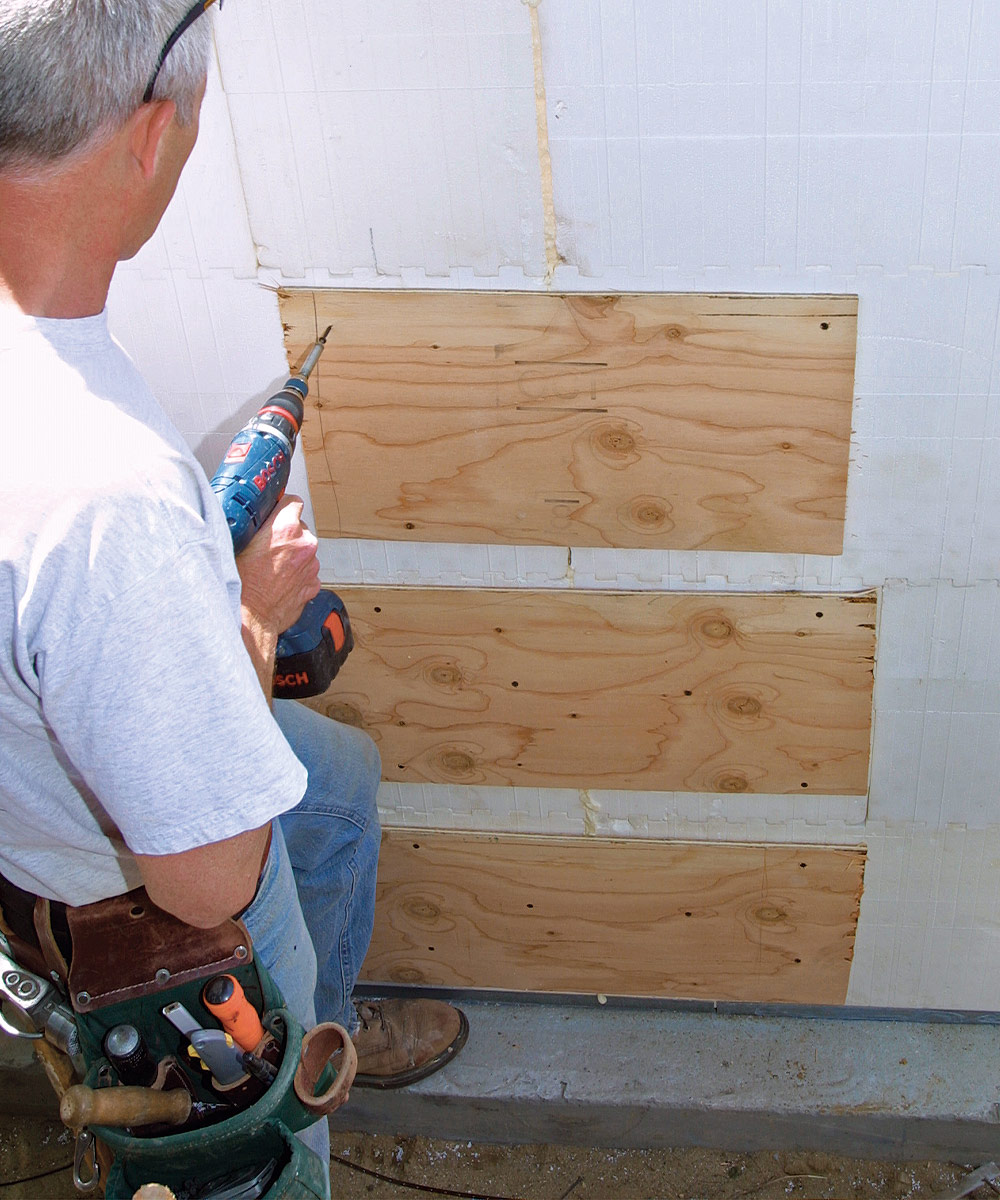
I straighten the top of the walls with steel track, which keeps the interlocking teeth from clogging with concrete. I also string up a dry line about an inch or two above the outside perimeter of the walls. After snapping in the top row of rebar, I reinforce the vertical cut seams in the blocks by gluing them together with foam and screwing plywood scabs into the embedded fastening strips across both sides.

It doesn’t take much concrete to move an unbraced wall, but it doesn’t take much time to brace it either. As concrete is poured into the wall, it tends to push the blocks away from the existing foundation. To prevent this, I brace the ends of the wall opposite the existing foundation. Because the blocks I use lock together so tightly, bracing the sides of the foundation isn’t necessary. However, if you use another brand of ICFs, check the instructions.

reinforcing seams with plywood
Plywood bandages. After gluing large vertical seams with foam, I reinforce them with plywood scabs screwed to the embedded fastening strips found on both sides of the seams. Photo: Justin Fink

The pour is the trickiest part

Most ICF manufacturers list how many blocks can be filled by 1 cu. yd. of concrete. For instance, 1 cu. yd. of concrete fills 7-1/2 13-in.-wide iForm blocks. So I simply count the number of blocks in the foundation, divide it by 7-1/2, then round up to the nearest 1/2 yd.

pouring concrete into the form
Pour the concrete. The pour requires close attention. It’s best to pour the walls in 2-ft.- to 3-ft.-high sections called “lifts.” Start with the corners before proceeding to the straight sections, making sure to watch carefully for a void-free pour. I use rocks to hold down the vents, and a dry line lets me double-check that the walls stay true. Photo: Justin Fink

The design and engineering of ICF blocks are based on a 3000-psi concrete strength, but double-check your local code and the ICF manufacturer’s specs to make sure you pour the right type of concrete in the foundation. I usually order 3000-psi concrete with 1/4-in. to 3/8-in. peastone aggregate. I’ve found that concrete with aggregate larger than 3/8 in. is difficult to pour and consolidate in the ICFs.

Pouring the concrete is the trickiest part of the process. Because the concrete needs to flow between the webbing of each ICF block, the consistency of the concrete is important. The lower the slump, the less water is mixed with the concrete, and the stiffer it will be. But a higher slump of 6 or 7 may result in substandard strength.

removing excess concrete from the top of the forms
Smooth the surface. Once the walls have been topped off, use steel track as a guide to remove excess concrete and to smooth out the surface before inserting anchor bolts.

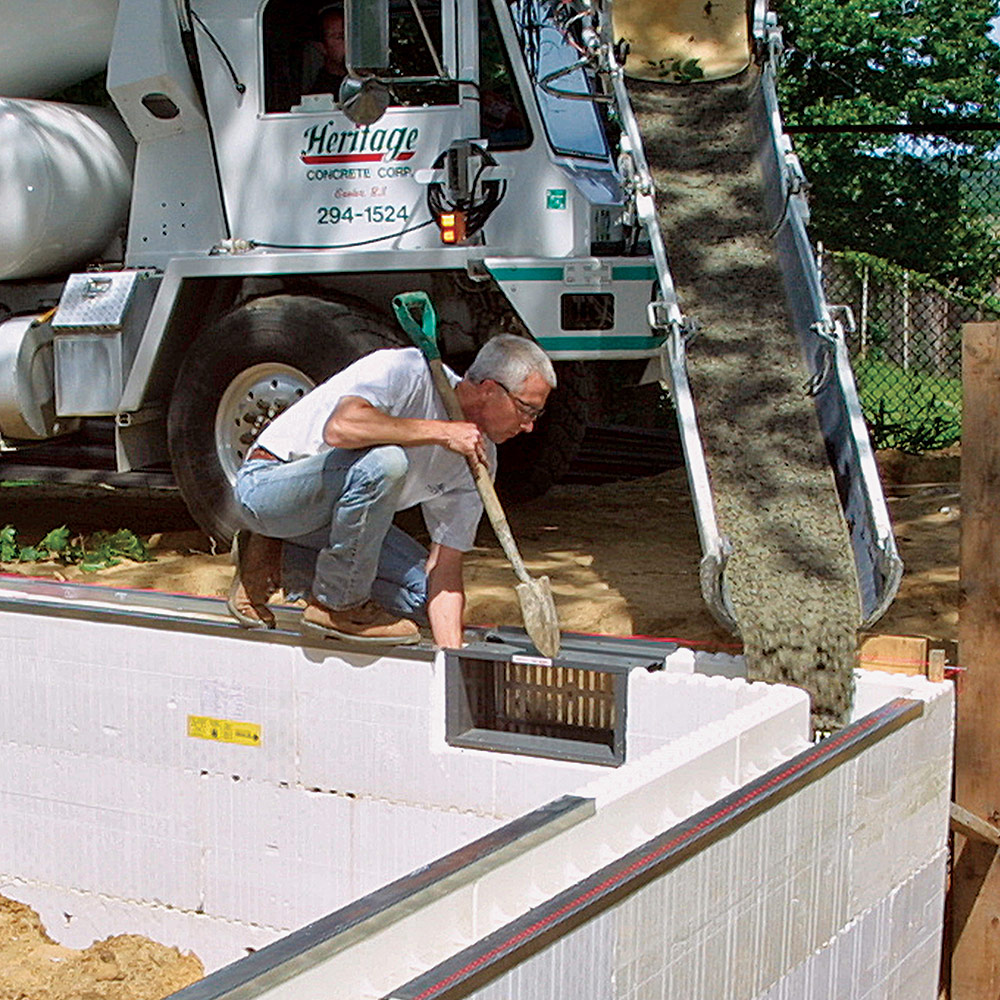
As with all three-wall foundations, I first anchor the corner blocks by filling them about halfway with concrete. Keeping the concrete at a 4 slump, I continue pouring the rest of the walls to the halfway mark. Then I have the truck driver loosen the concrete to about a 5 slump, start back at the corners again, and continue with the top half of the pour.

During the pour I constantly watch for voids forming, walls bowing, or gaps and seams opening up between the forms. I just use a stick to poke the concrete beneath the vents because I don’t like to use a vibrator unless absolutely necessary. If gaps or seams open up, I stop the pour and reinforce the area with plywood scabs. Then I give the concrete a little time to set up, usually by continuing the pour in another area.

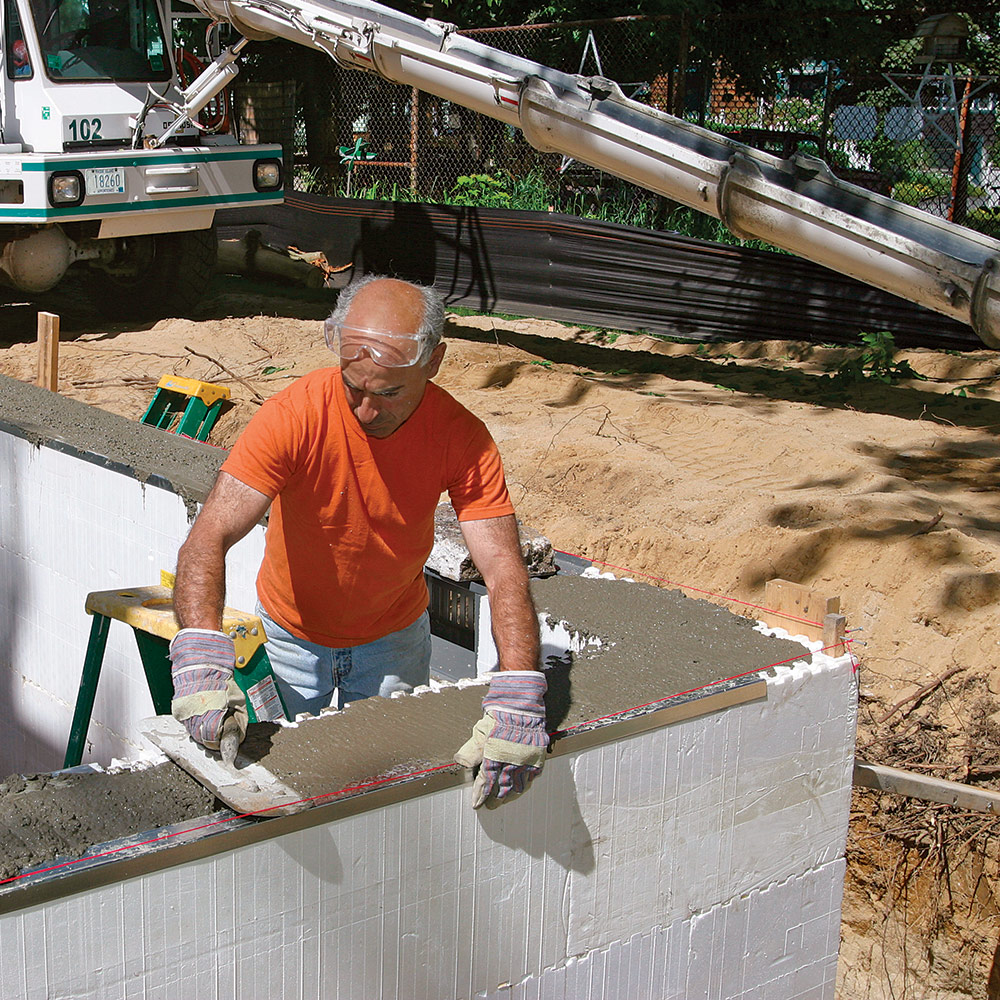
Once the wall has been topped off, I float it level with a trowel, using the steel track as a guide. Then I install the anchor bolts. One last adjustment can be made simply by pushing or leaning on the wall to tweak it straight—and my foundation is formed, insulated, and poured in record time.

Building with ICFs


Pros

  • Unlike conventional concrete foundations, ICFs require no special tools or training. Basic carpentry skills are about all that is needed.
  • The expanded-polystyrene (EPS) blocks are light, easy to cut and place, and permanent.
  • There is no hassle of stripping forms after the pour.
  • Fabrication around difficult areas like live sewer pipes and electrical conduit is very easy.
  • Basements built with ICFs are less prone to moisture problems than poured-concrete walls.
  • When concrete is poured inside ICF blocks, a negligible amount of water evaporation occurs, which is crucial to proper curing. Most contractors strip conventional forms a day or two after the pour, which increases evaporation and interferes with the curing process.
  • Pouring concrete in cold weather is not a problem because the curing concrete generates heat that’s retained by the insulation.
  • If a conditioned crawlspace is part of the building-envelope strategy, the ICFs provide a well-insulated and air-sealed barrier.

Cons

  • Exposed exteriors require a protective finish. I use an EIFS (exterior insulation and finish system) coating called Dryvit (dryvit.com) or 1/4-in. cementitious panels.
  • The outer 2-1/2 in. of the finished foundation is not load bearing, so I use a larger sill plate (2×8 instead of 2×6); I always double the plate anyway.
  • Building officials may require the inside wall of an ICF crawlspace to be covered with a fire-retardant material.
  • ICFs offer no means of visual inspection for insects. Some brands of ICFs are treated for insects, but termite shields and ground treatment are good ideas.


Rick Arnold is a builder in Wickford, R.I., and the author of Working With Concrete (The Taunton Press, 2003). Photos by Roe A. Osborn, except where noted.

Sources:

Founded in 1995, the Insulating Concrete Form Association (ICFA) is a growing group of professionals ranging from manufacturers to ready-mix suppliers, all focused on educating builders about the benefits of ICFs.

Fine Homebuilding Recommended Products

Fine Homebuilding receives a commission for items purchased through links on this site, including Amazon Associates and other affiliate advertising programs.

Smart String Line

String lines — sometimes called dry lines — are invaluable for straightening walls and a million other things. The reel makes it easy to stretch and wind the string.
Buy at Amazon

Anchor Bolt Marker

Quickly transfer anchor bolt locations to mud sill stock without measuring mistakes.
Buy at Amazon

Plate Level

A plate level allows to you plumb walls accurately because it registers off the plates without touching potentially warped or twisted studs. This one can reach the plates on 12-ft. tall walls.
Buy at Amazon
View PDF
Previous: Retrofitting a Foundation Next: An Addition Foundation

Guide

Foundations and Masonry Work

Chapter

Retrofits and Add-ons

Sign up for eletters today and get the latest how-to from Fine Homebuilding, plus special offers.

Signing you up...

This site is protected by reCAPTCHA and the Google Privacy Policy and Terms of Service apply.
See all newsletters
See all newsletters

Log in or create an account to post a comment.

Sign up Log in

Become a member and get full access to FineHomebuilding.com

Foundations and Masonry Work

Foundations and Masonry Work

Trusted, comprehensive guidance from the pros for working with concrete and masonry

View Project Guide

View All Project Guides »

Become a member and get unlimited site access, including the Foundations and Masonry Work Project Guide.

Start Free Trial

Concrete & Masonry Basics
  • Choosing & Mixing Concrete
  • Concrete & Masonry Tools & Techniques
Building Foundations
  • Foundation Basics
  • Foundation Footings
  • Insulated Concrete Forms (ICFs)
Waterproofing Foundations
  • Waterproofing Strategies
  • Foundation Drains
Retrofits and Add-ons
Masonry in the Landscape
  • Patios, Walkways, and Driveways
  • Retaining Walls
  • Dry Stone Walls
  • Fire Pits
Brick

Fine Home Building

Newsletter Sign-up

  • Fine Homebuilding

    Home building tips, offers, and expert advice in your inbox.

  • Green Building Advisor

    Building science and energy efficiency advice, plus special offers, in your inbox.

  • Old House Journal

    Repair, renovation, and restoration tips, plus special offers, in your inbox.

Signing you up...

This site is protected by reCAPTCHA and the Google Privacy Policy and Terms of Service apply.
See all newsletters

Follow

  • Fine Homebuilding

    Dig into cutting-edge approaches and decades of proven solutions with total access to our experts and tradespeople.

    Start Free Trial Now
    • Facebook
    • Instagram
    • X
    • LinkedIn
  • GBA Prime

    Get instant access to the latest developments in green building, research, and reports from the field.

    Start Free Trial Now
    • Facebook
    • YouTube
  • Old House Journal

    Learn how to restore, repair, update, and decorate your home.

    Subscribe Now
    • Facebook
    • Instagram
    • X

Membership & Magazine

  • Online Archive
  • Start Free Trial
  • Magazine Subscription
  • Magazine Renewal
  • Gift a Subscription
  • Customer Support
  • Privacy Preferences
  • About
  • Contact
  • Advertise
  • Careers
  • Terms of Use
  • Site Map
  • Do not sell or share my information
  • Privacy Policy
  • Accessibility
  • California Privacy Rights

© 2025 Active Interest Media. All rights reserved.

Fine Homebuilding receives a commission for items purchased through links on this site, including Amazon Associates and other affiliate advertising programs.

  • Home Group
  • Antique Trader
  • Arts & Crafts Homes
  • Bank Note Reporter
  • Cabin Life
  • Cuisine at Home
  • Fine Gardening
  • Fine Woodworking
  • Green Building Advisor
  • Garden Gate
  • Horticulture
  • Keep Craft Alive
  • Log Home Living
  • Military Trader/Vehicles
  • Numismatic News
  • Numismaster
  • Old Cars Weekly
  • Old House Journal
  • Period Homes
  • Popular Woodworking
  • Script
  • ShopNotes
  • Sports Collectors Digest
  • Threads
  • Timber Home Living
  • Traditional Building
  • Woodsmith
  • World Coin News
  • Writer's Digest
Active Interest Media logo
X
X
This is a dialog window which overlays the main content of the page. The modal window is a 'site map' of the most critical areas of the site. Pressing the Escape (ESC) button will close the modal and bring you back to where you were on the page.

Main Menu

  • How-To
  • Design
  • Tools & Materials
  • Video
  • Blogs
  • Forum
  • Project Guides
  • Reader Projects
  • Magazine
  • Members
  • FHB House

Podcasts

  • FHB Podcast
  • ProTalk

Webinars

  • Upcoming and On-Demand

Podcasts

  • FHB Podcast
  • ProTalk

Webinars

  • Upcoming and On-Demand

Popular Topics

  • Kitchens
  • Business
  • Bedrooms
  • Roofs
  • Architecture and Design
  • Green Building
  • Decks
  • Framing
  • Safety
  • Remodeling
  • Bathrooms
  • Windows
  • Tilework
  • Ceilings
  • HVAC

Magazine

  • Current Issue
  • Past Issues
  • Magazine Index
  • Subscribe
  • Online Archive
  • Author Guidelines

All Access

  • Member Home
  • Start Free Trial
  • Gift Membership

Online Learning

  • Courses
  • Project Guides
  • Reader Projects
  • Podcast

More

  • FHB Ambassadors
  • FHB House
  • Customer Support

Account

  • Log In
  • Join

Newsletter

Get home building tips, offers, and expert advice in your inbox

Signing you up...

This site is protected by reCAPTCHA and the Google Privacy Policy and Terms of Service apply.
See all newsletters
See all newsletters

Follow

  • X
  • YouTube
  • instagram
  • facebook
  • pinterest
  • Tiktok

Join All Access

Become a member and get instant access to thousands of videos, how-tos, tool reviews, and design features.

Start Your Free Trial

Subscribe

FHB Magazine

Start your subscription today and save up to 81%

Subscribe

You have 1 free article remaining.

Get complete site access, including thousands of videos, how-to tips, tool reviews, and design features.

Start your FREE trial

Already a member? Log in

We hope you’ve enjoyed your free articles. To keep reading, become a member today.

Get complete site access to expert advice, how-to videos, Code Check, and more, plus the print magazine.

Start your FREE trial

Already a member? Log in

Privacy Policy Update

We use cookies, pixels, script and other tracking technologies to analyze and improve our service, to improve and personalize content, and for advertising to you. We also share information about your use of our site with third-party social media, advertising and analytics partners. You can view our Privacy Policy here and our Terms of Use here.

Cookies

Analytics

These cookies help us track site metrics to improve our sites and provide a better user experience.

Advertising/Social Media

These cookies are used to serve advertisements aligned with your interests.

Essential

These cookies are required to provide basic functions like page navigation and access to secure areas of the website.

Delete My Data

Delete all cookies and associated data