Q:
This year is finally the year I renovate my dining room. My plans include replacing the chair rail, which was installed poorly: The miters on the inside corners have opened up. What can I do to keep the corners tight? Also, at the entrance to the dining room, the ends of the existing chair rail bevel back at a 45° angle with exposed end grain. The entrance has no molding, just drywall corners. How do I terminate the chair rail?
Artur Kelly, Old Greenwich, CT
A:
Former assistant editor Rich Ziegner replies: The first trim job my old boss, Jack Fox, gave me was putting baseboard in a basement closet. He was pretty sly, old Jack Fox. He looked at my work and said, “You mitered the inside corners.” “Yep,” I replied, thinking they looked pretty good. “Nope,” he told me, “you don’t miter inside corners. You cope them. Watch me.”
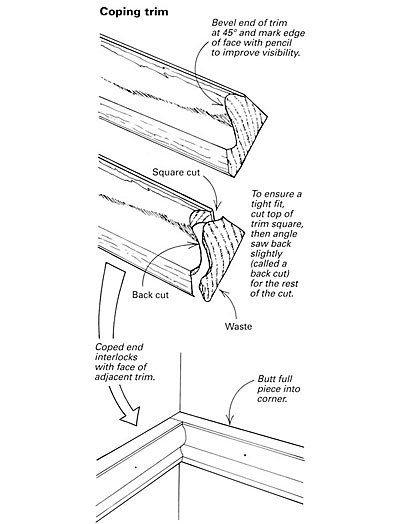
Jack beveled a piece of baseboard on the chopsaw. Then he penciled a dark line down the face of the baseboard where the bevel began. “This is so that you can see the profile.” After going upstairs to grab a coping saw, Jack cut off the beveled tip along the pencil line, angling the saw to remove a little more wood from the back face than from the front face, which is called a back cut. Cutting off the beveled tip left a coped end shaped like the molding’s profile. Jack butted the coped end against the face of another piece of baseboard. The two pieces interlocked. “That’s how you cope an inside corner.”
To cope the inside corners for your chair rail, put up one piece so that it dies square into a corner, then cope the end of the adjacent piece. Which piece gets the cope? The one that isn’t visually prominent. For example, you cope the sidewall pieces of baseboard in a closet and butt them into the back piece because the back piece is the most visible. In your dining room, consider which walls get the most attention and cope the pieces adjacent to those walls. A wall with a window might receive more attention than a blank wall, so butt the coped pieces into a full piece along the window wall.
When terminating the chair rail at the room entrance, you can also cope the ends. In this case, you don’t back cut the beveled end; you make a square cut that follows the profile of the trim. But you’ll see the end grain.
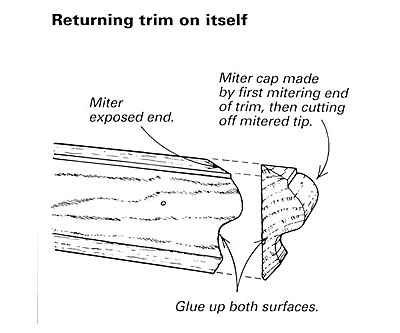
A better-looking alternative is to return the trim on itself. Cut the chair rail to length, mitering the end at 45°. Miter the end of a scrap, then lay it flat on the chopsaw and cut off only the mitered point. Go hunt for it when it flies off the saw because that’s the piece you need to cap the mitered end of your chair rail. This miter cap should be as long as the chair rail is thick. If not, cut another. When you’ve got the right-size piece, glue it to the mitered end of the chair rail, holding the cap in place for a few minutes so that it’ll set.
Miter caps are difficult and dangerous to cut; all I can tell you is to cut them from decent-size lengths of trim and to allow the chopsaw’s blade to stop spinning before letting it come back up. When putting up the chair rail, try to use full lengths for each run. But if you have to splice, use a scarf joint: a mitered end lapped with another mitered end. Cut the pieces so that you’re laying the second piece over the first, not tucking it behind the first, to make fitting the second piece easier. As with a coped joint, decide from which direction people are most likely to view the splice and cut it so that it’s angled in the opposite direction.
