10 Roof Goofs and How to Fix Them
Installation mistakes are often to blame for leaky roofs. Roofer Stephen Hazlett shows how to repair these problems—or avoid them altogether.
Synopsis: Surprisingly, it is not damage from wear and tear that causes most roof leaks but mistakes made during installation or reroofing. This article uses photos and drawings to illustrate what those mistakes are and what you can do about them. The advice is helpful whether you are trying to fix a leak or simply installing a new roof that you hope won’t leak.
As a roofer, I’m frequently called to solve the mysteries of leaky roofs. Surprisingly, it is not damage from wear and tear that causes most roof leaks but mistakes made during installation or reroofing. Some of these mistakes are impractical to repair after the fact. Others are repairable even years after the original installation.
When customers call about a leaky roof, they often have a good idea of where the leak is coming from. Regardless, I start my investigation with a few questions. How long has the roof been leaking? Has it leaked in that area before? How old is the roof?
If the leak has been appearing on and off for years, the problem is likely poor design or poor material choices. If the roof is 20 years old, it just may be worn out. If it is new (two to three years old), the problem is most likely faulty installation.
I first ask to see the water damage inside the house. I try to determine if the leak is even coming from the roof. What appears to be a leaky roof is sometimes a problem with siding or windows.
After I look inside the house, I go to the rooftop, where I usually can narrow the potentially leaky area to a 12-ft. radius around the damage inside. I examine the shingles. If they are in good shape, I look for punctures from nail pops or tree limbs, then check exposed fasteners. Poorly installed plumbing vent stacks, cable-wire guides, and satellite-dish mounts are always suspects on a leaky roof.
If I still haven’t found the source of the leak, I look at the step flashing against sidewalls and chimney flashings. I also inspect all valleys. A valley is susceptible to leaks, and it’s one place where I won’t do repairs. If I find problems in a valley, I replace the entire valley.
1. Poorly Fastened Sheathing
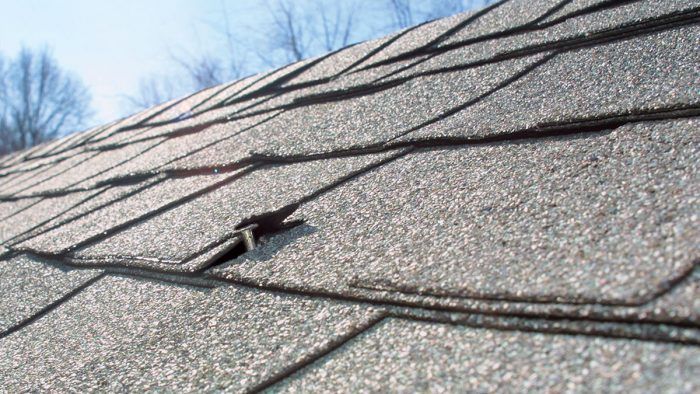
Sloppy deck installation on new roofs and poorly prepared decks on reroof jobs are among the most common problems I investigate. Poorly fastened sheathing curls along the edges, absorbs water, and swells. This movement causes the nails to pop out. Loose nails puncture the shingles and cause leaks. Tracking down the offending nail is often harder than the repair itself. Once I find and remove the loose nail, I replace the damaged shingle. Nail pops are to be expected over time. On an older roof, they are not a big concern. On a new roof, however, nail pops are a sign of a sloppy installation and frequently are followed by more problems.
2. Misaligned Starter Courses
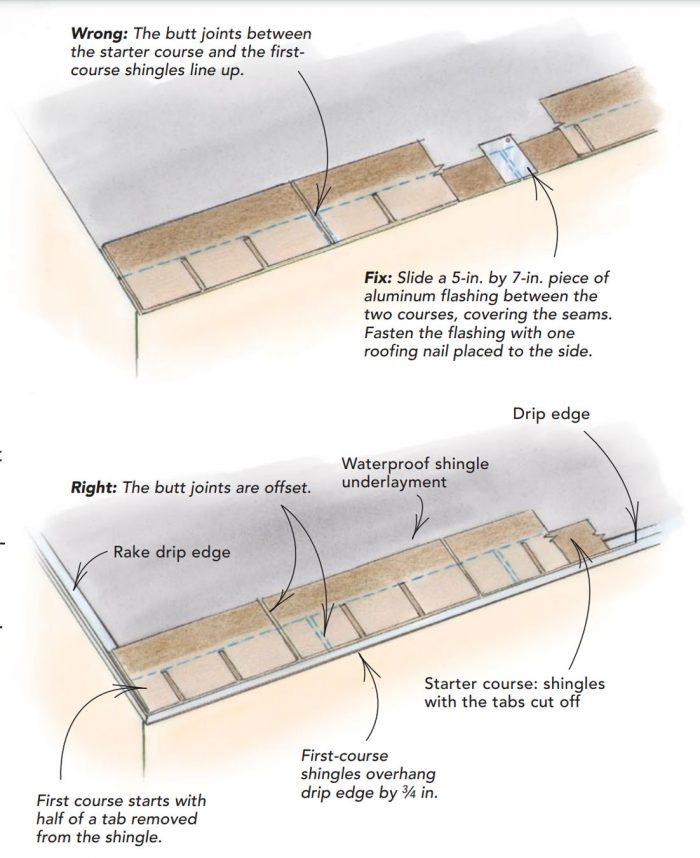 It’s surprising how often I see leaks because the butt joints between starter-course shingles line up perfectly with the joints between first-course shingles. This layout translates into a leak every 3 ft. along the bottom edge of a roof and will cause the rafter tails, wall sheathing, top plates, and drywall to get wet and rot. If the sheathing is not damaged, the repair is simple: Pull out a few nails, and slip a 5-in. by 7-in. piece of aluminum flashing between the starter course and the first course to cover the exposed joints. You can fasten the flashing with a single nail or with a bead of caulk between the flashing and the starter course and another bead between the flashing and the first course. If the sheathing is damaged, I remove several courses of shingles, replace the damaged wood, and install waterproof membrane with a properly aligned starter course.
3. Lazy Nailing
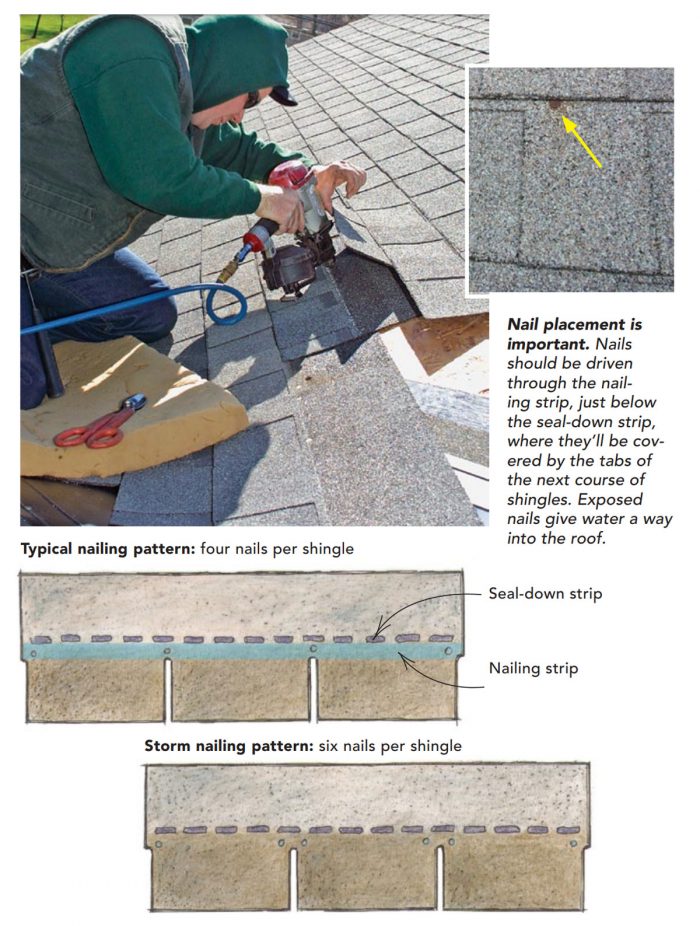
To see the other 7 Roof Goofs, read the entire article by clicking the “View PDF” button below.
Fine Homebuilding Recommended Products
Fine Homebuilding receives a commission for items purchased through links on this site, including Amazon Associates and other affiliate advertising programs.
Flashing Boot Repair
Roof Jacks
Ladder Stand Off



View Comments
Interesting and accurate, but only covers one type of shingle/roof. I've now lived in houses with: shingles as described; cedar; concrete "smooth" to resemble clay; concrete. There are a number of issues with each of these types. The open valley for concrete is a must as the closed invariably backs up and cause leaks sideways.
You're right about lots of sloppy installations. I used to sell for a roofing company and we did a lot of repairs. But we had a complete rip job that went a whole rainy summer without a leak, then it started leaking with big nasty stains on the living room ceiling. We sent the same crew back to fix the leak. They couldn't find it, even with a hose. So another one of the crews ripped it again and re-did the whole roof and re-painted the ceiling. A few weeks later, it's leaking again. The company owner goes out and hoses the roof down for over an hour, not a drop. Of course, the homeowner is quite pissed, threatens lawsuit, etc.
To make the story short, the homeowner had installed a wood stove and didn't run the chimney past the eaves, but stopped a couple feet short. The 'leak' was actually condensation from the chimney on the underside of the roof and running along the ridge beam until it dropped onto the ceiling. Argh!