
The days of applying horse-hair plaster onto wood lathe are long gone, yet plaster is still a viable option for interior wall construction. Modern systems consist of thick coats of high-strength gypsum plaster over expanded wire lath. This creates surfaces far superior to drywall in quality, durability, and the ability to straighten the most crooked framing. The downside to this system is that it is extremely labor intensive and very expensive.
Skim-coat plaster provides the same high-quality finish at a fraction of the cost. Both systems use a thin top coat of lime putty plaster which gets troweled to a hard polished surface. Compared to standard drywall and joint compound, skim-coat plaster has greater impact and abrasion resistance, improved sound isolation, and can be brought to a truer flat plane resulting in a virtually flawless surface.
Set up and preparation
The most common plaster systems used today are called veneer or skim-coat plasters. Falling under the general category of drywall finishes, they consist of one or two coats of thin plaster over sheets of special gypsum board. This gypsum board, also known as blueboard, is basically the same as standard gypsum board except it has a different paper surface designed for greater moisture absorption and bonding with plaster. The blueboard is available in 1/2-in. and fire-code 5/8-in. thicknesses and comes in standard drywall dimensions.
Our crew doesn’t install the blueboard, so prior to starting any plaster work; we check the installation to ensure that all the panels are tightly fastened. Protruding or loose screws that missed the framing are corrected. The panels should be tight to each other, and electrical boxes should be inset. We then cover the subflooring with tarps and protect all of the windows and the doors with painter’s plastic and masking tape. If plaster were to get on any wood, glass or metal surface, it would clean off easily, but it’s better to keep it off in the first place.
Blueboard that has been faded by ultraviolet light should be treated with either an alum solution or plaster bonding agent only if a lime putty plaster is applied directly to the board. With a two-coat system this is not a concern because the base coat is gypsum which will adhere just fine.
Installing corner bead and taping joints
For two-coat work, a #900 mesh mini bead is recommended for outside corners. In many cases we opt to use a much heavier 1-A type of corner bead, which is designed for heavy three-coat plaster work. Though this deviates from specification and requires us to put on a much thicker base coat, it significantly increases our ability to straighten and plumb walls, and it is much sturdier and less susceptible to damage. The beads are set straight and plumb with a level and attached with an electric powered stapler.
We tape the blueboard seams with a high-strength setting type joint compound (hot mud) and paper tape. Nothing resists seam cracks, as well and this is recommended under rapid drying conditions or when the framing is of steel construction. Self-sticking fiberglass tape is an acceptable method of treating the seams. All-purpose joint compounds should never be used for joints under plaster. It offers less strength and will soften again when the wet plaster is applied.
 |
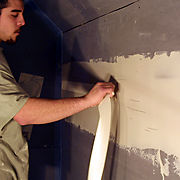 |
| The 1-A type of corner bead (top) lets the plasterers build out the depth of the plaster to correct any bows or dips in a wall. The #900 mesh is appropriate for a single skim coat over blueboard. | Unlike drywall, the seams get a coat of setting type compound. Then the tape is embedded, and that’s it. It’s important to feather this joint so it won’t interfere with plastering later. |
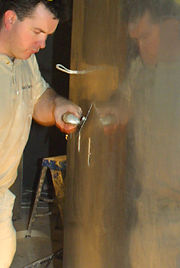
The critical task of mixing plaster
There are many ways to ruin a plaster mix. If the water is too cold, the plaster will set prematurely. Too hot, and the plaster will take too long to set. Dirty water will cause a rapid, premature set. We will not use plaster that is older than six months because it is no longer reliable and may not set properly.
For small batches (less than a bag) we mix it in 5-gallon buckets. We also have 15-gallon plastic buckets for one or two bag mixes. For three to five bag mixes, we use heavy-duty plastic trash cans. To mix the plaster, we use the prescribed cage style mixers and heavy-duty 1/2-in. drills that spin at 900 RPM, which delivers the necessary shearing action to make the plaster fully workable within the two- to five-minute mixing period. Overmixing will significantly shorten the workable time span. Paddles should not be used to mix plaster. They have a folding action, which is inadequate for achieving proper workability. With the exception of a plaster finish called Keenes Cement, plaster should never be re-tempered, so once mixed, that is it, and we never remix. Doing so would significantly weaken the plaster.
Applying the first coat
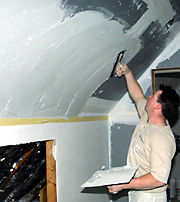
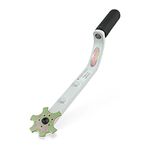
The base coat of plaster is applied in two applications from the same mix. The first application is commonly called the scratch coat. The term is a carryover from the first coat in conventional systems, where the plaster is raked with a scarifier. The second application we call the double, sometimes referred to as greasing or sweetening. These two applications together make one coat. The double should leave the surface without voids (cat’s eyes) or trowel marks. A browning rod is brought to the surface to ensure straightness. Once all corrections are made, a cement brush is dragged across the surface to roughen it for the finish coat.
This base coat will set within an hour of mixing, after which the lime putty finish coat can be applied. Most of the time, we prefer to wait a day to put on the finish coat to allow the base coat to give up most of its moisture, especially on damp days. However, in the winter, when the air is heated and dry, the base coat that has set, but is still wet (green) is best finish coated the same day. Lime putty over a dry base coat will be difficult to spread evenly and could dry out and check. If the base coat is too wet, blisters are likely to appear and polishing will be more difficult.
 |
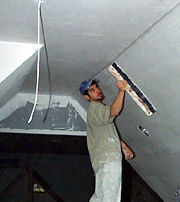 |
| The pressure on the upward stroke is kept to the bottom inside edge of the trowel. The next motion is a downward arc to fill any voids that may have occurred. By shifting your wrist you’ll apply pressure to the outer top edge of the trowel. | The plaster is setting, and a brush is used to scratch the surface so that the final coat can form a strong bond to the base coat. After the plaster sets, the loose plaster burls are scraped off with a putty knife. |
Applying the finish coat
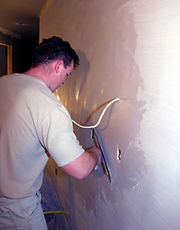
Like the base coat, the finish coat is applied using a two-coat application method. The finish coat should be pressed up tight as it is applied. The main objective when putting on the scratch coat is to get an even thickness with as few trowel lines and cat’s eyes as possible. I always use three strokes to put it on. The first stroke spreads it on, a backstroke presses it in the opposite direction and the third stroke comes back again erasing the trowel line. All three strokes happen in one continuous motion, without the trowel leaving the surface.
The plaster is troweled on in arcs. The reason is that trowels have a slight bow to them. The front edge of the trowel is pressed as the trowel is arced. On the back stroke, the same applies except the back edge gets pressed. Executed correctly true flat surfaces are achievable without trowel lines.
The double is a lighter coat that is applied with just two strokes. I like to leave the surface near perfectly smooth at this point. The fewer times the trowel is run over the surface the better. Over troweling will only make things worse. When the plaster begins to set, it can be water troweled to a smooth finish. The key is to be patient, because if the plaster is troweled too soon, it will pull and drag, causing lumps, ridges, and blisters. I use water sparingly, because too much water can also cause blisters and weaken the plaster. When the plaster begins to turn brown in color (brown out), it begins to harden. At this point we begin hard polishing the surface.
Before calling it a day, we ensure that plaster has been removed from all electrical boxes, that door and window jambs are clean and bottoms are left neat and clean so the baseboard and trim can be installed without the carpenters having to scrape or chip away my plaster. The plaster is now ready for primer and paint. Though the surfaces are left very smooth and polished, the painters should never sand the surface. Sanding is not necessary for the primer to adhere. Sanding will only mar and weaken the hard-packed and polished surface.
Tools for the trade
A plasterer’s trowel is the single most important tool. It should be a flat stainless steel finishing trowel. We use trowels made by Curry Tool (www.currytrowel.com), because they are rigid, yet have just the right amount of flex. The 4 1/2 x 11-in. trowel is very popular with many plasterers because it is easy to control. I use a larger 5 x 14-in. trowel because it covers a lot more area and with a little practice is relatively easy to control. I’ll use the smaller sized trowel for heavy base-coat mixes. For tight spots, I use a midget 3×5 or margin trowel. Contrary to convention we prefer to use new trowels to scratch and double the plaster. Though it is very difficult to plaster with a rigid new trowel, once you get used to it you can achieve flatter surfaces. An old well-worn trowel is best fro smoothing and polishing. A light coat of WD-40 on the tools makes it easy to keep them clean.
A long-handled brush with a five-gallon bucket, one quarter filled with water, is kept handy to clean off the trowels while working. It is important to keep all the tools clean. Dried or set plaster on tools will draw moisture from the fresh wet mix, making it hard to spread smoothly.
Sam Singer operates Avalanche Plastering LLC in Uncasville, Connecticut. Photos: James Kidd
Fine Homebuilding Recommended Products
Fine Homebuilding receives a commission for items purchased through links on this site, including Amazon Associates and other affiliate advertising programs.
Anchor Bolt Marker

100-ft. Tape Measure

Plate Level

View Comments
Amazing idea, and i really liked the way you working here!
Great Information.
It's interesting watching the different methods of application of plasters.
Really interesting information.