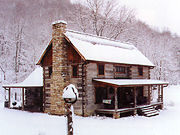
Raising a Hand-Hewn Log Cabin
Unimpressed by manufactured log cabins, this family took matters into their own hands
 A mix of modern technology and 200-year-old construction techniques, along with hidden utilities and salvaged materials, creates the cabin’s authentic look.
Growing up in the Appalachian Mountains of Kentucky, my wife and I have always been fond of old log cabins. For more than 200 years, they have represented Appalachian history and lore. The truth is they’ve become part of the landscape. When we decided to build a home for our family, a log cabin was the obvious choice.
We researched kit homes but found them too modern-looking, too expensive and too limited in design. Encouraged by our family and friends, and inspired by the challenge, we decided to design and build our own.
The project began in 1992 with a design sketched on a yellow Post-It note pad. The initial illustration eventually became a CAD drawing, a floor plan and a log schedule. Neither my wife nor I had any building experience, but six years, two new roads, 167 logs and five salvaged chimneys later, we moved into an authentic-looking, custom-built Appalachian log cabin. Did I forget to mention a lot of hard work?
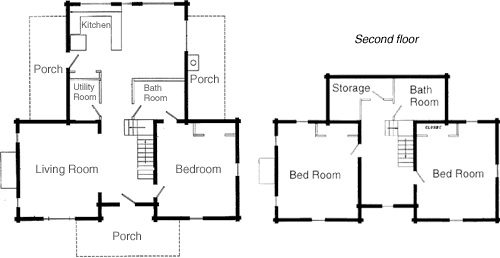
Designing a log cabin means connecting the squares
Appalachian log cabins built in the mid-1700s were simple, boxy and down to earth. Our goal was to capture this look with our cabin while creating a comfortable, energy-efficient interior. Sunlight, views and unrestricted airflow were among our design considerations (see the Floor plan for our final design).
Traditional log cabins, however, are limiting to a designer because of their rectilinear nature. The interior and exterior walls are all part of the same log construction, and rooms must be square or rectangular, and enclosed during construction. Doors and windows are cut out later. These squares and rectangles are called pens, and the trick is to connect them in the most suitable fashion.
We began with two equal-size, independent pens. Each would have two floors for a total of four rooms: a living room and three bedrooms. To save space in the rooms, we put the stairwell in an area called a dogtrot that connects the pens. Unlike a pen, a dogtrot cannot be built independently but is a space created by connecting pens.
Two necessary spaces, a kitchen and bathroom, now needed to be added to our design. For the kitchen, we attached a single-story pen to the rear of the cabin. The kitchen was designed to be the main gathering place with a cathedral ceiling, bathroom and substantial pantry. For extra storage and a second-story bathroom, we added a small pen to the back of the second floor.
Floor plan
Log-cabin construction begins with pens. Pens are square or rectangular areas built first with solid log walls on all sides. Door and window openings are cut afterward. Pens can be adjacent or separate, and are connected by a common roof or dogtrot. The dogtrot, traditionally a breezeway, is between the pens and in this case closed in with connecting log walls.
First floor: Three pens connected by a dogtrot and thoughfully placed doors and windows give the cabin an open feeling with long, unobstructed sightlines.
Second floor: A modified version of the first floor, the second story has two bedrooms, a bathroom and a storage area. But because the third pen has been shrunk, the kitchen below has a cathedral ceiling and tall windows for more light.
Local timber and recycled stone add to the authenticity of the cabin
Once the plans were finalized, we began gathering material. Poplar is the log of choice for cabins because it grows tall and straight. We were fortunate to find a local logging crew harvesting 400 acres of poplar on a nearby mountain. We contracted them to cut and deliver the stock.
We needed 167 straight logs with a minimum diameter of 14 in. The length of the logs ranged from 11 ft. to 25 ft. As a safety measure, we ordered each a foot longer than the finished length we would use.
We had the logs cut in the winter when poplar sap retreats from the tree’s trunk to the roots, making the logs less likely to crack. Seasoning the logs also prevents cracking, so they were stacked and left in the forest shade for a full year after harvest.
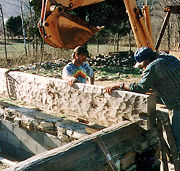
Meanwhile, we began chimney hunting. We needed enough stone for the foundation, a large chimney and a porch. Dilapidated log cabins in the area offered salvageable chimneys to a resourceful scavenger. Gathering chimney stones was a four-phase process of locating suitable chimneys, buying them, dismantling them and transporting them to our site.
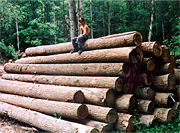 The straight, tall nature of poplar makes it ideal for log cabins. A year in the shade prevents cracking during hewing and construction.
 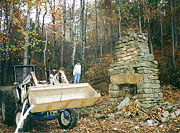 Once surrounded by cabins, abandoned chimneys provide recyclable stone to a resourceful, authorized scavenger.
Logs are like fingerprints: No two are the same
 The most important thing to know is that bark peels most easily in summer. Otherwise, all it takes is a place to start peeling and a lot of elbow grease.
It takes a great deal of strength, control, stamina and experience to hew a log by hand. When we began, we fell short in each area, but it wasn’t long before we could work a log start to finish in only a few hours.
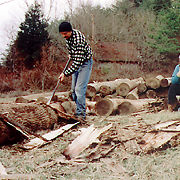
Before logs can be hewn, however, they must be debarked. To remove the bark, we used a spud bar and a shovel. Once all the bark was removed, we stabilized the logs with wedges and marked them for hewing.
Every 6 in. to 8 in., we scored the sections of the wood we needed to remove with a chainsaw. We then used a foot adz to knock off the chunks. After four or five chunks, and in need of a break, we went back and hewed the log down to a smoother surface with a more controlled swing.
Several times along the length of a log, we would have to change the direction of the adz strokes to avoid tearing out a knot, a twist or a change in the grain. Every log is different, and it takes experience to read each one.
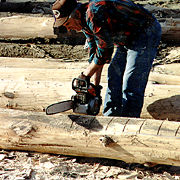 A chalkline marks the finished dimension and acts as a guideline for a chainsaw to score the wood.
 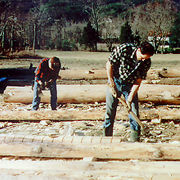 Brawny strokes of the adz remove the bulk of timber. More controlled strokes smooth the surface for a finished look.
All the walls go up together
 Half-dovetail notches are cut as the logs are maneuvered into place with a combination of machine and man power.
 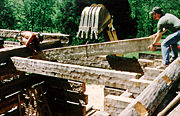 Beams are mortised into the log walls and secured by the next course of logs to support the second floor.
With the stone foundation in place, we began to raise and dovetail the logs. Because the walls are tied together, they are built simultaneously, one complete course at a time. The logs were raised and lowered into place with a backhoe, then maneuvered by hand with cant hooks. Because the logs were hand-hewn and imperfect, varying diameter ends were offset to keep the courses level. A half dovetail notch was rough-cut with a chainsaw and finished with a hand adz. Some logs were removed several times to be shaved for better fit.
When we reached first-floor ceiling height, we installed 6-in. by 12-in. beams every 3 ft. o. c. to support the second floor. The beams were mortised into the logs with a mallet and chisel and eventually secured by the next course of logs.
The final course of logs was the most demanding. Not only did we have to fabricate an extension for the backhoe to reach the final height, but we also had to level the logs in place to install a 2×6 that would anchor the roof trusses. Hewing a log on the ground is hard work. Hewing one 18 ft. in the air, straddling it pigeon-toed, is downright scary.
Chinking brings it all together
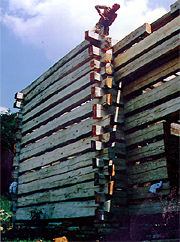 The final course of logs is the most challenging because it has to be leveled in place to support a sturdy roof.
Chinking is the process of sealing gaps between runs of logs. We aimed for 3-in. gaps, but they turned out to be irregular and ranged from 2 in. to 4 in. Although clay traditionally was used for chinking, we insulated the gaps with fiberglass and used mortar instead.
The process begins outside with the installation of heavy wire mesh; the mesh should be taut and recessed from the face of the logs. Nails are pounded in halfway, then bent down to pull the mesh tight. Then, from the inside, the gap is filled with fiberglass insulation, and again wire mesh is nailed into place.
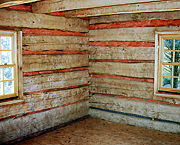 Held in place with wire mesh, fiberglass insulation then is sealed with mortar.
Finally, both sides are sealed with a sand and mortar mix. We mixed the mortar for both consistency and color, and like hewing the logs, we needed some time before we became competent with the mud. My wife and a loyal friend gave up a summer to chinking more that 8000 lin. ft. of logs.
Finishing the cabin inside and out
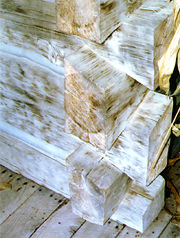 A plumb line and chainsaw made easy work of evening the dovetail ends.
Finishing the cabin began with trimming the dovetails and bleaching the logs. To make the dovetails even, we dropped a plumb line from the top course of logs, marked each one on the way down and cut them with a chainsaw.
The logs and beams were various colors of gray, and some were dirty from rolling around on the ground for two years. We wanted to even out the color of the logs so that they would weather evenly over time. The answer was to clean the logs with a bleach and saltwater solution.
The benefit of bleaching the logs was threefold. The process cleans the logs, evens out the color and deters many insects and fungi. After bleaching the logs, we allowed them to dry for a week. Then we sprayed them with Penatreat. This borax and water solution further cleans and protects the wood.
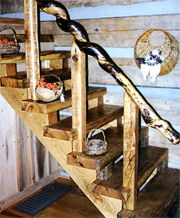 Made with leftover log pieces and a handrail fashioned naturally, the staircase is in keeping with the cabin’s rustic appeal.
The interior finish was a bit different from conventional construction. The cabin has no drywall and no paint. It took a lot of foresight and creative carpentry to hide the electrical wiring, plumbing and ductwork.
Throughout the cabin, the ceilings and most of the floors are tongue-and-groove hardwoods. The bathroom and kitchen floors are tile, and all the cabinetry is custom-made, including the kitchen cabinets, which are salvaged barn board. The stairway was made with the spare log segments removed from the door and window openings, and the handrail was made from the trunk of a sassafras tree that was twisted naturally by a vine.
Howard Farris holds a master’s degree in technical education and is a design specialist at Lexmark International. He lives with his wife and three children in their log cabin in Kentucky. Photos courtesy of Howard Farris; floor plans: Howard Farris


View Comments
It is more than awesome that you have accomplished your dream--as I am in the planning stages of a similar structure as I search knowledge I find it is not as read-ably available as one would think if were at all possible I would love to ask questions maybe more photo's It has always been my dream to build with my own hand's my house for my Family----and hopefully it will look as good as yours