Replacing a Floorboard
A renovation contractor explains how to remove a damaged tongue-and-groove floorboard and install a new one

To remove a damaged board, drill holes across it so you can pry it out in splinters, using a hand chisel. You could also cut into the damaged board by using a circular saw set to the depth of the flooring and then pry out the pieces with a flat bar. To make this pocket cut, rest the heel of the saw on the floor, pull back the saw guard, and slowly lower the front of the saw sole until the turning blade engages the wood. Be careful: Holding a blade guard back is never advisable if you can avoid it, and the saw may jump when it engages the wood. Let the blade stop before you lift the saw.
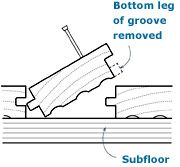
Try to find a replacement board that’s similar in color and grain. Hold the board next to the hole and use a utility knife to mark off the appropriate length. To make the replacement fit more easily, slightly back-bevel its lower edges on a table saw. If the stock is tongue-and-groove, use a tablesaw to cut off the lower leg of the groove. Apply construction adhesive to the underside of the new board, and then drive it into the opening using a piece of scrap to cushion the hammer blows. It’s not possible to nail the board through its tongue, so predrill and face-nail two 6d finish nails at either end. Use a nail set to drive the nails below the surface. Fill the holes with wood putty.
Michael W. Litchfield is a renovation contractor and the author of Renovation, 3rd edition. Drawing by: Vincent Babak


