A Clever Beadboard-Wainscot Corner
Get a seamless-looking beadboard-wainscot corner using a dowel to cover the joint.
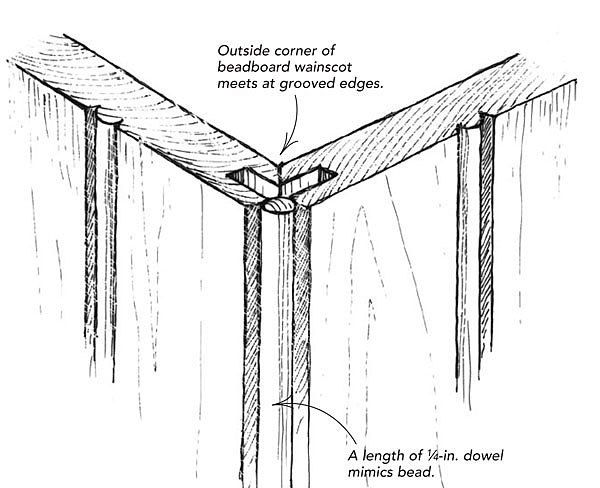
I enjoyed Rick Arnold’s article “Beadboard Wainscot Made Easy” (from FHB #173) but found that one common tricky spot was not addressed: outside corners. The usual way to handle them seems to be to cut the tongue or groove off both sides and have a butt joint at the corner.
I wanted my beadboard to look like it seamlessly rounds the corner. The solution was to orient the tongue-and-groove boards at the corner so that they intersect with grooved edges on both sides. Then I used construction adhesive to fill the resulting gap with a 1/4-in.-dia. dowel, as shown in the drawing.
I used this technique nine years ago in my daughter’s room, in a high-traffic area just inside the bedroom door. The paint has worn off in a couple of places where the dowel has been banged, but the bead has held up well.
— Elise Burgess; Westboro, MA
From Fine Homebuilding #176
RELATED STORIES
- Installing Wainscots
- Rabbeted Baseboards and Top Rails for Beadboard Wainscot
- Beadboard Wainscot Made Easy
Got a Tip?
Do you have any great tips like this one on installing beadboard wainscot around outside corners? Share your methods, tricks, and jigs with other readers. Tag them @FineHomebuilding on social, email them to us at [email protected], or upload them to FineHomebuilding.com/reader-tips. We’ll pay for any we publish.


View Comments
I like it.
I think a pin nailer would be perfect to hold the dowel in place
The illustration shows chamfers imposed on grooved edges, but if the dimensions don't actually favor butting two grooves, the tip will still work with chamfers on the inside corner and square cuts on the outside corner.