6 Rules for Fast and Foolproof Cabinetmaking
A smart design, a few jigs, and some tactical advice will maximize output and minimize mistakes.
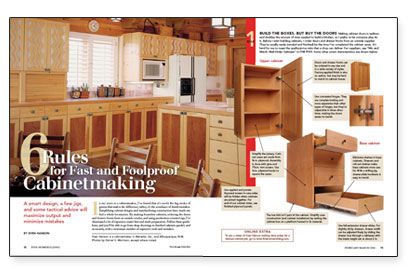
Synopsis: In the old days, cabinet making meant finely tuned hand-crafted joinery, but nowadays with power tools, polyurethane glue, and Sven ”Leastwork” Hanson, it’s not such a daunting task. The information in this article will arm even the least accomplished carpenter with the know-how to design and build simple and strong cabinets for kitchens (the methods are adaptable to many other tasks as well). Through a series of jigs, tips, and tactical advice, Hanson walks us through assembly-line manufacturing for strong and simple cabinets.
In my years as a cabinetmaker, I’ve found that it’s rarely the big stroke of genius that makes the difference; rather, it’s the avoidance of dumb mistakes. Simplifying cabinet designs and standardizing construction have made me feel a whole lot smarter. By making frameless cabinets, ordering the doors and drawer fronts from an outside vendor, and using production-oriented jigs, I’ve eliminated a lot of expensive router bits and stock preparation. Follow these guidelines, and you’ll be able to go from shop drawings to finished cabinets quickly and accurately, with a minimum number of expensive tools and mistakes.
Build the boxes, but buy the doors
Making cabinet doors is tedious and doubles the amount of time needed to build a kitchen, so I prefer to let someone else do it. Before I start building cabinets, I order doors and drawer fronts from an outside supplier. They’re usually ready (sanded and finished) by the time I’ve completed the cabinet cases. It’s hard for me to meet the quality/price ratio that a shop can deliver.
Finish before you start
Edgebanding and applying a finish are best done to big pieces, but not too big. My usual strategy is to rip 4×8 sheets of plywood into 2×8 pieces, a size that’s easy to finish and move. You’ll have to go back and add a little edgebanding after all the parts are cut, but working on 2×8 sheets first will get the work done faster.
Stick with basic dimensions
I begin the process by making a cutlist of all the parts I’ll need (sides, tops, bottoms, backs, etc.) and note the dimensions both on the cutlist and on an unfinished end of the part (ballpoint ink will last). I use basic dimensions that divide well into a plywood panel. To account for the sawkerf, subtract 1⁄8 in. from the following sizes: 6 in. and 9 in. work well for drawers and toe-kick stock; 12 in., 16 in., and 18 in. work well for varying depths of upper-cabinet sides, tops, and bottoms; 24 in. is good for base cabinets
Speed assembly with simple joinery and a low table
Rarely do I rabbet cabinet backs or dado drawer bottoms. Instead, I fasten backs and bottoms directly to the edge of the plywood with polyurethane construction adhesive and nails or screws. When assembling, I use homemade corner blocks and a low assembly table to keep things square and at a comfortable working height.
Use drilling templates
Because I think that base cabinets with shelves are a sin against common sense, I fill them with drawers or roll-out upgrades. But installing all that drawer hardware can be finicky business. I avoid a lot of mistakes by using a full-size template made from 1⁄4-in. plywood or melamine. My template defines the positions of the holes for drawer slides in kitchen base cabinets (three- and four-drawer type), vanity cabinets, and file drawers, too. I simply color-code the holes to minimize mistakes.
For more photos, drawings, and details, click the View PDF button below:


