Build a Craftsman-style Pergola
Durable materials and strong joinery mean this great-looking gateway will be around for a long time
 Janet Delaney
Building a pergola can be a lot like building a piece of fine furniture. The finished product exhibits great craftsmanship while showcasing the beauty of wood. Unlike a cherry Shaker table, though, a pergola is exposed to sun, rain, wind, and snow. It’s important to build one that can weather the elements and live a long life.
Look to the site for inspiration
The pergola shown here consists of four posts supporting a canopy of purlins and joists. With this basic tunnel shape as a starting point, I looked to the house for inspiration because my goal was to integrate the pergola’s design with the site. I wanted to mimic the brackets that support the gable eaves on the main house, so I used 6x6s chamfered to a point and notched over the posts. The corbels beneath these beams were copied from the ones on the house, lending another visual tie-in. To evoke the Craftsman aesthetic, I chose large-dimension stock. Although 2x6s and 2x4s would have worked well for the upper layers, I used 3x dimensions to keep in scale with the 6×6 posts and beams.
I designed the construction details to ensure the pergola’s stability and longevity, and I also wanted to show some level of craft without making the process too difficult or expensive. To guarantee the pergola’s durability further and to enhance its visual appeal, I chose redwood reclaimed from an old bridge. Although I built the canopy in my shop, this pergola could be built on site using the tools most carpenters have in their trucks.
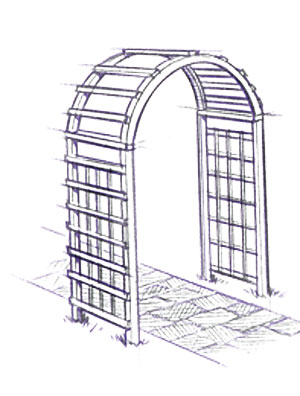
is it a trellis, an arbor, or a pergola?
Although the terms often are used interchangeably, trellises, arbors, and pergolas are distinctly different structures. A trellis is typically a latticework built to support climbing plants or vines. It can be a simple panel attached to the side of a building, or it can be freestanding in a garden or yard. An arbor usually incorporates a trellis into its structure, creating a tunnel-like passageway of climbing plants.
Arbors have a continuous run of latticework from one side of the “tunnel” to the other, often in an arched shape.
Pergolas, too, are designed to support climbing plants. Unlike arbors, though, pergolas simply have posts supporting a rooflike structure. They’re most commonly used to shade a walkway or a deck.
 Arbor
Arbor  Trellis
A layered design with interlocking parts
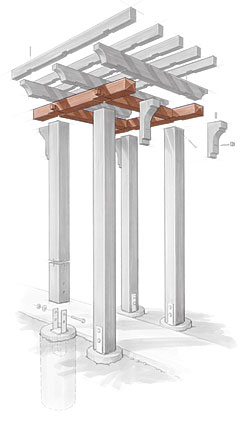
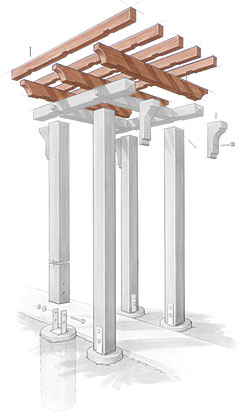
The pergola’s canopy consists of three layers, beginning with the beam assembly that’s anchored to the tops of the posts. Lap joints in the purlins and joists create an interlocking framework that’s strong and attractive.
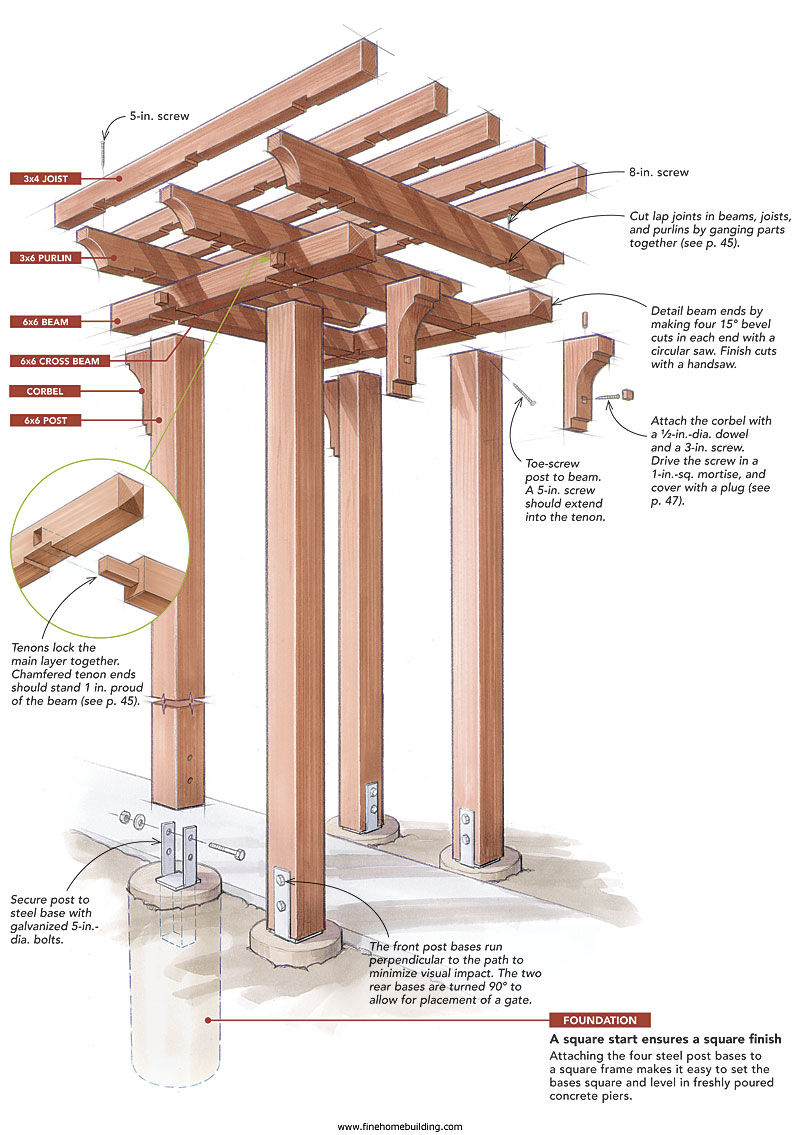
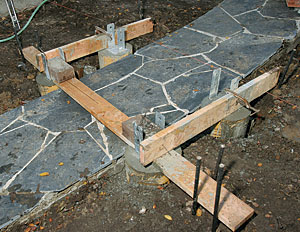
A square start ensures a square finish. Attaching the four steel post bases to a square frame makes it easy to set the bases square and level in freshly poured concrete piers.
Temporary braces keep posts plumb
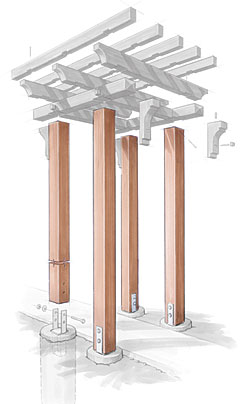
Once the concrete set, I installed the four posts. With the posts braced plumb, properly spaced, and cut to height, I took all the measurements needed to build the canopy in my shop.
![]()
 Bore holes from each side. Center an auger bit in the post base hole while an assistant helps to keep the bit level with a combination square. Bore halfway through the post, then finish the hole from the other side
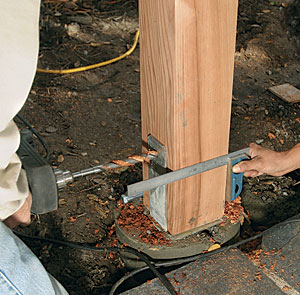
 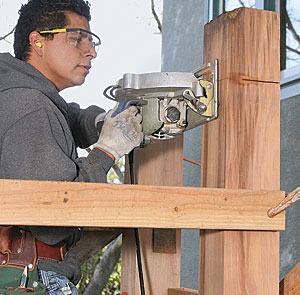 Make this cut carefully. Level top cuts are made with posts in place, two passes for each post. Although it’s not used here, a guide block clamped to the post would support the base of the saw to ensure a precise cut.
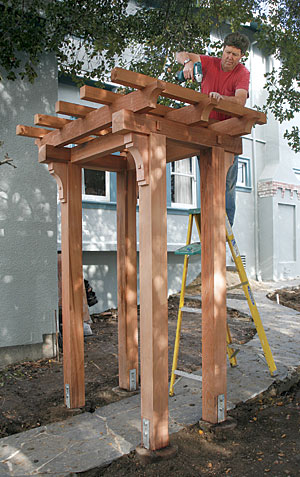
Build the canopy on the ground
With the initial sitework complete and the posts braced plumb as shown above, I took measurements for the beam notches and cross-beam lengths, and headed to my shop to build the canopy.
We began with the main 6×6 beams, which would be notched to fit on the posts. Because the beams and posts would be set flush to each other on the sides, I eased the edges of the notches and the tops of the posts with sandpaper. This treatment expresses the joint and hides small inconsistencies.
The two 4×6 cross beams between the two main beams add structural integrity to the pergola. Mortise-and-tenon joints give the assembly the strength to resist racking, and the shoulders of the tenons set the distance between the posts. The proud through-tenons add visual interest.
I cut the through-mortises in the 6×6 beams with a plunge router equipped with a guide bushing and a straight bit. (This also could be done using a straight bit with a top-mounted bearing.) Between 1⁄4-in.-deep passes, I vacuumed the mortise to keep the router running smoothly. Using a saddlelike plywood jig, I was able to line up the mortise from both sides, leaving it perfectly square so that the cross-beam shoulder sits flush with the beam.
We cut the tenons on a tablesaw and cleaned up the tenon cheeks with a block plane, a chisel, a rasp, and a sanding block until they slipped into the mortises without binding.
After cutting the 3×6 purlins to length, we used a pattern to mark the curved ends, then made the cuts on a bandsaw. We used a drum sander to smooth out the saw marks. Next, we laid the 3×6 purlins on the beam assembly, centering them over the beams and scribing notch locations with a marking knife. The 3⁄4-in.-deep lap joints lock the beams tight to the cross beams.
The topmost layer consists of five 3×4 joists placed over the 3x6s. The layout again began with finding the center of the lower layer. Once the 3x4s had been cut to length, I finished the ends with a simple 1⁄4-in. chamfer.
The canopy goes together with lap joints, mortises, and tenons
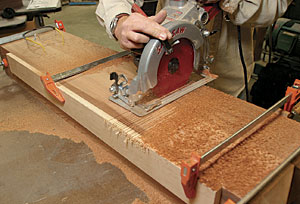
The technique I use to notch the beams also works for lap joints in the purlins and joists. I cut lap joints with the parts ganged together, using a sacrificial piece of plywood to eliminate tearout.
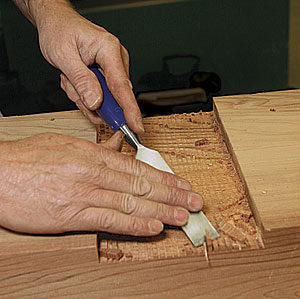 After knocking out the waste with a hammer, finish with a chisel.
 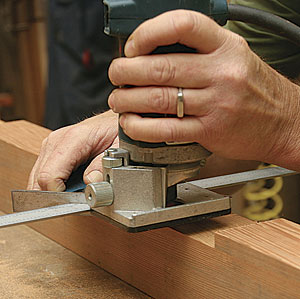 Use a trim router and a combination square to fine-tune the fit.
Mortises
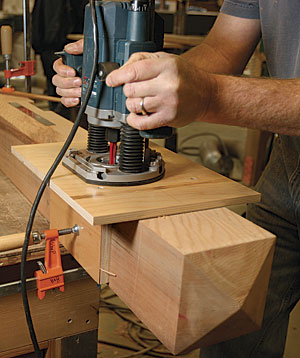 Rout through-mortises from both sides. With a guide bushing and a plywood jig clamped to the beam, plunge-cut the mortises in 1⁄4-in. stages, removing debris after each full pass.
 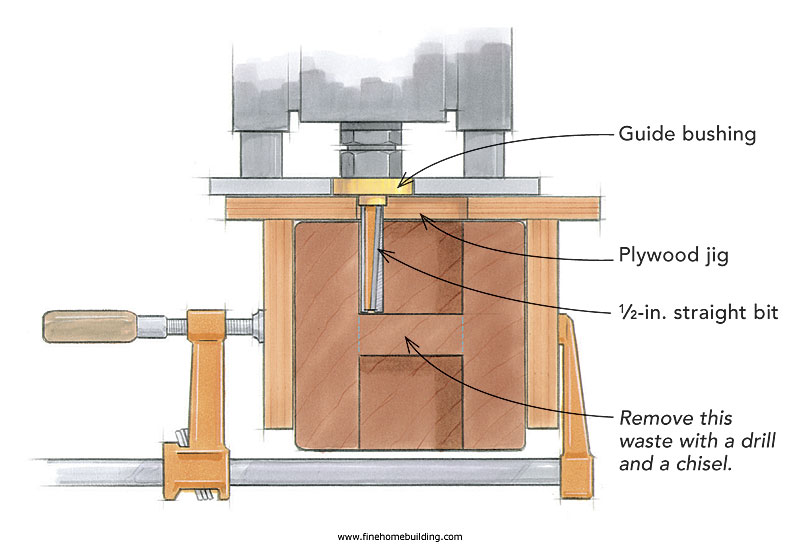 Once each side is routed as deeply as the bit can reach, remove the remaining waste with a drill bit and a chisel. Square the mortise corners with a chisel and a rasp.
Tenons
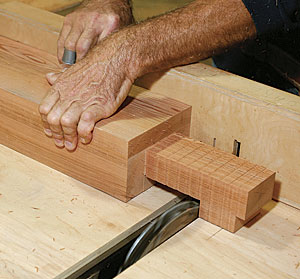 Cut tenons with a crosscut sled. Made of plywood, the sled rides on runners that fit in the tablesaw’s miter-gauge grooves. Cut the tenon shoulders first, using a finish-cutting blade. Then switch to a stacked dado set to maximum width, and make multiple passes to cut each tenon cheek. For an easier fit, use a utility knife to pare out the section of tenon corners that won’t be visible.
 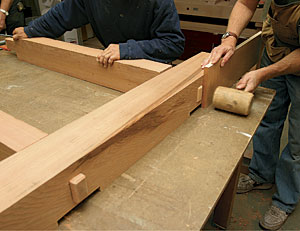 Test-fit, adjust, and assemble. Chamfer the tenon ends, and use a handplane to trim the tenon if the fit is too snug. Then coax the joints together with a wood mallet and scrap block.
Hidden fasteners lock the layers together
Once all the pieces are cut, I lay out everything on a table, then mark and label the pieces. Fine-tuning the notches happens now, too, so that assembly goes smoothly at the site.
 Add the purlins and joists. Any adjustments to lap joints are made on the ground in the dry-fit/layout stage.
 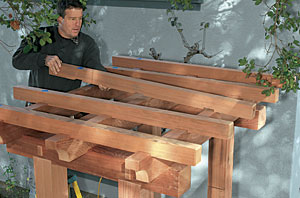 Here, the top layer locks the bottom layer in place. Install long screws from above to keep the joints tight.
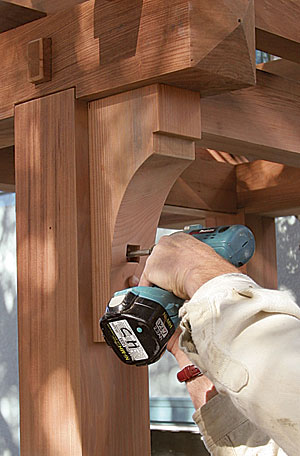
Corbels complete the details
The final pieces cut were the four corbels. I made a stiff paper template from a tracing of an existing corbel on the house and used it to draw the four corbels on pieces of 4×6 redwood. These pieces were cut on the bandsaw and cleaned up on belt and drum sanders. I used a hollow chisel mortiser to cut 1-in. sq. mortises about 1 in. deep in the faces of the corbels. I then made square plugs with finished, chamfered ends to fit snugly into these holes.
Assemble the beams and cross beams
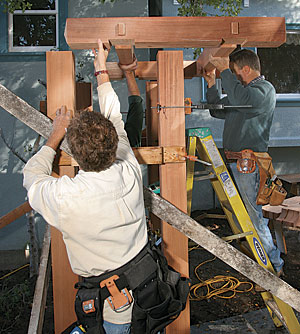
Careful, precise work in the shop ensures that the assembly work on site goes smoothly. With all parts cut and ready, it was time to assemble the canopy on the posts. We kept the beam-and-cross-beam assembly together, lifting it onto the posts as a unit. A small amount of fussing resulted in the beam notches sliding cleanly over the posts. We clamped the beams tight to the cross beams and set the 3×6 purlins in place over the beams. The layer of 3×4 joists was assembled in the same way, resulting in a rigid structure that locked in place without fasteners.
When the final position of all pieces was established, we fixed the beams to the posts with 5-in.-long exterior screws. By drilling pilot holes up at an angle from the face of the posts into the beams, we were able to catch the tenons as well. These screws were countersunk, and the heads later were covered by the corbels. We used 8-in. screws to fasten the purlins to the beams and 5-in. screws for the joists. Screws were countersunk slightly, and the holes were filled with silicone after the wood was coated with clear finish.
With the fence and gates installed, the pergola is now the centerpiece of the garden. My clients and I eagerly await the arrival of the final touch, clusters of white wisteria gracefully entwined in the redwood canopy.

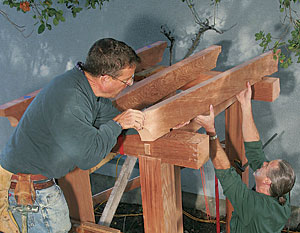
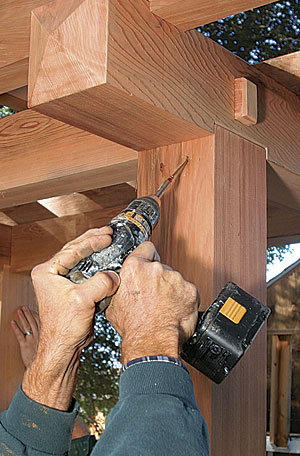 Toe-screw posts to the beam assembly. Drill pilot holes and drive two 5-in. screws through each post and into the tenon. This permanently secures the canopy to the posts.
 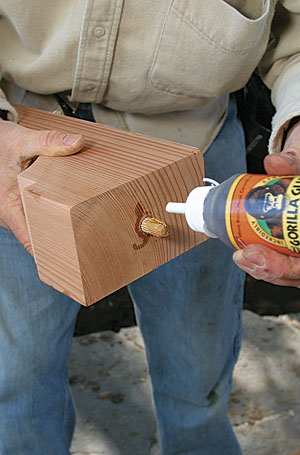 Install the corbels with hidden fasteners. To locate the dowels accurately, use a dowel center, pressing the corbel up into the beam at the desired location on each post. Before inserting the dowel in the corbel, dip it in water and coat both ends with exterior-grade polyurethane glue.
 A screw through the mortise locks the corbel in place.
 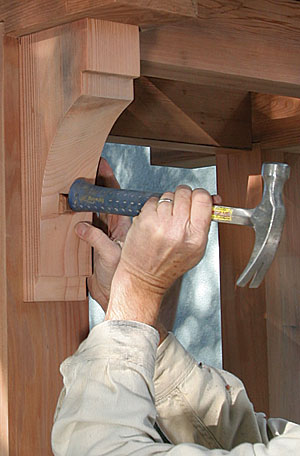 Finally, glue a plug into the mortise to hide the screw head and to mirror the through-tenons
Chip Harley is a principal in the design/build firm Holland & Harley Construction Inc. in Berkeley, Calif. Photos by Christopher Ermides, except where noted.