FHB Logo Facebook LinkedIn Email Pinterest Twitter X Instagram Tiktok YouTube Plus Icon Close Icon Navigation Search Icon Navigation Search Icon Arrow Down Icon Video Guide Icon Article Guide Icon Modal Close Icon Guide Search Icon Skip to content
Subscribe
Log In
  • How-To
  • Design
  • Tools & Materials
  • Restoration
  • Videos
  • Blogs
  • Forum
  • Magazine
  • Members
  • FHB House
  • Podcast
Log In

Fine Homebuilding Project Guides

Finish & Trim Carpentry

Guide Home
  • Trim Design
  • Tools and Materials
  • Interior Trim Basics
  • Window and Door Casings
  • Baseboard and Crown Molding
  • Wainscot and Paneling
  • Mantels and Fireplace Surrounds
  • Coffered Ceilings
How-To

Salvaging Old Trim for Reuse

Learn how to pry baseboard trim from walls without damaging either one.

By Tom O'Brien Issue 178
  • X
  • facebook
  • linkedin
  • pinterest
  • email
  • add to favorites Log in or Sign up to save your favorite articles

Renovation work often means removing trim elements that then must be saved and reused. This work is considered rough carpentry, but it ought to be treated like surgery, a series of deliberate steps that employs a variety of small pry bars. Leave the sledgehammer in the tool shed, and use a big wrecking bar only as a last resort. Replicating a short length of carelessly destroyed molding is expensive, as is patching a damaged wall. When a molding is to be put back in the same place, prevent confusion by numbering pieces according to their location. And for safety’s sake, be aware that any moldings installed before 1978 might be covered with lead-based paint. For information about how to work safely around lead-based paint, read Lead-Paint Safety, at Home and on the Job  from Fine Homebuilding Issue #150 (Oct/Nov 2002), pp. 66-73.

Start small with the pry bars

using pry bars

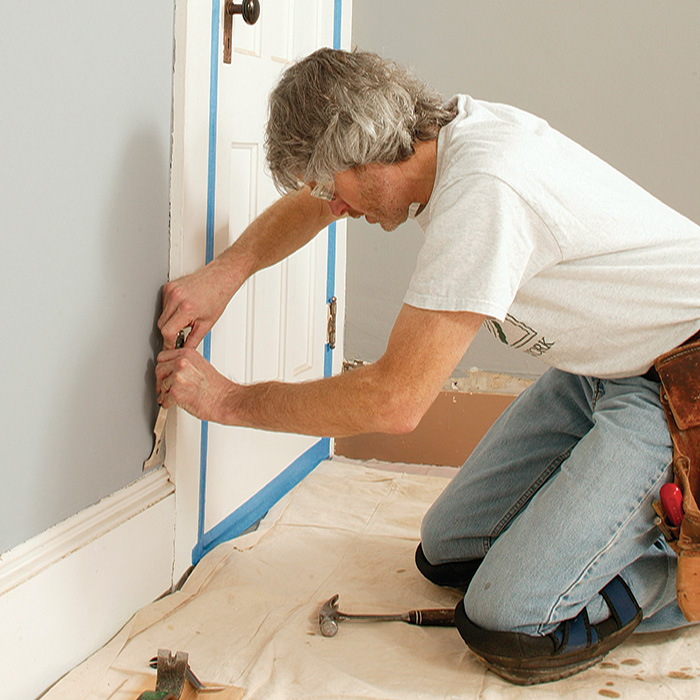
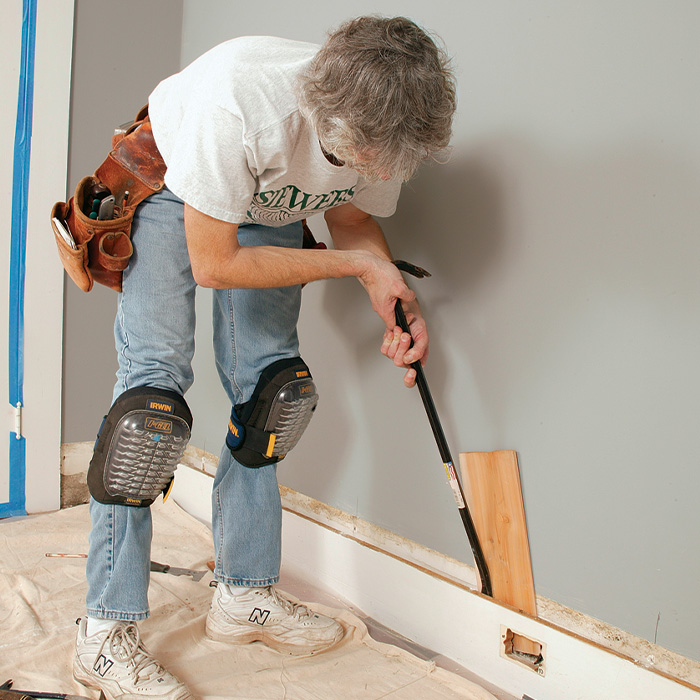
Step 1: Cut the paint first. Multiple layers of old paint can fasten trim as securely as nails. To ease removal and to prevent damage to adjacent surfaces, cut through the joints with a sharp utility knife. To prevent having to change blades constantly—old paint is rough on knife blades— keep a pocket-size sharpening stone on hand to regain the edge quickly.

cutting through the joints with a sharp utility knife
putty knife

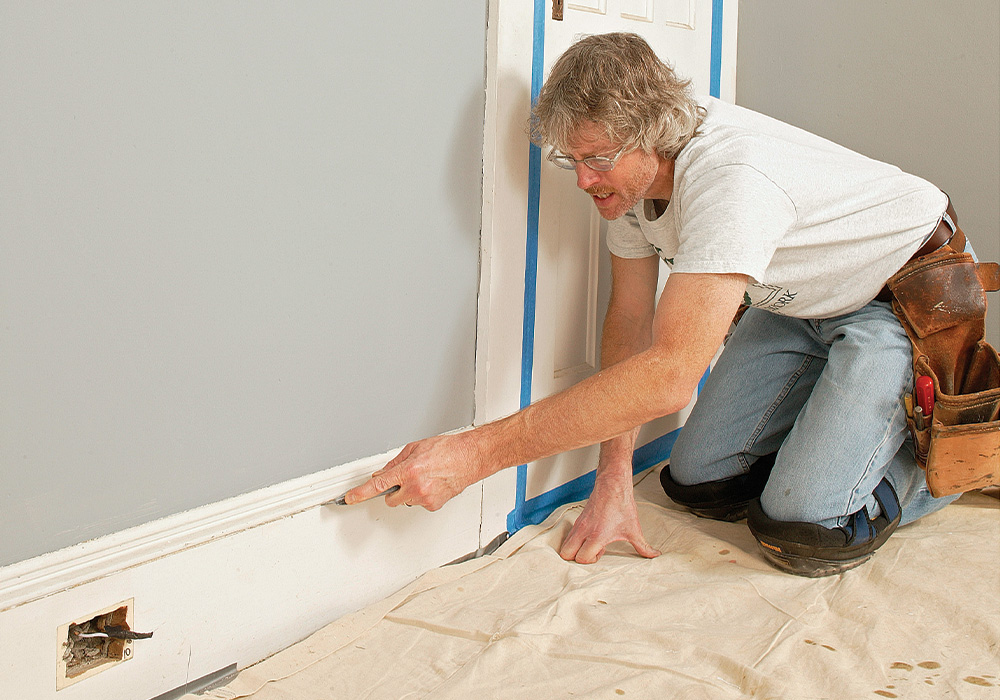
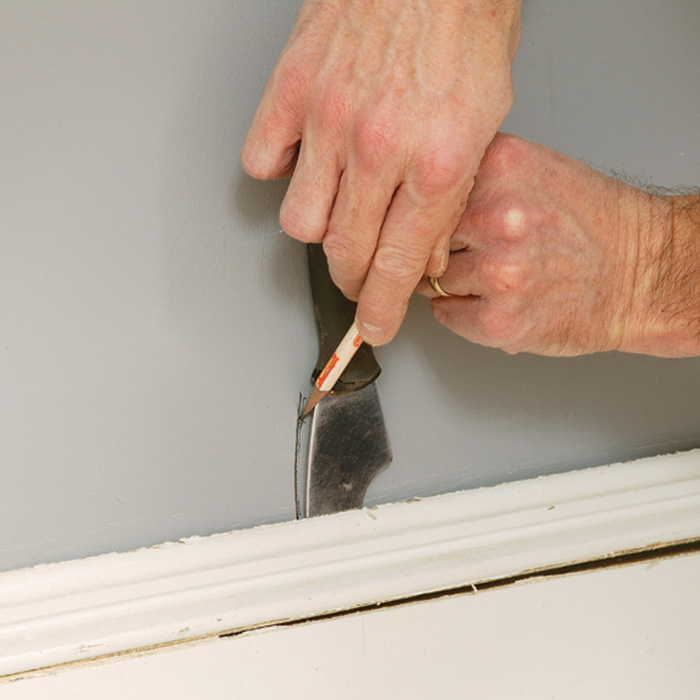
Step 2: Putty knife precedes pry bar. With its thin, stiff blade and sharp, knife-like edge, a painter’s 5-in-1 putty knife is the ideal tool to divide wood from plaster. Slip the knife behind one end of the trim—tap the handle with a hammer if it needs a bit of persuasion—and wiggle the tool back and forth until the gap is wide enough to insert a thin pry bar.

marking stud location putty knife and pry bar

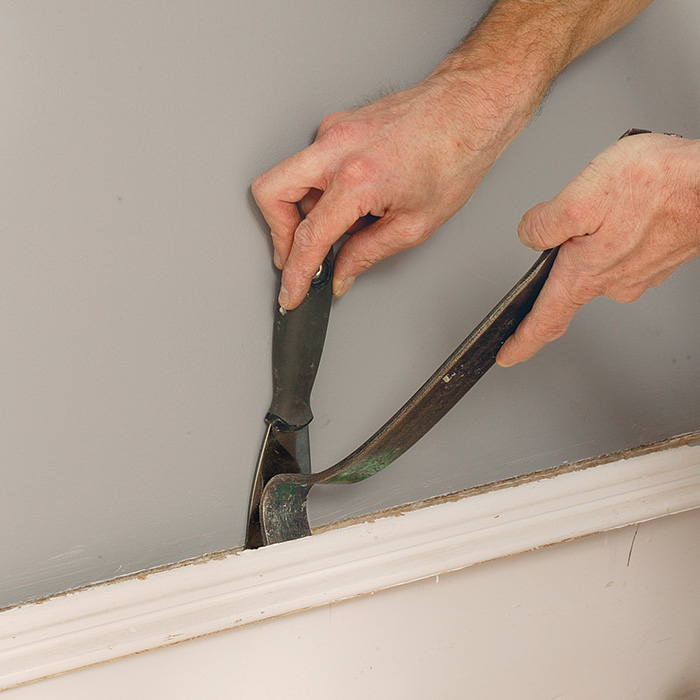
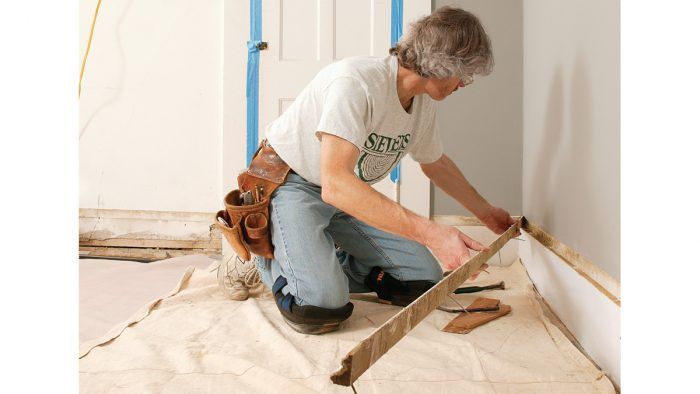
Step 3: Use framing for support when prying. Slide the knife behind the molding until it hits a nail, then mark the stud location for future reference. To prevent plaster damage, pry directly over the studs, and always back up the pry bar with the 5-in-1, or a wider knife if necessary. To avoid splitting the wood, apply leverage slowly, and stop when the molding hangs up on the next nail down the line. Depending on the length of the nails, you may have to switch to a full-size flat bar to draw them completely free of the wall.

Indispensable tools for trim removal

pry bars

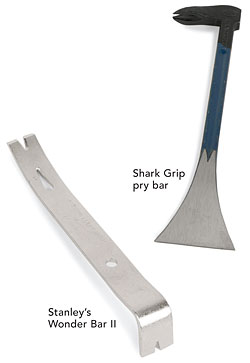
The hardest part about removing trim in good condition is getting started. For that, you need a wafer-thin pry bar that can slide into the tiniest gap between wood and plaster and still provide enough leverage to widen that gap. For years, the clear choice was Stanley’s Wonder Bar II (www.stanleyworks.com). This miniature flat bar is effective, and it’s available at almost every hardware store and home center. A newer arrival from Japan is the Shark Grip pry bar (www.sharkcorp.com). The 8-in. version is the same length as the Stanley (both fit easily in a tool pouch), but its blade is wider and sharper. (Larger models are also available.) A serious renovator should own both of these tools.

Larger trim demands bigger tools

bigger tool for trim

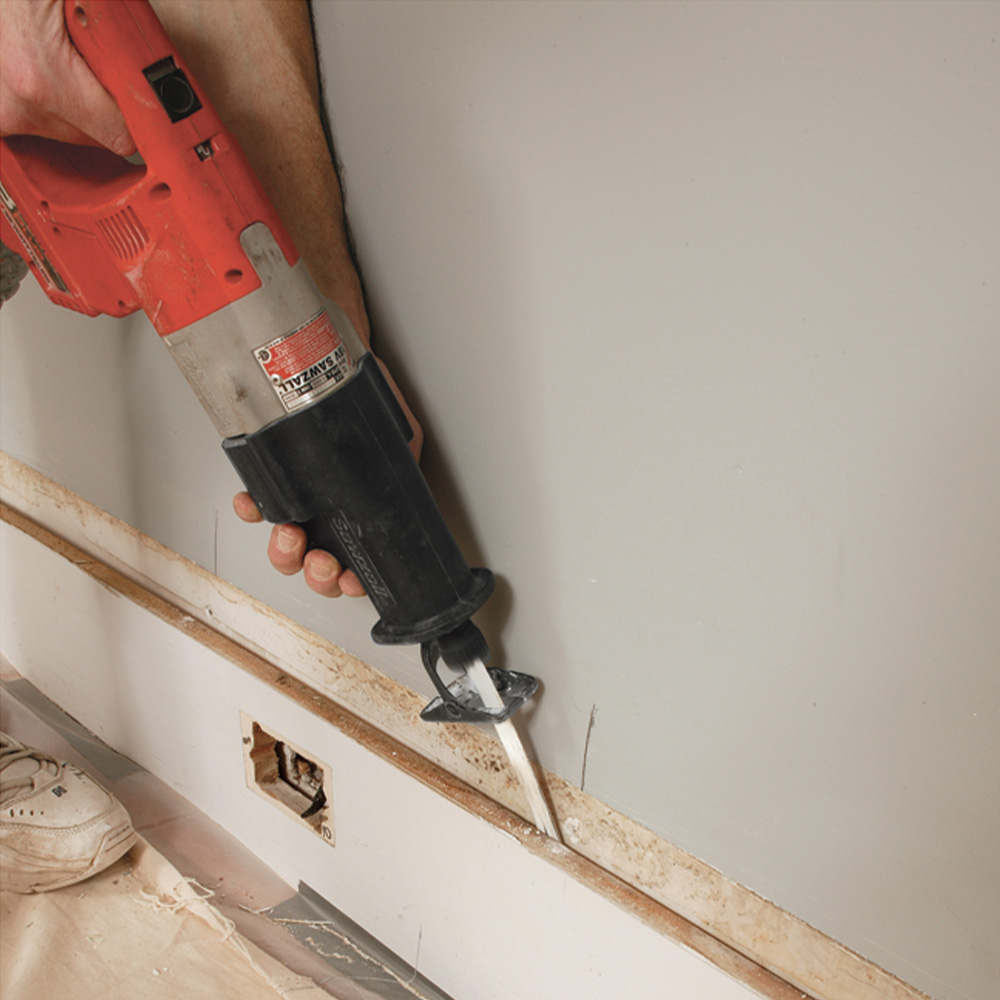
Step 4: Cut the nails, cut the resistance. Compared to simple moldings, large items such as baseboards, casings, and door jambs require substantial leverage to detach. Use pry bars to open a slight (1/16 in.) gap, then slip in a metal-cutting reciprocating saw blade, and chop off as many nails as you can reach.

full size wrecking bar
flat pry bar

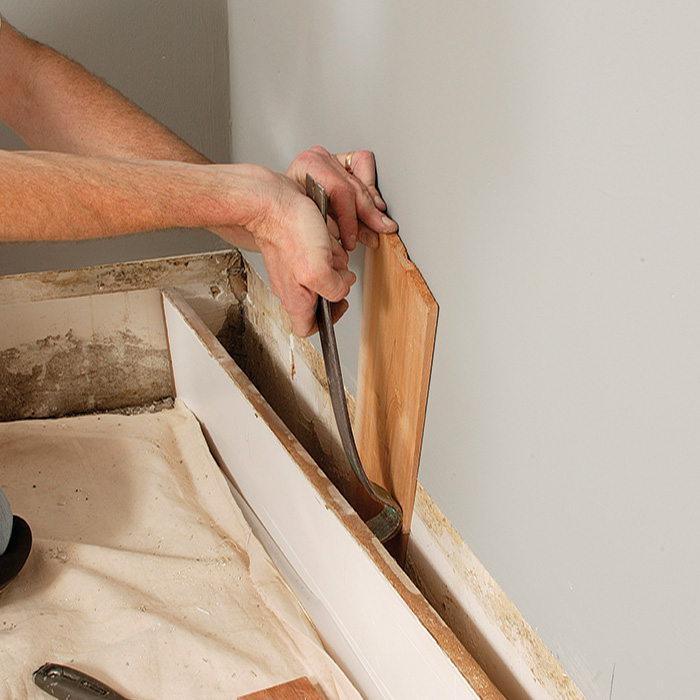
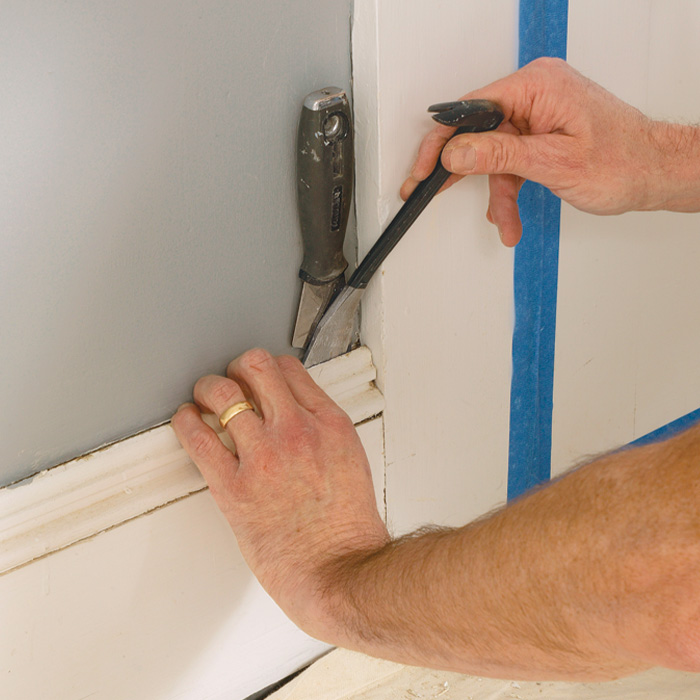
Step 5: Bigger bars, more leverage. Place the flat bar over a wide shim shingle to protect the plaster better, and force open at least a 1/2-in. gap. At this point, if the trim refuses to pop off easily, insert the business end of a full-size wrecking bar in the gap, and allow the tool to provide the leverage necessary to get the job done.

Prep trim for reuse

pulling out nails with end clippers
scrapping off excess paint

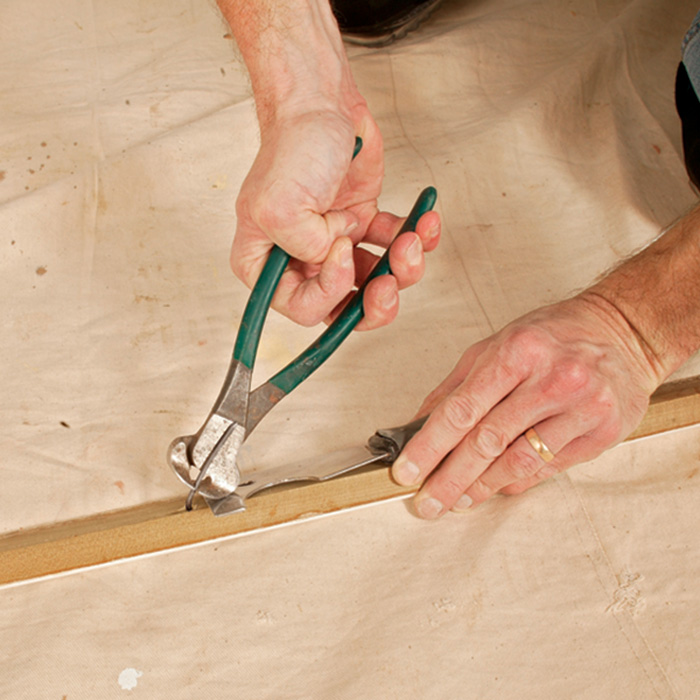
Step 6: Cleanup and repairs are best done immediately. After the molding is free but before it’s put away for storage, extract the nails by pulling them out through the back side using a pair of end nippers. This is also the time to scrape off excess paint that might interfere with re-installation and to inspect for damage.

repairing splits with clamps and glue

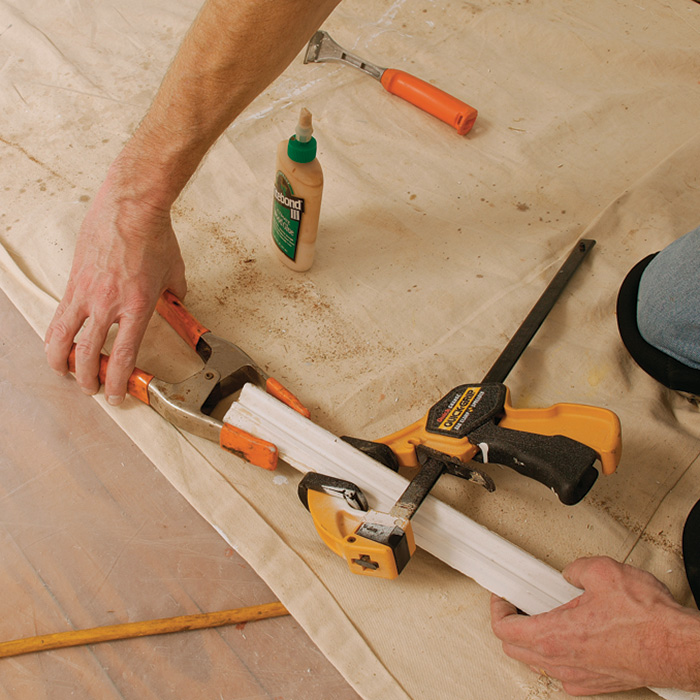
Step 7: Repair splits and cracks easily with a dab of glue and a clamp or two.

Photos by: Charles Bickford

From Fine Homebuilding #178

Previous: Retrofitting a Skirtboard Next: Crown-Molding Fundamentals

Guide

Finish & Trim Carpentry

Chapter

Baseboard and Crown Molding

Sign up for eletters today and get the latest how-to from Fine Homebuilding, plus special offers.

Signing you up...

This site is protected by reCAPTCHA and the Google Privacy Policy and Terms of Service apply.
See all newsletters
See all newsletters

Log in or create an account to post a comment.

Sign up Log in

Become a member and get full access to FineHomebuilding.com

Finish & Trim Carpentry

Finish & Trim Carpentry

Trusted, comprehensive guidance from the pros for creating perfect trim details in any room of the house

View Project Guide

View All Project Guides »

Become a member and get unlimited site access, including the Finish & Trim Carpentry Project Guide.

Start Free Trial

Trim Design
  • Trim Style and Design
Tools and Materials
  • Tools
  • Materials
Interior Trim Basics
  • Tips and Tricks
  • Techniques
  • Using Jigs
Window and Door Casings
  • Windows
  • Doors
Baseboard and Crown Molding
  • Baseboard
  • Crown Molding
  • Specialty Crown Situations
Wainscot and Paneling
  • Beadboard Wainscot
  • Paneled Wainscot
  • Chair Rails
  • Wall Treatments
Mantels and Fireplace Surrounds
  • Design
  • Installing Mantels and Surrounds
Coffered Ceilings

Fine Home Building

Newsletter Sign-up

  • Fine Homebuilding

    Home building tips, offers, and expert advice in your inbox.

  • Green Building Advisor

    Building science and energy efficiency advice, plus special offers, in your inbox.

  • Old House Journal

    Repair, renovation, and restoration tips, plus special offers, in your inbox.

Signing you up...

This site is protected by reCAPTCHA and the Google Privacy Policy and Terms of Service apply.
See all newsletters

Follow

  • Fine Homebuilding

    Dig into cutting-edge approaches and decades of proven solutions with total access to our experts and tradespeople.

    Start Free Trial Now
    • Facebook
    • Instagram
    • X
    • LinkedIn
  • GBA Prime

    Get instant access to the latest developments in green building, research, and reports from the field.

    Start Free Trial Now
    • Facebook
    • YouTube
  • Old House Journal

    Learn how to restore, repair, update, and decorate your home.

    Subscribe Now
    • Facebook
    • Instagram
    • X

Membership & Magazine

  • Online Archive
  • Start Free Trial
  • Magazine Subscription
  • Magazine Renewal
  • Gift a Subscription
  • Customer Support
  • Privacy Preferences
  • About
  • Contact
  • Advertise
  • Careers
  • Terms of Use
  • Site Map
  • Do not sell or share my information
  • Privacy Policy
  • Accessibility
  • California Privacy Rights

© 2025 Active Interest Media. All rights reserved.

Fine Homebuilding receives a commission for items purchased through links on this site, including Amazon Associates and other affiliate advertising programs.

  • Home Group
  • Antique Trader
  • Arts & Crafts Homes
  • Bank Note Reporter
  • Cabin Life
  • Cuisine at Home
  • Fine Gardening
  • Fine Woodworking
  • Green Building Advisor
  • Garden Gate
  • Horticulture
  • Keep Craft Alive
  • Log Home Living
  • Military Trader/Vehicles
  • Numismatic News
  • Numismaster
  • Old Cars Weekly
  • Old House Journal
  • Period Homes
  • Popular Woodworking
  • Script
  • ShopNotes
  • Sports Collectors Digest
  • Threads
  • Timber Home Living
  • Traditional Building
  • Woodsmith
  • World Coin News
  • Writer's Digest
Active Interest Media logo
X
X
This is a dialog window which overlays the main content of the page. The modal window is a 'site map' of the most critical areas of the site. Pressing the Escape (ESC) button will close the modal and bring you back to where you were on the page.

Main Menu

  • How-To
  • Design
  • Tools & Materials
  • Video
  • Blogs
  • Forum
  • Project Guides
  • Reader Projects
  • Magazine
  • Members
  • FHB House

Podcasts

  • FHB Podcast
  • ProTalk

Webinars

  • Upcoming and On-Demand

Podcasts

  • FHB Podcast
  • ProTalk

Webinars

  • Upcoming and On-Demand

Popular Topics

  • Kitchens
  • Business
  • Bedrooms
  • Roofs
  • Architecture and Design
  • Green Building
  • Decks
  • Framing
  • Safety
  • Remodeling
  • Bathrooms
  • Windows
  • Tilework
  • Ceilings
  • HVAC

Magazine

  • Current Issue
  • Past Issues
  • Magazine Index
  • Subscribe
  • Online Archive
  • Author Guidelines

All Access

  • Member Home
  • Start Free Trial
  • Gift Membership

Online Learning

  • Courses
  • Project Guides
  • Reader Projects
  • Podcast

More

  • FHB Ambassadors
  • FHB House
  • Customer Support

Account

  • Log In
  • Join

Newsletter

Get home building tips, offers, and expert advice in your inbox

Signing you up...

This site is protected by reCAPTCHA and the Google Privacy Policy and Terms of Service apply.
See all newsletters
See all newsletters

Follow

  • X
  • YouTube
  • instagram
  • facebook
  • pinterest
  • Tiktok

Join All Access

Become a member and get instant access to thousands of videos, how-tos, tool reviews, and design features.

Start Your Free Trial

Subscribe

FHB Magazine

Start your subscription today and save up to 81%

Subscribe

We hope you’ve enjoyed your free articles. To keep reading, become a member today.

Get complete site access to expert advice, how-to videos, Code Check, and more, plus the print magazine.

Start your FREE trial

Already a member? Log in

Privacy Policy Update

We use cookies, pixels, script and other tracking technologies to analyze and improve our service, to improve and personalize content, and for advertising to you. We also share information about your use of our site with third-party social media, advertising and analytics partners. You can view our Privacy Policy here and our Terms of Use here.

Cookies

Analytics

These cookies help us track site metrics to improve our sites and provide a better user experience.

Advertising/Social Media

These cookies are used to serve advertisements aligned with your interests.

Essential

These cookies are required to provide basic functions like page navigation and access to secure areas of the website.

Delete My Data

Delete all cookies and associated data