Build a Chinese Railing
This alternative to balusters is attractive and easy to assemble.
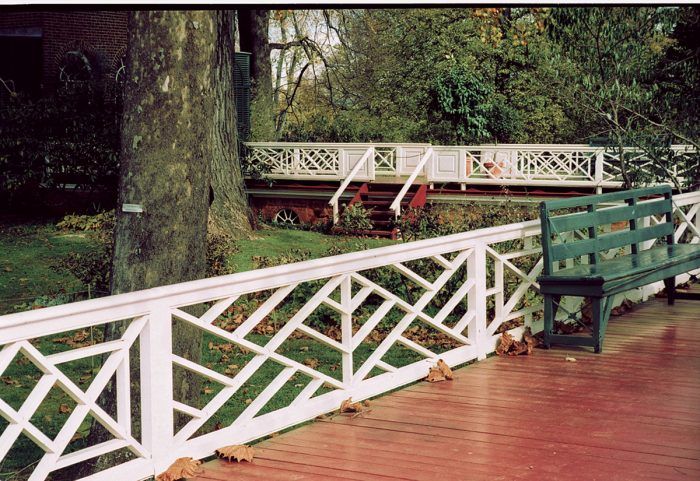
Synopsis When he designed Monticello, architect/statesman Thomas Jefferson borrowed ideas from a book of Chinese architecture and incorporated them into railings, trim details, and garden furniture. Contributing editor Scott McBride uses this same detail to build decorative panels for porch railings. This article describes his layout and construction techniques to make this attractive, easily assembled project.
In Central Virginia, a region known for its architectural landmarks, one of the most famous is Monticello, the home of America’s first great architect, Thomas Jefferson. According to the book Jefferson’s Monticello by William Adams, Jefferson probably was influenced by a pattern book of the day titled Designs of Chinese Buildings. Evidence of this influence can be seen in the striking geometric railings used in various locations on the estate.
I recently used a similar design for a set of wooden panels that cover the lower half of a screened porch. The panels are a lively alternative to conventional balusters and allow a floor-to-ceiling view. Functionally, the panels protect screens from dogs and errant projectiles. They also have the practical advantage of being self-bracing because of their triangulated configuration.
First make a pattern, then cut
Despite their complicated appearance, these railings aren’t too difficult to build. My first step was to draw a full-scale layout on a large piece of drywall: the perimeter first, followed by the long diagonals. This task divided the panel into triangular quadrants. The two intermediate rails for each quadrant then were drawn parallel to the diagonals. I sped up the drawing process by using a board as both a straightedge and a spacer. I found that a 1×4 board created a pleasing interval between rails.
After the layout was complete, I made a sample of each part and a cutlist. I chose 1-1⁄2-in.-thick clear cedar for this project, but you also could use redwood, cypress, mahogany, or synthetic lumber. However, I won’t recommend that you use pressure-treated yellow pine, which is unstable and has a coarse grain that’s vexing to work.
Stainless: the fastener of choice
The pieces were butted and fastened with stainless-steel square-drive trim-head screws. Screwing directly into end grain doesn’t make a strong attachment. Most of these joints are oblique, however, and the screws enter at a somewhat cross-grain angle.
To avoid splitting the wood, pilot holes are required for all trim-head screws. I used scrapwood to determine the proper diameter bit to use. Too small a hole causes the head to strip, and too large a hole weakens the grip. If the pilot hole is sized properly, the head sets neatly about 1 ⁄16 in. below the surface. After priming the panels, I filled the screw holes with glazing compound.
I finished the panels with a water repellent followed by an oil-based primer and a high-quality acrylic topcoat. The panels are mounted on the exterior against the screen, surrounded by a 3⁄4-in. by 1-1⁄8-in. stop nailed to 6×6 corner posts or 2×4 intermediate posts. Turn buttons make the panels easily removable so that leaves and other debris can be accessed. The finished panels proved to be remarkably sturdy and, as an unexpected bonus, cast bold shadows on the porch floor.
For more photos, drawings, and details, click the View PDF button below:
Fine Homebuilding Recommended Products
Fine Homebuilding receives a commission for items purchased through links on this site, including Amazon Associates and other affiliate advertising programs.

4-Gallon Piston Backpack Sprayer
Angel Guard Deck Demon
Standard Marking Chalk


