
Doghouse Dormers: Framing From the Ground Up
Assembling parts on the ground and cutting the roof at the last minute provide a low-stress route to a high-value project.
Synopsis: Doghouse dormers can be the perfect accent to many house styles. Rhode Island builder and Fine Homebuilding contributing editor Rick Arnold shows his technique for cutting and assembling doghouse-dormer parts on the ground to minimize rooftop assembly time — and also to minimize the duration that a house’s interior is open and at risk to the elements. Arnold highlights the process with details about how he calculates a precise roof pitch, then uses the Pythagorean theorem to determine dimensions for framing members and dormer parts. Included are sidebars about dormer design and the California valley that Arnold uses when installing a doghouse dormer.
One of the most popular ways to open the dark, cramped upper level of a house is to build one or more dormers. From a homeowner’s point of view, these small additions can increase curb appeal and create more-hospitable living space in the top level of a house. From a builder’s point of view, dormers concentrate almost all aspects of residential framing into one small package. Like any building project, the success of constructing dormers depends on precise calculations, careful planning, and some smart assembly work. Trust me, the last thing you want is to be on the roof trying to figure out why the wing wall won’t fit while a rain cloud hovers overhead, waiting to take advantage of that big hole in the roof.
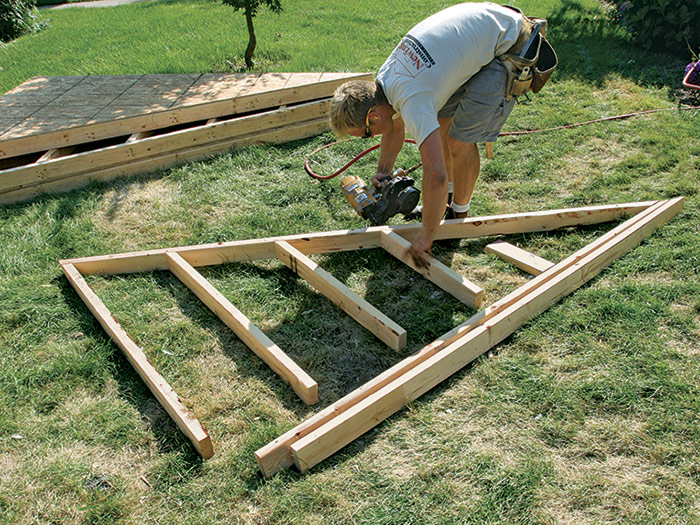
This system is safer because it reduces the amount of time I’m measuring and building on the roof, and it also minimizes the number of trips to the ground to make cuts. My system also lowers the level of stress that comes with having a roof that’s open to the elements for an extended period of time. The trade-off is that all the measurements have to be as accurate as possible. Many of the calculations build off one another, and a sloppy measurement in one step throws off the math in the many steps that follow. It sounds daunting, but most of the components of a doghouse dormer can be found by dividing the framing components into a series of triangles, and then calculating the missing dimensions.
Check the existing pitch on site
I always start a dormer project by verifying the pitch of the existing roof. I don’t want to assume that I know the pitch, then cut and build all the dormer components only to discover that the dormer doesn’t fit correctly. Trusting the plans is tempting, but you might end up missing an abnormality like the 7 1/8-in-12-pitch roof on this project.
The most accurate process is to measure the total rise and total run from inside the attic. This project took place in an attic that was being remodeled, so the rafters, the subfloor, and the main ridge all were exposed. This made it easy to get precise rise and run measurements. If the framing had not been exposed, I would have cut back the drywall at the proposed dormer opening and measured the roof pitch there. That said, I prefer to have the rafters exposed so that I can take the largest set of measurements possible. The longer the two sides of the triangle (rise and run) that you are measuring, the more accurate the numbers will be.
Roof pitch and window height determine the wing-wall dimensions
Once I know the pitch of the existing roof, I need to calculate one of the two sides that make up the dormer’s triangular wing wall. I begin with the height of the front wall, which often is driven by the window height.
On this project, the homeowner wanted the dormer window to be about 3 ft. 6 in. tall. That would require a rough opening of 3 ft. 7 1/2 in. to allow for window installation. As a rule, I keep dormer-window openings at least 6 in. above the main roof, leaving room for proper flashing, and about 6 in. below the top plate of the front wall so that the top of the window lines up near the bottom of the dormer’s soffit. Adding the numbers, I end up with a front-wall height of 4 ft. 7 1/2 in. Now I can combine the height of the wing wall with the pitch of the roof and simply solve for the missing pieces.
Dormer roof is based on the available space
To figure the size of the dormer roof, I have to determine how much room I have between the top of the dormer walls and the top of the existing roof ridge. A dormer-roof ridge that comes too close to the existing main-roof ridge not only will look out of proportion but also will be much harder to flash and shingle properly.
For this project, the ceiling height was limited in the attic by a series of collar ties, which were 7 ft. 6 in. off the subfloor; so I installed the dormer wing walls so that the top of the top plate would be level with the bottom of the existing collar ties. I also added about an inch of wiggle room to the height of the dormer ceiling; experience has taught me that it’s unusual to find old collar ties that are perfectly level and in line with each other.
Knowing that the distance from the top of the main-roof ridge to the surface of the subfloor was 10 ft. 7 in., I subtracted the existing ceiling height of 7 ft. 6 in. and was left with just over 3 ft. from the wing-wall top plates to the existing main-roof ridge.
The plans for this project called for a dormer-roof pitch of 6-in-12. I always make sure that the dormer ridge intersects the existing roof at least 8 in. below than the existing main ridge to avoid the flashing and aesthetic problems of trying to intersect two shingled ridges.
I knew from previous calculations that the overall width of the dormer (including the 1⁄2-in. sheathing on each side) would be 6 ft. 1 in. I divided that number in half, then used it to find the dimensions of the dormer rafters and the dormer-ridge height.
It’s like building a small house with angled walls
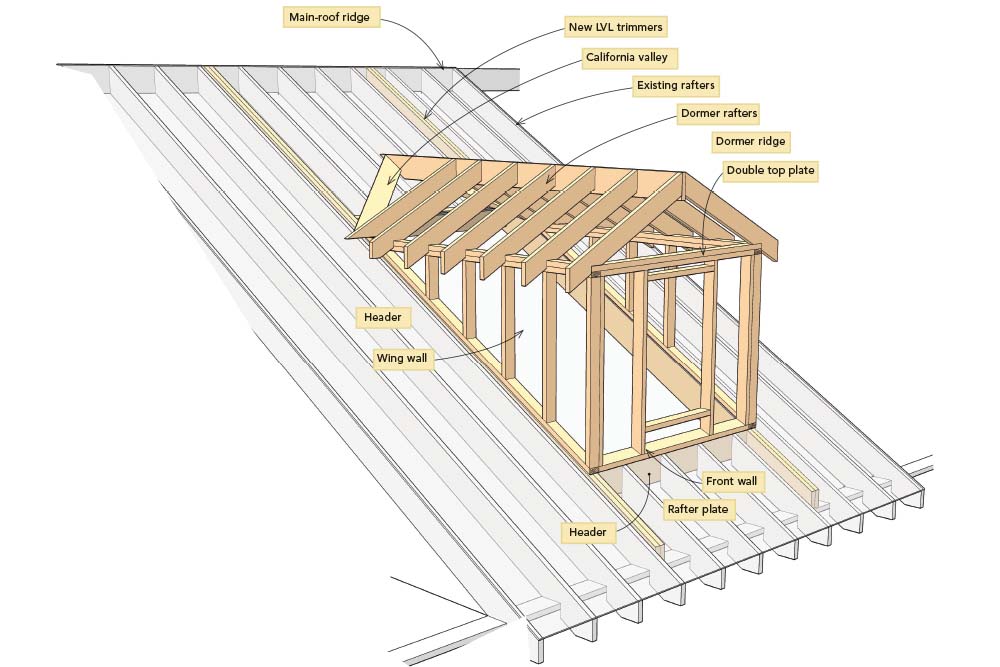
Dormers look difficult to frame because of the angled sidewalls and all the beveled cuts they require. But you’re actually dealing with a series of triangles, so most of the calculations can be made by getting measurements for two sides of a triangle and solving for the third (the Pythagorean theorem: a² + b² = c² ).
A construction calculator helps to minimize the math. To make things easier, construction calculators allow you to work with quantities and components that you encounter on the job site. Measurements are entered in feet and inches; labeled keys enable you to input and calculate rise, run, pitch, and other useful dimensions. It’s much faster than relying on longhand equations. Construction calculators are available at most hardware stores and lumberyards, or through online sources like www.calculated.com. Prices start around $30.
Size and placement are important
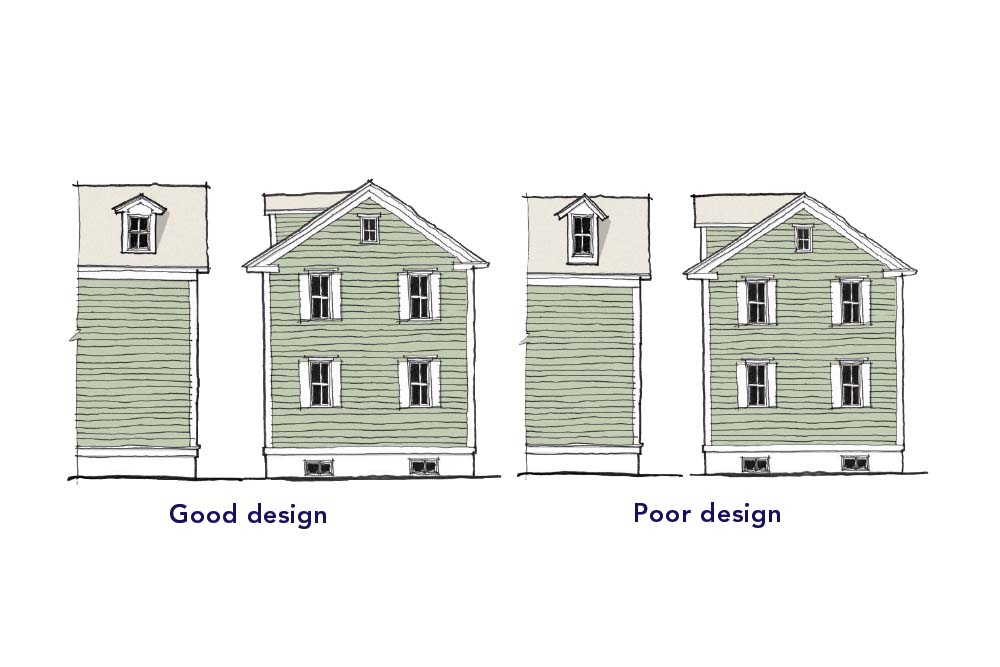
A doghouse dormer is a great way to open up an attic and add light to a relatively dark area, but don’t get carried away with size. If the dormer is too big, it will look out of scale with the rest of the house. The front wall of the dormer should be just large enough to fit the window (ideally, smaller than the windows on the lower levels of the house) and should leave just enough room for proper flashing where it joins the main roof. Also, a well-proportioned dormer sits beneath the line of the main-roof ridge and is set back from the facade of the house.
1. Measure the biggest triangle to find the precise pitch
I can use a Speed Square or framing square to find the roof pitch, but measurements from such a small area can be misleading. To get the most accurate pitch, I measure the largest possible rise and run. On this project, I measured from the top of the roof ridge to the attic subfloor, and from the outside edge of the rafter plate to a plumb line down from the roof ridge. Subtracting the height above plate (HAP), as shown at right, gives me the correct rise.
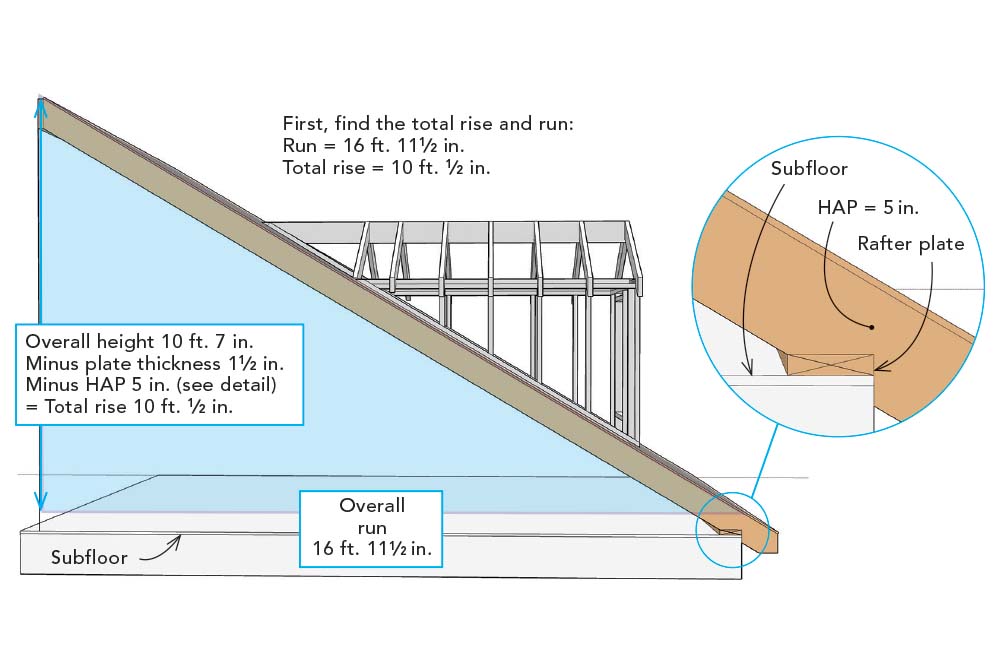
On the calculator: Enter 10 ft. 1⁄2 in.; PRESS “Rise.” Enter 16 ft. 111⁄2 in.; PRESS “Pitch,” and get 71⁄8 pitch, or 71⁄8 in. of rise for every 12 in. of run.
2. Decide on window size, then calculate wing-wall details
On this project, the homeowner wanted the dormer window to be about 3 ft. 6 in. tall. That would require a rough opening of 3 ft. 71⁄2 in. to allow for window installation. I always keep the window opening at least 6 in. up from the roof to leave room for flashing, and in this case, about 6 in. down from the top plate of the front wall so that the top of the window lines up near the bottom of the dormer’s soffit. I ended up with a front-wall height of 4 ft. 71⁄2 in. As shown below, once you know the front-wall height and the roof pitch, it’s not difficult to calculate exact dimensions for all wing-wall framing members.
On the calculator:
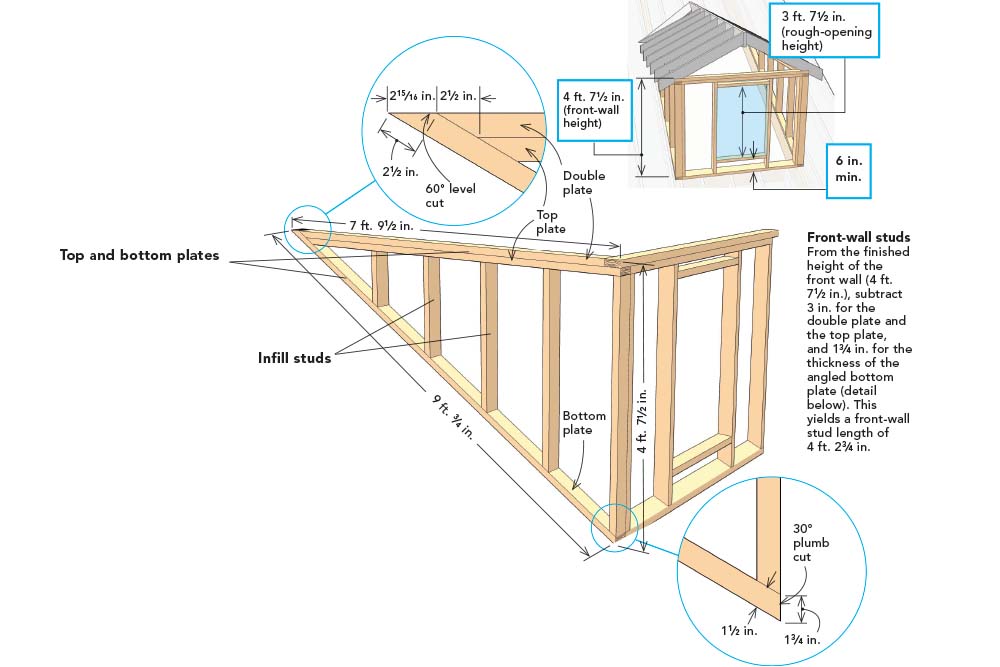
Top and bottom plates. Knowing the height of the front wall, I also have the height of the adjoining wing wall. This height, combined with the roof pitch, gives me the length of the wing-wall top plates and bottom plate.
Enter 4 ft. 71⁄2in. front-wall height; PRESS “Rise.” Enter 71⁄8in. ; PRESS “Pitch,” and get 7-ft. 91⁄2-in. wing-wall length. PRESS “Dlag,” and you get 9-ft. 3⁄4-in. bottom-plate length. PRESS “Dlag,” and you get a 30.7° plumb cut. Round this to an even 30°. PRESS “Dlag” again, and get a 59.3° level cut. Round this to an even 60°. Refer to the detail drawing to see how the wing-wall top plate and the wing-wall double plate need to be shortened because of corner overlaps and bevel cuts.
Infill studs. Each of these will have a bevel cut on the bottom, 60° in this case. I use the calculator’s R/Wall (rake wall) function to determine the different stud lengths.*
Enter 4-ft. 2¾-in. front-wall stud length; PRESS “Rise.” Enter 7⅛-in. pitch; PRESS “Pitch.” Press “R/Wall” (Screen displays selected stud spacing, 16 in. on center in this case.) PRESS “R/Wall” repeatedly to display descending stud lenghts
*You might have to PRESS “Conv” first to use the “R/Wall” function
Front-wall studs. From the finished height of the front wall (4 ft. 7½ in.), subtract 3 in. for the double plate and the top plate, and 1¾ in. for the thickness of the angled bottom plate. This yields a front-wall stud length of 4 ft. 2¾ in.
3. Dormer roof is based on the available space
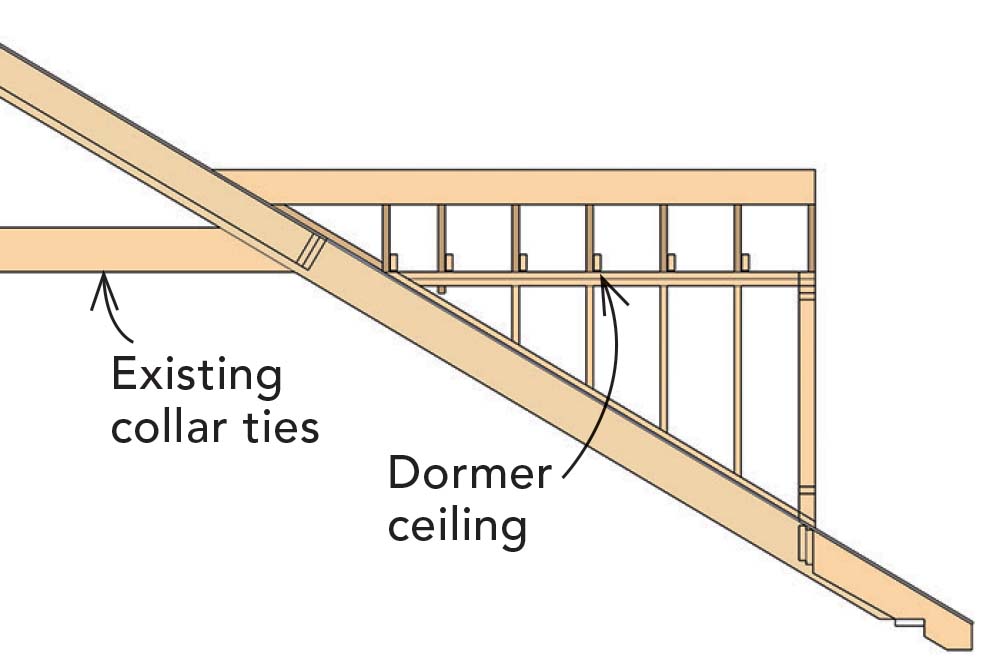
To find the size of the dormer roof, I have to consider how much room I have between the top of the dormer walls and the top of the existing roof ridge. For example, on this project, I had collar ties that were going to remain in place, which set the attic-ceiling height at 7 ft. 6 in. above the subfloor. I also make sure that the dormer ridge intersects the existing roof at least 8 in. below the existing main ridge to avoid the flashing and aesthetic problems of trying to intersect two shingled ridges.

On the calculator:
- Find the location of the dormer ridge. Before I can lay out the dormer rafters, I need to find the distance between the sheathed wing walls. The easiest way to do this is to take the length of the front-wall top plate (6 ft.) and add in the thickness of the wing-wall sheathing (1⁄2 in. on each side). This gives a finished width of 6 ft. 1 in. Enter 6 ft. 1 in. ÷ 2, PRESS “=”, and you get 3 ft. 1⁄2 in.; this is the total run of dormer rafters, but this number needs to be adjusted by subtracting half the thickness of the dormer-roof ridge: 3 ft. 1⁄2 in. – 3⁄4 in. = 2 ft. 113⁄4 in.
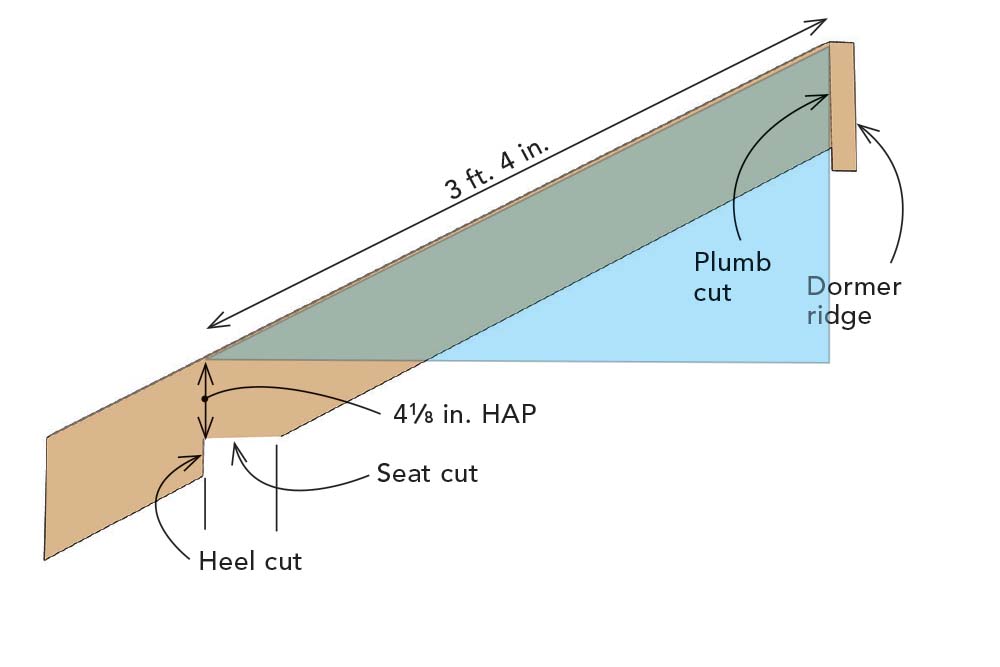
- Calculate dormer-ridge height. I wanted a 6-in-12 roof pitch on the dormers, so I used that combined with the run I found above to determine the adjusted length of the dormer rafters and the height of the dormer ridge: Enter 2 ft. 11¾ in.; PRESS “Run.” Enter 6 in.; PRESS “Pitch.” PRESS “Dlag,” and get 3 ft. 4 in. (length of the dormer rafter.) PRESS “Rise,” and get 1 ft. 5⅞ in. (unadjusted dormer ridge height.)
- Lay out the dormer rafter. I start by making a plumb cut that reflects the 6-in-12 pitch of the dormer roof. Next, I measure 3 ft. 4 in. from the long point of that cut and mark a line plumb with the wing wall to indicate the heel cut of the rafter bird’s mouth. The seat cut is perpendicular to the heel cut and is equal to the width of the top plate and sheathing—in this case, 4 in. (3½-in. top plate + 1⁄2-in. sheathing). With the bird’s mouth marked, I find the HAP of 4⅛ in. I add this number to the rise I found in the calculations above (1 ft. 5⅞ in.) and get a top-of-ridge height of 1 ft. 10 in. above the dormer walls—still falling well below the main ridge.
- Find dormer-ridge length. I already know that the wing walls are 7 ft. 9½ in. long, so I just need to find the length that the ridge extends past the wing walls before meeting the existing roof. I do this by using another small triangle: Enter 1 ft. 10 in.; PRESS “Rise.” Enter 7⅛ in; PRESS “Pitch.” PRESS “Run,” and get 3 ft. 1¹⁄₁₆ in. Add 7ft. 9½ in.; PRESS “=”; you get 10 ft. 10⁹⁄₁₆ in., which is the total length of dormer ridge, straight cut to long point with a 60° cut.
Install trimmers and headers, and then cut the hole
I can perform all the work up to this point, including cutting all the components for the dormer and assembling the walls, without opening the existing roof. This way, unless I have to strip off the entire roof to be reshingled, the rest of the procedure, including dry-in, takes only about four hours from start to finish. This procedure minimizes risk of exposure to the elements.
Measure for the new dormer headers.
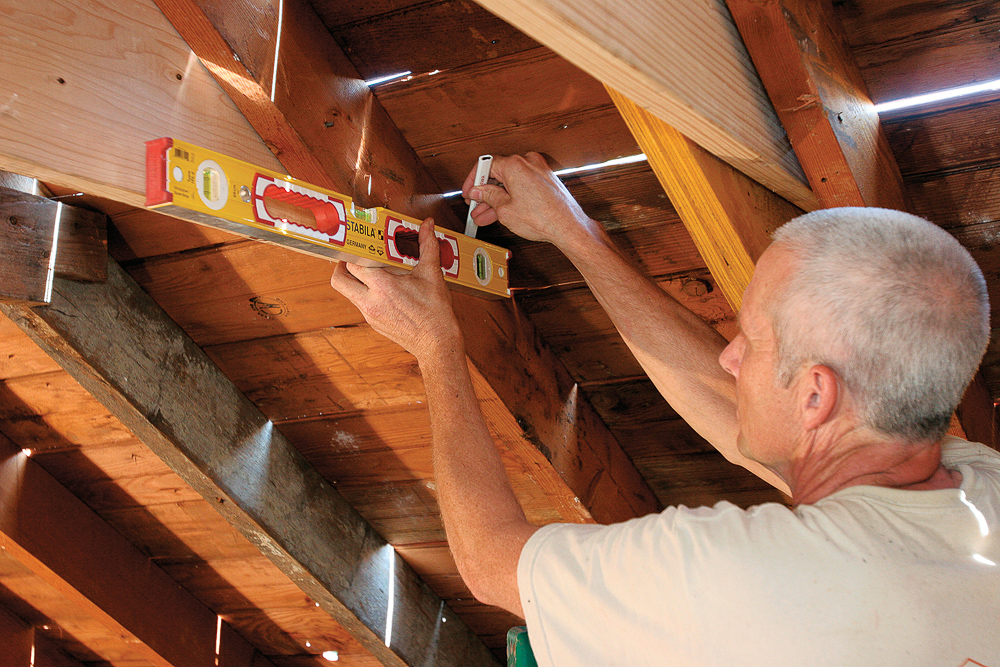
I first draw a level line across the rafter at the desired height.
In this case, I’m matching the underside of the collar ties. Then, starting from the inside end of that mark, I square up to the underside of the sheathing. Then I move the square toward the ridge, marking the 1½-in. thickness of each header piece.
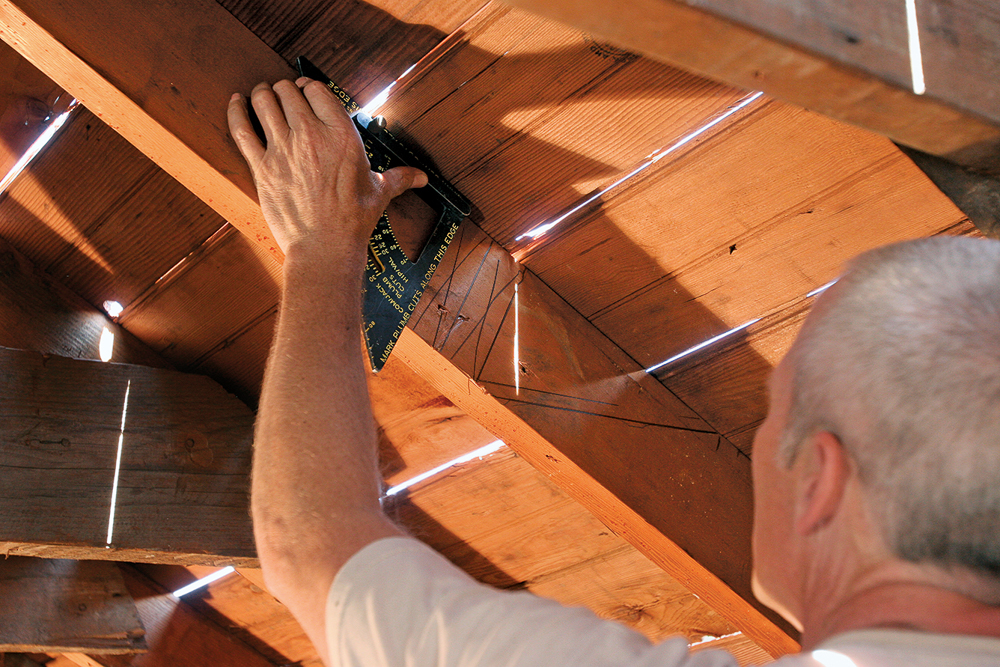
The last line I draw is the inside edge of the first top header, which is also the cutline. To mark for the bottom header, I first put a nail into the sheathing at the last line I just drew, hook my tape to the nail, and measure along the underside of the sheathing the length of the wing-wall bottom plate. Next, I plumb down that line along the face of the rafter.
The inside edge of the dormer wall is 31⁄2 in. in (toward the ridge) from this plumb line. Then I measure back (toward the eave) the thickness of the doubled-up 3-in. header and draw a plumb line to indicate the cutline for the lower header. I transfer these cutlines to all the rafters to be cut.

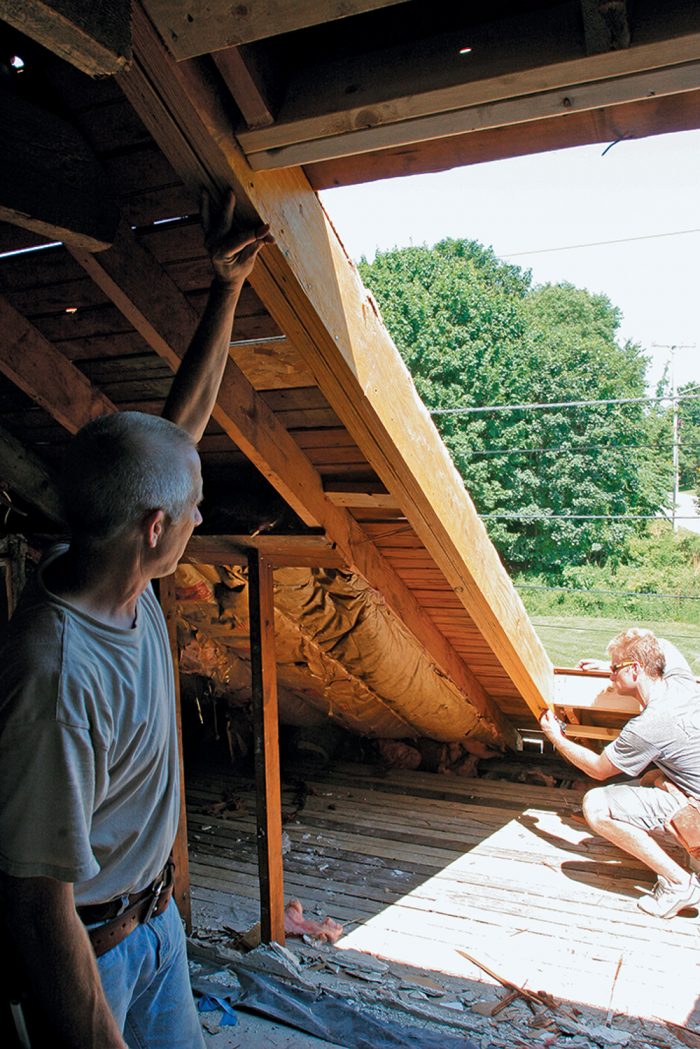
Install the trimmers. We removed or bent back any protruding nails that might get in the way before sliding the LVL trimmer into place through the exposed eaves. Slightly beveling the leading edge of the trimmer made it easier to rotate into place.

Double 2x headers complete the rough framing. Once the rafters are removed, I install two-piece headers at the top and bottom of the opening. A couple of temporary cleats support the newly cut rafters and keep the LVL trimmers spaced evenly until the double headers are put in place.
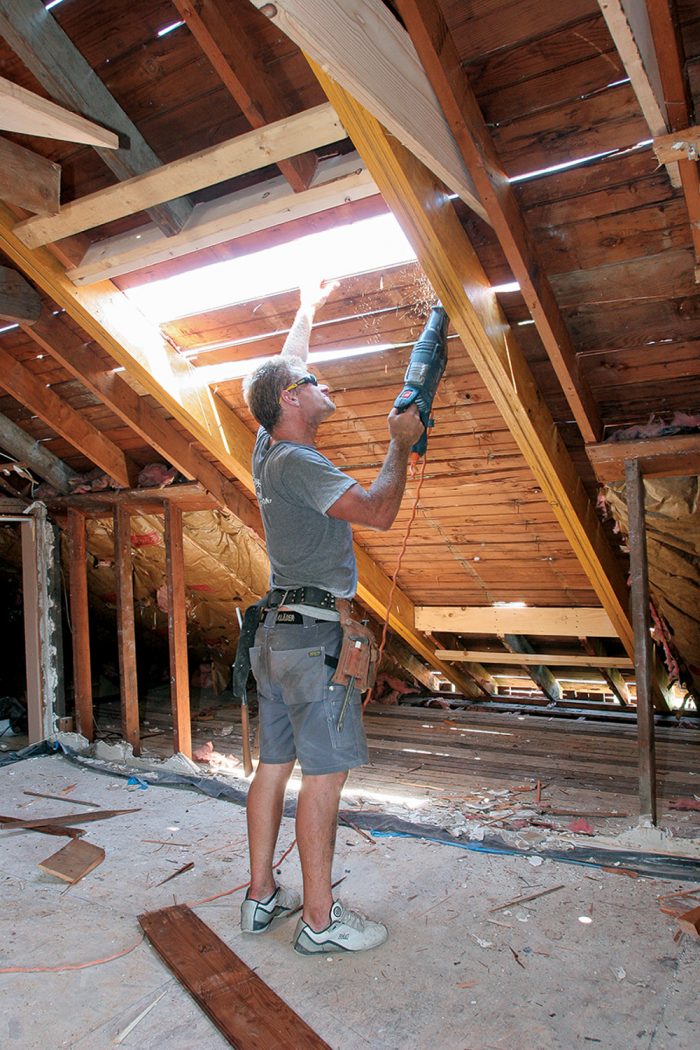
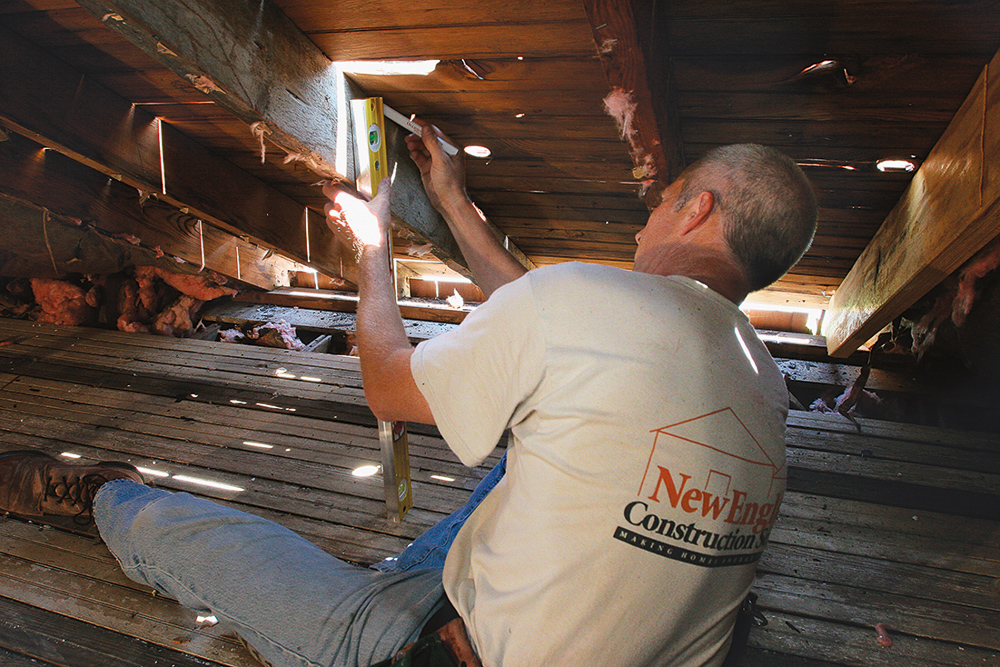
The safest way. Standing inside on the subfloor and cutting through the roof is easier and safer than standing on the roof and cutting down into the attic
True up the opening. I run a stringline along the inside edge of the trimmers and make any necessary adjustments to get them straight and plumb. Then I nail through the existing roof sheathing and into the new framing to keep everything lined up.
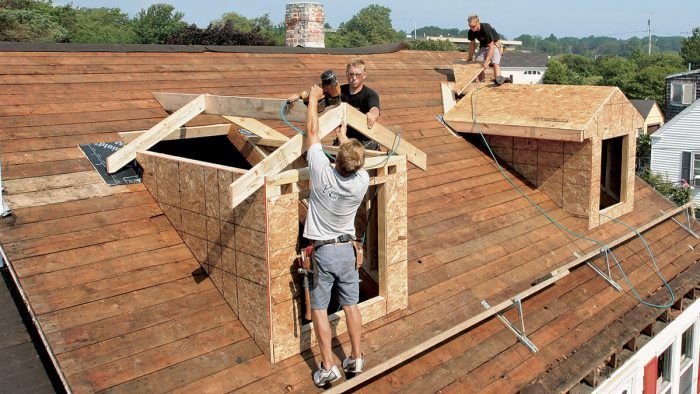
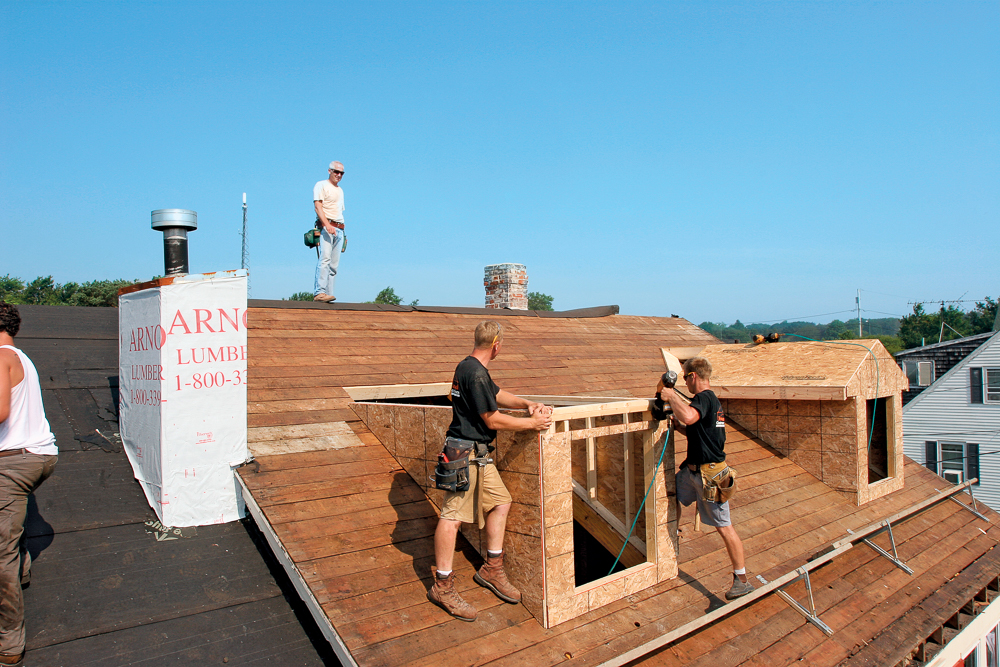
The payoff: parts go together quickly
If the calculations were accurate, the front wall and the two wing walls should fit each other and the existing roof without any major hitches. The dormer rafters and ridge should be carried up in pieces and assembled in place.
Wing walls go up first.

It takes two workers to lift the assembled walls into place.
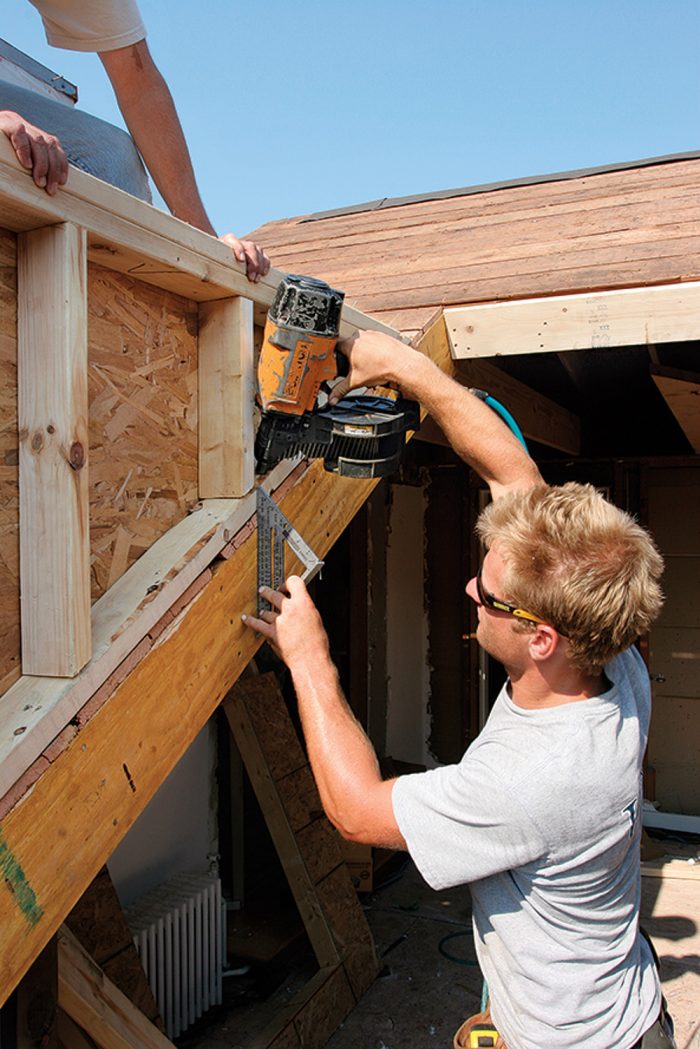
Make sure to keep the inside face of the wing wall flush with the edge of the new trimmers.
Drop the front wall between the wing walls.
Measuring, cutting and installing the California Valley
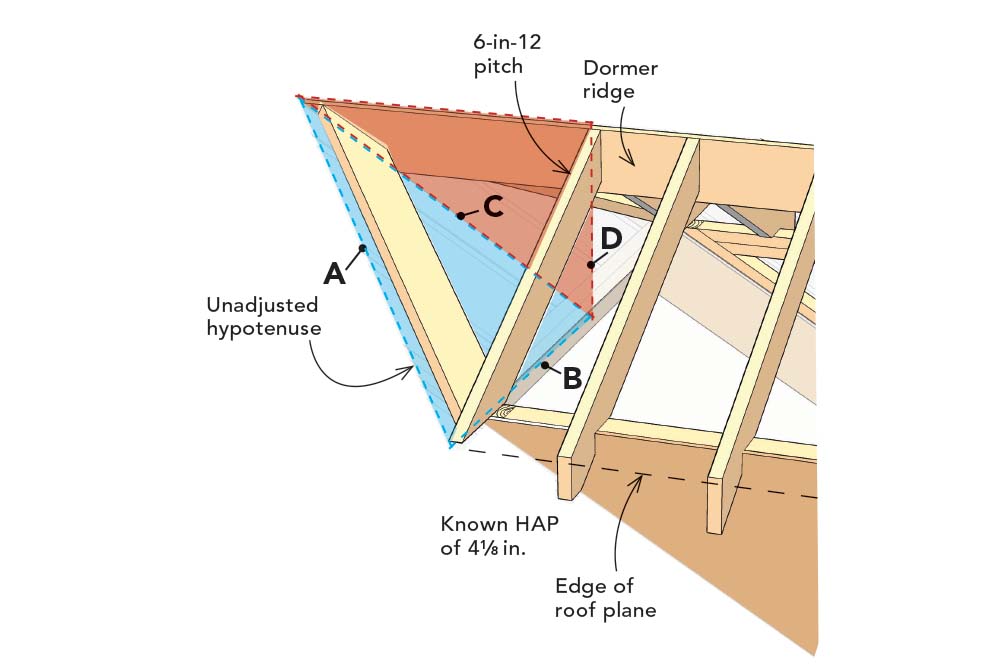
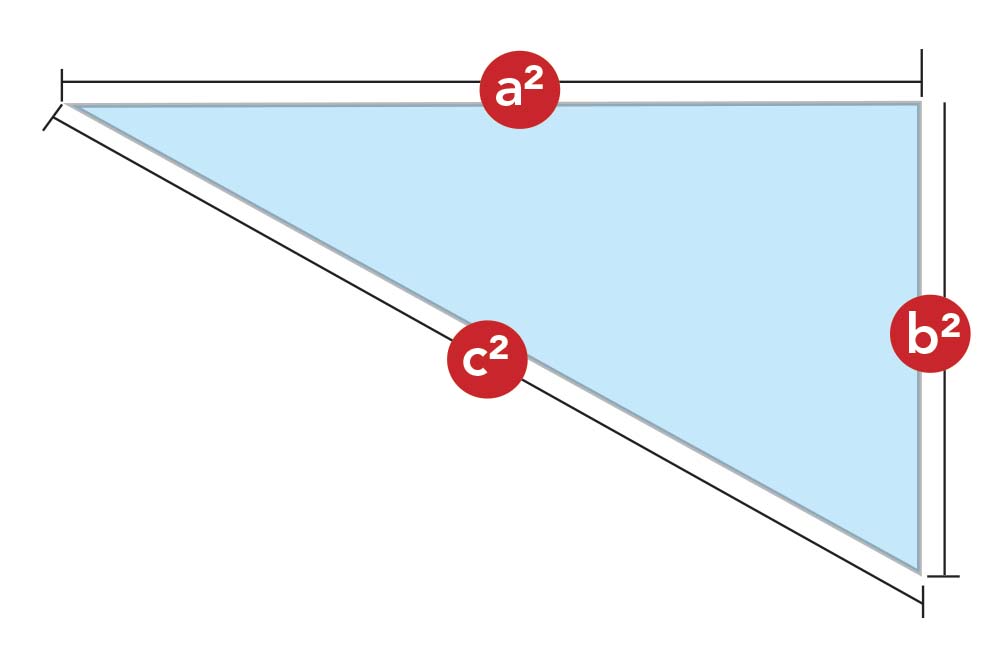
A California valley is calculated and cut to sit on top of the sheathing of a roof rather than connecting directly to the underlying framing. The length of the California valley is the hypotenuse (A) of an imaginary triangle that lies flat on the existing roof (shown in blue). Just like in the previous parts of the dormer, my goal is to find this missing hypotenuse by plugging in the lengths of the other two sides (B and C) that make up the completed triangle.
- Side B: Based on the measurements I used to find the adjusted run of the dormer rafters, I know that the distance from the outer edge of the sheathed wing wall to a line that’s plumb with the near face of the dormer ridge is 2 ft. 11¾ in. I also have to add in the distance to the point that the rafter intersects the roof plane. Enter 4¼ in.; PRESS “Rise.” Enter 6 in.; PRESS “Pitch.” PRESS “Run,” and get 8¼ in. ADD 2 ft. 11¾ in. + 8¼ in.; PRESS “=” and get 3 ft. 8 in.
- Side C: I still need to find one of the legs of this triangle, so I have to create a second triangle (shown in orange) in which side (C) is a shared dimension. I know the height of the dormer ridge (D) is 1 ft. 10 in., and I know the pitch of the existing roof is 7⅛-in 12, so I use my calculator to find (C). 1. Enter 1ft. 10 in.; PRESS “Rise.” 2. Enter 7⅛ in.; PRESS “Pitch.” 3. PRESS “Dlag,” and you get 3 ft. 7¹⁄₁₆ in.
Adjust for a flush fit. I now have the two legs of the triangle (B and C) that I need to solve for the missing hypotenuse (A), but first I have to adjust their lengths so that when the California valley is installed, the edge of the 2x stock won’t stick up past the top edges of the dormer ridge and the rafter tail.
Reduce top (ridge) end of valley
Enter 1½ in.: PRESS “Rise”. Enter 7⅛ in.; PRESS “Pitch.” PRESS “Run” and get 2½ in.
Reduce lower (rafter tail) end of valley
- Enter 1½ in.; PRESS “Run.”
- Enter 7⅛ in.; PRESS “Pitch.”
- PRESS “Dlag,” and get 1¾ in.
- Enter 1¾ in.; PRESS “Rise.”
- Enter 6 in.; PRESS “Pitch.”
- PRESS “Run,” and get 3½ in.
Adjusted length of side B: 3 ft. 8 in. – 3½ in.; PRESS “=”, and get 3 ft. 4½ in.
Adjusted length of side C: 3 ft. 7¹⁄₁₆ in. – 2½ in.; PRESS “=”, and get 3 ft. 4⁹⁄₁₆ in.
- Side B = Enter 3 ft. 4½; PRESS “Run.”
- Side C = Enter 3 ft. 4⁹⁄₁₆ in.; PRESS “Rise.”
- Side A = PRESS “Dlag”: 4 ft. 9⁵⁄₁₆ in.
- PRESS “Dlag” 45.04 plumb cut
- PRESS “Dlag” 44.96 level cut
A quick bevel for a snug fit. Last, the bottom of the valley needs to be beveled to sit snug against the dormer rafter. To find this plumb bevel angle, use the known main roof pitch: Enter 7⅛ in.; PRESS “Pitch.” Then PRESS “Pitch” again, and get a 30° bevel angle.
Photos by Justin Fink and Krysta S. Doerfler. Drawings by Justin Fink, Dan Thonrton, and Donald Powers.
Related stories:
From Fine Homebuilding #186
For more information and diagrams on how to install a dormer, click the View PDF button below.
Fine Homebuilding Recommended Products
Fine Homebuilding receives a commission for items purchased through links on this site, including Amazon Associates and other affiliate advertising programs.
Portable Wall Jack
Flashing Boot
Protective Eyewear
