Maximize Pantry Storage
Replace shelves with shallow drawers, and you can stop diving deep to find the soup.
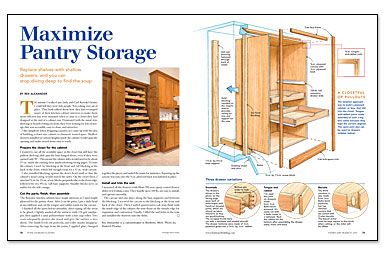
Synopsis: Cabinetmaker Rex Alexander had a solution for a client who wanted better kitchen storage. He built a cabinet filled with pullout shelves and installed it in a pantry closet. This two-page article details the joinery used for both the carcase and the shelves, as well as alternatives for shelf joinery.
The minute I walked into Judy and Carl Rawski’s home, I could tell they were tidy people. Not a thing was out of place. They both talked about how they had revamped many of their kitchen-cabinet interiors to make them more efficient but were stumped when it came to a closet they had designed at the end of a cabinet run. Frustrated with the usual wire shelving or boards resting on cleats, they were looking for lots of storage that was accessible, easy to clean, and attractive.
I like simplicity when designing a pantry, so I came up with the idea of building a closet-size cabinet to eliminate wasted space. Shallow drawers installed at various heights inside the cabinet would span the opening and make stored items easy to reach.
Prepare the closet for the cabinet
I wanted to use all the available space in the closet but still have the pullout shelving slide past the butt-hinged doors, even if they were opened only 90°. This meant the cabinet sides would need to be about 1½ in. inside the existing door jambs. To inset the cabinet, I used 2×2 blocking at the front and 2×4 blocking at the back of the closet, which left enough room for a 32-in.-wide carcase.
I also installed blocking against the door’s head jamb so that the cabinet’s head casing would match the sides. On the closet floor, I attached ¾-in. by 1½-in. screw blocks perpendicular to the front edge, followed by two 4¼-in.-tall base supports. Smaller blocks serve as nailers for the side casings.
Cut the parts, finish, then assemble
The Rawskis’ kitchen cabinets have maple interiors, so I used maple plywood for the pantry closet. After I cut the parts, I put a dado head in my tablesaw and cut the tongue-and-rabbet joints for the carcase.
I finished all the parts before assembly. After taping off the areas to be glued, I lightly sanded all the surfaces with 220-grit sandpaper, then applied a satin polyurethane with a fine-nap roller. Two coats adequately protect the wood and give the surface a nice sheen. The finish levels out perfectly, and roller marks disappear. After removing the tape from the joints, I applied glue, clamped together the pieces, and nailed the joints for insurance. Squaring up the carcase was easy once the ¼-in. plywood back was fastened in place.
Install and trim the unit
I mounted all the drawers with Blum 550-mm epoxy-coated drawer slides (www.blum.com). They handle up to 100 lb., are easy to install, and operate smoothly.
The carcase slid into place along the base supports and between the blocking. I screwed the carcase to the blocking at the front and back of the closet. Then I nailed quartersawn oak trim flush with the inside edge of the cabinet; the trim floats on the outside edge for expansion and contraction. Finally, I filled the nail holes in the trim and installed the drawers onto the slides.
RELATED STORIES
For more photos, illustrations, and details, click the View PDF button below:
