A Simple Approach to a Paneled Passageway
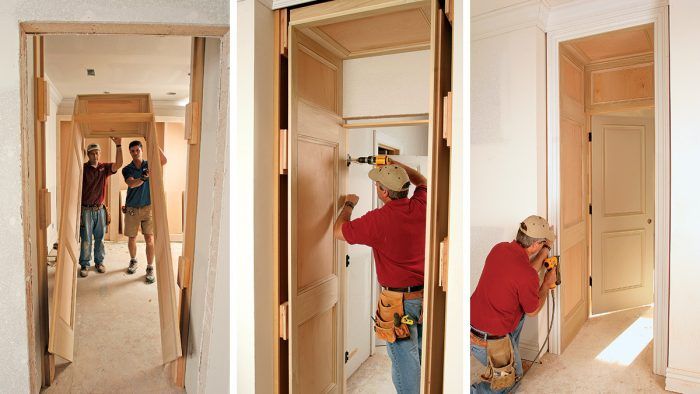
Starting with a prehung door, you can create an elegant vestibule by adding frame-and-panel jamb extensions.

Synopsis: Arkansas builder Gary Striegler digs in to his bag of tricks to show a way to enhance privacy and to add some variety to a room: using a prehung door to craft a vestibule. With his process, Striegler starts with a prehung door, then adds frame-and-panel jamb extensions to create the vestibule. A structure like this can create areas for built-ins like bookcases and spaces for furniture. They also can be built using a room’s existing partition walls.
Look in just about any old building, and you’ll see that the paneled passageway has been around for a long time. This trimmed-out space has a dramatic impact on the overall look of a home’s interior. Even more important, a passageway can add a sense of privacy to the room it serves. Adding this transition area can make a room feel more peaceful and sequestered. When I’m building a house, my clients often ask me to add paneled passageways to enhance privacy in certain rooms, especially master bedrooms and studies.
The good news is that you don’t need to be a furniture maker to build paneled passageways, and they don’t require expensive materials. I use simple pocket-hole joinery along with birch plywood, 1x poplar, and basic poplar moldings to build the panels. The best aspect of this approach is that everything is built off a prehung-door unit. With the door hinges already mortised, adding a paneled passageway to your next project requires only a little extra time and a few basic tools.
It all starts with a prehung door
The frame-and-panel assemblies that form the sides of the vestibule are actually extensions of the side jambs from a prehung door. After removing the door and the hinges, I rip the side jambs down to 2 in. wide. Then I set aside the side jambs and head jamb and use the door’s dimensions to lay out the jamb extensions. I build the side-jamb extensions, the top panel, and the filler panel, and then assemble them near the door opening.
Use the door to lay out the jamb extensionThe proportions of the jamb extensions should reflect the proportions of the door. I use a story pole to transfer rail heights from the door to the jamb extension. It’s important to note, however, that the extension has one more rail than the door. I make the stiles 2-1 ⁄ 2 in. wide because that dimension seems most pleasing to the eye. The jamb extension’s width is determined by the depth of the vestibule.  |

|
|
|
Assemble the pieces, and hang the door
The vestibule’s side panels extend above the door’s head jamb, which I install before tilting up the unit. Nailing up blocking ahead of time makes it possible to shim the panels plumb and level.

|
|
|

Shim the stiles plumb, then add the casing
Once the door is hung, I finish hanging the rest of the unit. Although I could install the filler panel earlier, I choose to install it once the vestibule is nailed in place so that I can fine-tune the side jambs as needed. When everything is shimmed and nailed plumb, I reinstall the doorstop and nail up the casing.

|
|
|
Gary Striegler is a homebuilder in Fayetteville, Ark.
Photos by Chris Ermides.
From FineHomebuilding #188
To view the entire article, please click the View PDF button below.


