A Sweeping Handrail for a Centerpiece Stair
A pitch-block jig and a deadman stand are two keys in transforming a jumble of parts into a continuous handrail.
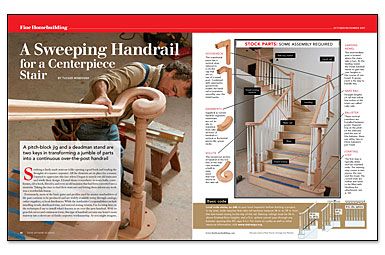
Synopsis: The epitome of elegance, a sweeping, curved handrail makes a eye-catching centerpiece for a stairway. Boston-area architect Tucker Windover shows his techniques for building such a complicated, beautiful handrail by using stock railing parts and some handy jigs, including a pitch block to help calculate the handrail’s geometry and deadman stands to hold the handrail at finished height while it is being assembled. Starting at the top, Tucker installs the balusters and rail pieces. Then he finishes at the bottom with the starting newel post, which is secured to blocking attached to the subfloor to anchor the handrail assembly.
Magazine extra: Tucker Windover shares five simple techniques that greatly improve staircase construction.
Studying a finely made staircase is like opening a good book and reading the thoughts of a master carpenter. All the elements are in place for a reason. I started to appreciate this fact when I began to search out old staircases and study their design. I found them everywhere: in town halls, courthouses, old schools, libraries, and even an old mansion that had been converted into a museum. Taking the time to find these staircases and letting them inform my work was a worthwhile lesson.
Fortunately, most of the basic parts and profiles used by master stairbuilders of the past continue to be produced and are widely available today through catalogs, online suppliers, or local distributors. While the stairbuilder’s responsibilities include installing treads, skirtboard trim, and mitered nosing returns, I’m focusing here on the techniques I use to install what’s known as an over-the-post handrail. With its graceful curves and continuous form, this type of handrail can turn any home’s main stairway into a showcase of finish-carpentry workmanship. As you might imagine, it’s also one of the more difficult railings to assemble and install.
Handrail design is all about the curves
Continuous handrail design has two key principles. the first is simple but important. As with many staircase styles, the balusters, the handrail, and the newel posts all share the same centerlines. Where the staircase turns, the intersection of the centerlines locates the newel at that turn. In about 15 minutes, using these layout guides, I can have centerlines drawn directly on stair treads and have all the newel posts located save for the starting newel.
The second key to design has to do with the curved railing sections, called easements, that need to be cut and joined to straight railing sections. Despite the complicated look of a continuous handrail, there are only two types of curves to worry about: the curve that connects the rail from level to rake (or incline); and the curve that transitions the rail from rake to plumb (or vertical).
The easement pieces supplied by the manufacturer are milled to the same radius. Also, the cuts on the easement are always made at 90° to the adjoining straight sections. To locate and make the cuts, I use a pitch block and a pitch-block jig.
Work from the top down
It’s generally true that we build from the ground up, from foundation to roof. But with an over-the-post rail, this sequence doesn’t work. I work from the top down, and I begin with the handrail held in its finished position, supported by a pair of dead-man stands. I’ve found this technique to be a foolproof way to mark and measure for final cuts because I’m working from final locations instead of laying the handrail on the nosings of the stairs, then adding or subtracting to get layout or cut lengths.
For more photos and details, click the View PDF button below:






View Comments
Do you have a video for sale on this subject?
I am still waiting for a response.....!