Where Do You Want the Blocking?
Five tradesmen weigh in on where to put solid blocking for stair skirts, grab-bar anchors, and everything else the code leaves out.
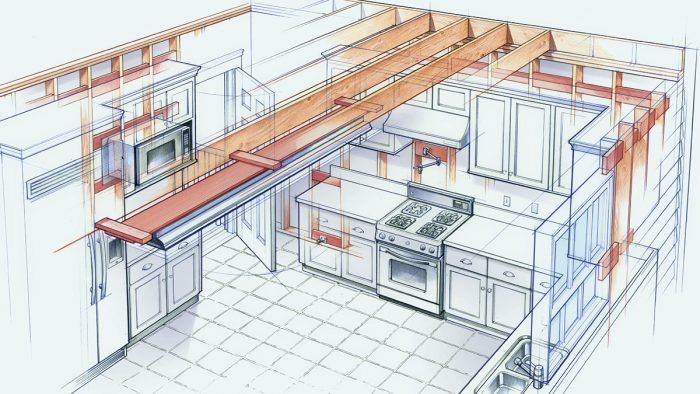
Synopsis: Code-required blocking is one thing, but many builders would say tell you that there’s plenty of helpful blocking not required by code. Veteran tradesmen Ed Cunha, Myron R. Ferguson, Mike Guertin, Gary M. Katz, and Clifford Popejoy outline the not-code-required blocking they like to see when they’re doing finish carpentry, plumbing, drywall, and electrical work. Whether it’s in the kitchen for hanging wall cabinets or a built-in microwave, in the bathroom for attaching grab bars, or in the living room for fireplace surrounds and wainscoting, the right blocking can make a big difference.
The final 5% of any good framing job is blocking. It makes work easier for the subsequent tradesmen and future homeowners, and it can be completed using cutoffs that would otherwise land in the Dumpster. So why doesn’t every house have sturdy blocking behind towel bars, under stairs, and in closets? Some of it is eliminated to save time and money, and some is overlooked. It’s also a good bet that lots of blocking is left out simply because nobody ever asked the right people where it was needed. But what if the plumber, the electrician, the drywall contractor, and the finish carpenter showed up on the job before the framers rode off into the sunset?
To explore this scenario, I asked five of our frequent contributors to help create a blocking wish list. Every house is different, of course, and this list isn’t complete. It does, however, provide a useful road map to a desirable destination: solid backing for many of the fixtures, appliances, trim details, and other common features found in a typical house.
Kitchen blocking
Stagger blocking for wall cabinets. Wall cabinets need lots of support, especially along the top mounting rail. I use a combination of 2×4 and 2×6 blocks set at the height of the top of the cabinet. The 2x4s are nailed in every other stud bay; then 2×6 blocks fill the remaining bays. This way, I can through-nail the 2x6s rather than toenailing them, making a much stronger connection.
Support narrow and end-of-run cabinets. I make sure to install 2x blocking for narrow cabinets that miss stud locations and for the last cabinet in each run, whether this cabinet is narrow or not. Without this blocking, it can be difficult or impossible to pull the back of the cabinet snugly against the drywall.
Microwave blocking can be tricky. Microwaves have a mounting panel that needs to be secured to the wall. Although the panel can be attached to a stud, I feel more confident when it’s screwed to blocking. If the microwave is over a cooktop, the key is to locate the blocking to avoid the area where exhaust-venting ductwork runs through the stud cavity. If the venting runs down through the wall, I put a block above the opening. If it runs up through the wall, I put a block below the opening. If it’s direct vent, I block above and below the opening.
Bathroom blocking
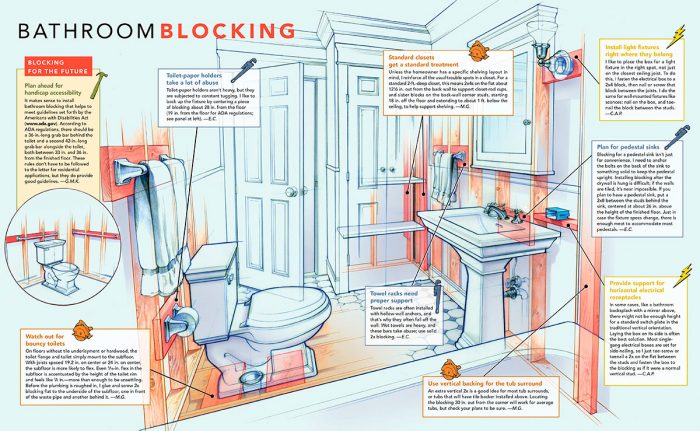
Use vertical backing for the tub surround. An extra vertical 2x is a good idea for most tub surrounds, or tubs that will have tile backer installed above. Locating the blocking 30 in. out from the corner will work for average tubs, but check your plans to be sure.
Watch out for bouncy toilets. On floors without tile underlayment or hardwood, the toilet flange and toilet simply mount to the subfloor. With joists spaced 19.2 in. on center or 24 in. on center, the subfloor is more likely to flex. Even 1⁄16-in. flex in the subfloor is accentuated by the height of the toilet rim and feels like 1⁄4 in.—more than enough to be unsettling. Before the plumbing is roughed in, I glue and screw 2x blocking flat to the underside of the subfloor, one in front of the waste pipe and another behind it.
Plan ahead for handicap accessibility. It makes sense to install bathroom blocking that helps to meet guidelines set forth by the Americans with Disabilities Act (www.ada.gov). According to ADA regulations, there should be a 36-in.-long grab bar behind the toilet and a second 42-in.-long grab bar alongside the toilet, both between 33 in. and 36 in. from the finished floor. These rules don’t have to be followed to the letter for residential applications, but they do provide good guidelines.
From Fine Homebuilding #190
To view the entire article, please click the View PDF button below.
Fine Homebuilding Recommended Products
Fine Homebuilding receives a commission for items purchased through links on this site, including Amazon Associates and other affiliate advertising programs.
Portable Wall Jack
Leather Tool Rig
Guardian Fall Protection Pee Vee

