Reproducing historic architectural details
When a train station's 120-year-old roof brackets decay, a carpenter braces the roof and constructs a detailed template to guide the restoration
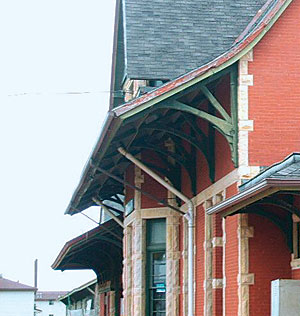
The train station in Winona, Minn., had been in use since it was built in 1888. Part of its charm derived from the large, ornate roof brackets that supported a post-free 7-ft.-deep overhang. Cleverly designed, the once-sturdy brackets were embellished with scroll work, a curved brace, and other decorative details. However, two brackets most exposed to the elements were coming apart. The station’s owner, the Canadian Pacific Railroad, hired me to build replacements.
After the roof was temporarily braced, the brackets were removed. I conducted a postmortem and discovered that their failure was due to both design and decay.
The braces were just let into notches and were toenailed in place (no mortise-and-tenon joinery), though the curved brace flared out at the ends for a stronger connection. The paint also had not been maintained; water, sun, and organisms had all had their way with the wood.
Build a good template
My first step was to produce a template by tracing one of the original brackets. I used a 4×8 sheet of 1/2-in. MDO (medium-density overlay) for the template stock. MDO is light and strong, and it provides a smooth surface for tracing, marking, and writing notes. The bracket was too large to fit in the area of a 4×8 sheet, so I traced each of the four bracket pieces individually.
Each template piece was inscribed with measurements and marks indicating connecting points, extent of chamfers, and location of rosettes. I dry-biscuited the pieces together so that I could accurately transfer the design to the new stock. The original brackets were built of white pine from Minnesota’s “endless forest,” as it was known. I wanted to use material from my local sawmill, but clear white pine was neither affordable nor available. (Ironically, this town once provided white pine for places as far away as Denver and New York.) Instead, I chose white oak for its strength and decay resistance.
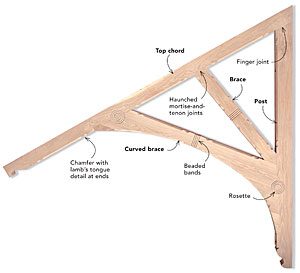
Rather than reproduce the three original layers of thicker stock, I laminated five layers of more readily available 1x stock. To match the original thickness, I planed the center lamination to 1/2 in. thick. I also ripped the boards to the approximate width of each beam before laminating.
I figured that my homemade glulam beams would be too heavy to maneuver for some of the delicate scroll work, so I traced the pattern onto each beam lamination, rough-cut the profiles on a bandsaw, then clamped the template onto each piece and made a cleanup pass using a pattern bit and a router.
For the last step before glue-up, I dry-fit all the pieces of the assembly. After I was satisfied with the fit, I glued up each beam. When the glue had dried, I used a spindle sander placed in the middle of a large plywood table to smooth out any discrepancies between the layers.
The right glue for the job
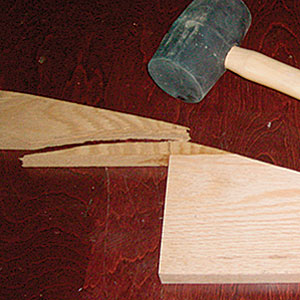
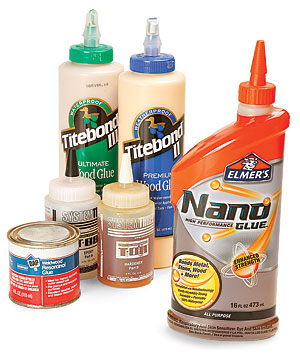
There’s a tremendous array of choices when it comes to adhesives. For this project, I needed a waterproof glue rated for structural applications. Some aliphatic resins (like Titebond 2 and 3; www.titebond.com) are formulated for exterior use, but they can creep under load and shouldn’t be used structurally. Resorcinol was in the running, but major manufacturer DAP/Weldwood (www.dap.com) doesn’t recommend that it be used for glue-ups below 70°F. In the old dance hall that I use as my workshop, winter temperatures range from 40°F to 60°F. Epoxies are good, but my research indicated that most epoxies do not bond well with white oak. Polyurethane glues, however, bond at temperatures down to 40°F, have long open times, are waterproof, and can be used structurally. I experimented with a dozen test assemblies of white oak that I glued together with a polyurethane glue from Elmer’s (www.elmers.com) and thoroughly clamped overnight. The wood—not the glue joint—in 11 out of 12 samples broke in two after being whacked with a deadblow mallet. Combined with structural joints and the stainless-steel fasteners I added later, this glue was a sound choice for these brackets.
Precise details with the aid of a jig
Before assembling the components into a complete bracket, I added the beading and chamfers to each member. I was inspired to work carefully; it’s hard to replace what you’ve taken away.
The bulk of the chamfered area was hogged out with a router, but the lamb’s tongues were hand-chiseled. I removed the chisel marks with a small drum-sanding bit fitted in a Dremel tool.
The beading concerned me because it was oriented across the grain. Also, making three beads takes four passes with the router on all four faces of the braces, meaning that I had to make a total of 64 router passes that had to be uniform. A helpful soul on FineHomebuilding.com’s “Breaktime” forum suggested that I make a jig for the sake of efficiency. I eliminated tearout by clamping sacrificial boards on each side.
Tight joinery requires some coercion
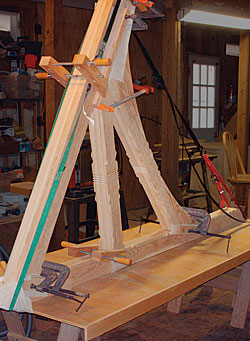
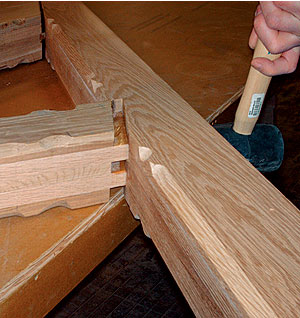
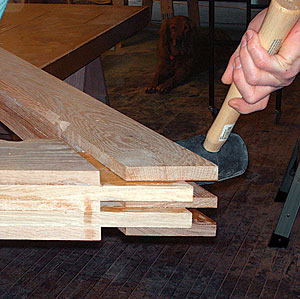
I applied glue to the mating surfaces of each of the bracket joints, then fit the joints together. I coaxed tight-fitting pieces into place with a rubber mallet or a small sledgehammer and my favorite wood block for this kind of work: a short section of oak handrail. It has a comfortable grip and a thick, wide surface to distribute the blows from the mallet. I also used ratcheting straps to squeeze the parts together, although there was a point in my work on this project when it seemed as if I could have employed a come-along.
The joinery of the pieces looks like the braces-let-into-notches approach of the original, but I actually improvised some mortise-and-tenon joints in the middle laminations. The curved brace’s center layer sticks out as a 1-in. tenon that extends into mortises in the mating pieces. The short brace is also keyed into slots and bird’s-mouth cuts in the middle layers.
I chose finishes with an eye toward weatherproofing in three stages: first, a copper-naphthalate product by Cuprinol (www.cuprinol.com) that would discourage decay organisms; second, a latex exterior primer; and third, two coats of exterior-grade latex paint. I also applied an extra coat of paint to any exposed end grain.
Building the template
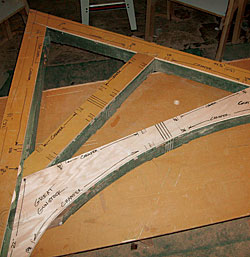
The template has all the details. Once I had traced the outline of each of the four pieces of the bracket, I marked the location of each detail on the MDO template. Template pieces were dry-biscuited together so that I could use them separately and then check the entire assembly.
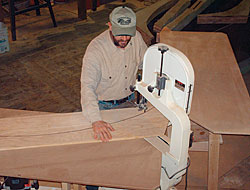
Flying on the wings of a bandsaw. To support the unwieldy lengths of stock, I made a pair of outfeed tables, each with a 45° corner at one end. With the cut corner against the saw table, the outfeed tables were oriented for curved pieces; spun 180°, the tables supported straighter stock.
Getting the details right
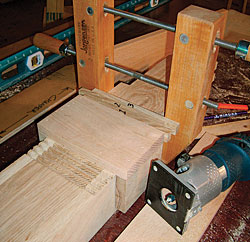
Repeated details call for jigs. To rout the beaded band, I used a hand-screw woodworking clamp, three numbered 1/2-in.- thick spacers, and a U-shaped edge guide sized so that I could set the clamp 7 in. to the right of the center bead’s location. Using this setup, I started with all the numbered spacers in place, made a pass with a 1/4-in.- radius beading bit in my laminate trimmer, removed a spacer, repeated twice, and made the last pass with just the edge guide.
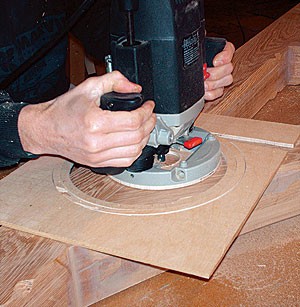
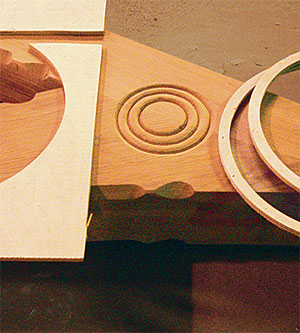
A circle jig cuts the rosettes. To cut the rosettes, I used a circle jig to cut three concentric rings from 1/4-in. plywood based on the diameter of my plunge router. With a beading bit in the router, I nested all three rings, cut the smallest-diameter circle, then removed the smallest ring and cut the next circle. After the last circle, I rounded any sharp edges with sandpaper.
Interlocking joints add strength. The haunched brace/post joint (photo left) was strengthened with a double mortise and tenon, created by cutting two inner laminations an inch longer. I also finger-jointed the laminations on the intersection of the post and top chord.
Photos by: Allie and Brian Campbell, except where noted
Fine Homebuilding Recommended Products
Fine Homebuilding receives a commission for items purchased through links on this site, including Amazon Associates and other affiliate advertising programs.
Stabila Extendable Plate to Plate Level
Portable Wall Jack
Flashing Boot


