Cheaper Hot Water
From wrapping your tank to tapping the sun: Six ways to put your water heater on an energy diet

As a mechanical contractor, I’ve been responding to homeowners’ concerns about high energy bills for a long time. And now, with fuel costs escalating at an alarming rate, these calls are becoming more frequent, and more urgent.
Heating water for domestic purposes—showers, laundry, dishes, and the rest—accounts for 12% to 26% of a home’s energy use. That’s between $240 and $520 for an average U.S. household. But you can put your hot-water system on an energy diet without sacrificing comfort. The six strategies that follow range widely in cost and complexity, but all will reduce your energy bills and your carbon footprint.
1. INSULATE YOUR WATER HEATER
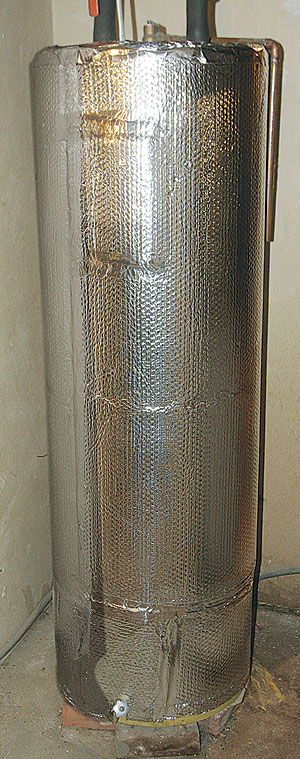
The facts: If your tank-style water heater predates the 2004 federally mandated increase in tank insulation, it’s costing you money every day in standby heat losses.
The fix: Adding an insulating jacket costs less than $30 and takes less than an hour. If you have a gas- or oil-fired water heater, follow the jacket’s instructions carefully to avoid cutting off combustion air or interfering with exhaust. All appliances using fossil fuels produce deadly carbon monoxide (CO) during combustion. The combustion-air intake and exhaust draft are two components that keep CO in check. If either is compromised, dangerous levels of CO can leak into the home.
When insulating electric water heaters, be sure to allow access to the elements and the wiring inlet for future service. The inlet/outlet should be accessible for routine inspection (leaks), and the temperature and pressure (T&P) relief valve should remain exposed with its drip leg extended within 6 in. of the floor for annual testing and for observation of any water discharge.
The savings: Wrapping an older water heater with an insulation kit can cut standby heat losses by 25% to 45%, saving you 5% to 10% on your water-heating costs.
2. INSULATE YOUR HOME’S HOT-WATER PIPES

The facts: Every foot of bare 1⁄2-in. copper tubing carrying 120°F water around a 70°F home loses 14.1 Btu an hour; 3⁄4-in. tubing loses 19.1 Btu per hour (1 Btu is the amount of energy needed to raise the temperature of 1 lb. of water by 1°F). You can substantially reduce this loss by insulating the hot-water supply lines.
The fix: Pipe insulation comes in 6-ft. strips and is typically fiberglass or foam-based material. Choose the best you can afford; fiberglass or elastomeric foam will save you more than cheaper foam tubing.
Insulation should fit snugly over the tubing to prevent condensation, and all joints and slits should be firmly sealed. Foam pipe insulation is often available with a preglued slit; you can use contact cement to seal butt ends or mitered joints. Some cements require adequate ventilation, so read and follow all instructions. Fiberglass insulation should be handled according to manufacturers’ instructions. (Always wear safety glasses when working with fiberglass.) Costs range from under $2 per 6-ft. length for R-2 insulation to $12 per length for R-8 UV-resistant Armaflex, used to insulate exterior piping in solar systems.
In a retrofit, the amount of piping accessible for insulating depends on the home’s style. The main distribution lines in most houses are accessible through the basement; only the risers in the walls can’t be accessed. In one-story homes, then, this means you can insulate all but a few final feet of piping.
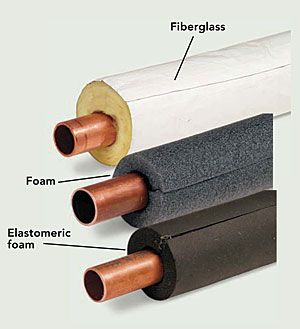
The savings: If three family members shower for 20 minutes a day each, with hot water traveling 50 ft. through uninsulated 3⁄4-in. pipe from the heater to the shower, the daily energy loss adds up to 975 Btu. Insulate that same run of piping with 1-in. fiberglass, and the energy loss is reduced to just 233 Btu. (That’s like not having to heat almost 542 gal. of water a year.) By insulating the pipes, the family above saves about $12 a year if their water heater is gas-fired and $23 a year if it burns oil.
Choose the BEST INSULATION
All pipe insulation is not equal. The chart below shows the varying effectiveness of insulation types applied to a 50-ft. run of ¾-in. copper hot-water pipe. The effectiveness is measured in Btu lost over one hour, the total amount of time the shower was used by the family cited in the example above.
Insulation type Btu lost
No insulation (bare copper) ……… 975
3⁄8-in. foam ………………………….. 425
½-in. foam ……………………………. 366
½-in. fiberglass ……………………… 325
¾-in. foam ……………………………. 301
1-in. fiberglass ………………………. 233
Source: Based on data from www.engineeringtoolbox.com
Diving into dollars
Whenever there’s waste in a home, it’s only natural to want to know the cost of that waste in real dollars. That’s not too hard to calculate on a specific job when I have all the facts: the type of fuel used, the efficiency of the water-heating system, the length and other characteristics of the pipe runs, and the amount of temperature rise required (the difference between the temperature of the water when it enters the home and the temperature at which the water heater is set). Likewise, when I’m examining a specific house, I can fill in the blank on another big variable: the price the homeowners pay for fuel, which varies nationally and fluctuates constantly.
With so many variables, though, it’s tough to make generalizations about exactly how much savings will result from a given water-system improvement. In most cases in this article, I offer potential savings as a percentage of energy conserved. In some cases, I use specific examples where I spell out the variables to arrive at a meaningful dollar-savings figure. But as they say in the car business, your individual mileage may vary.
Your local mechanical-systems specialist, plumber, or energy consultant can help you determine more specifically the savings you can expect from any water-system improvements in your home.
3. FIND AND REPAIR LEAKS AND DRIPS
The facts: Leaky plumbing that’s not causing damage—such as a faucet dripping into a sink—is often ignored. But a single hot-water faucet that drips once a second (60 drips per minute) costs a homeowner with a gas-fired water heater $22 a year in wasted Btu alone. Depending on where you live, you might also pay for water and its disposal; at my house, that adds about $24. Not bad? If that leak is actually a dribble that fills one 8-oz. cup a minute, it’ll cost $348 annually—plus $230 for the water and its disposal. If your water heater runs on electricity or oil, these numbers will be even higher.
The fix: Most leak repairs are manageable for any handy homeowner and can be done with little expense. Leaks in more remote areas can easily go undetected, but many can be found with a little investigation.
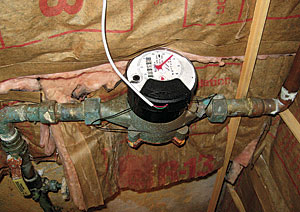
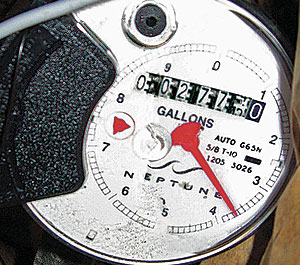
If you have municipal water, the meter probably has a tattletale spinner; if the faucets are all shut off and it’s spinning, you’ve got a leak. If the meter doesn’t have a tattletale gauge, record the reading in the evening after your last use and again in the morning before using any water. If there’s a difference, then you have a leak.
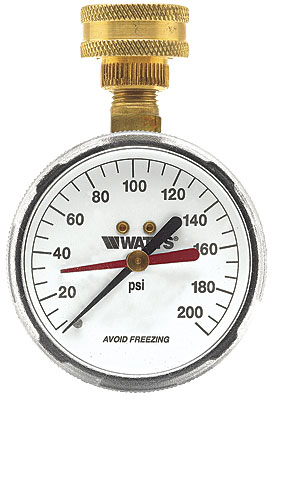
Well-water systems present a different challenge for detecting leaks. In this case, a pressure gauge like the Watts IWTG can be screwed onto any available hose-thread faucet. Open the faucet, return to the well tank, and close the outlet valve. This isolates the home’s piping from the well tank. Water is essentially non-compressible, so even a minute leak—like a slow drip—will show up on the gauge as a decrease in pressure.
Other areas to check visually for leaking hot water include the water heater’s inlet, outlet, boiler drain, and relief-valve ports, where leaks can be wicked into surrounding insulation and evaporated quickly by the heated storage tank. Other common leakage sites include pinholes in piping; joints that weep where solder has cracked or where threads are not adequately tightened; and joints between different types of piping.
Once you’ve found the leak, the first step—whether you tackle the repairs yourself or call in a pro—is shutting off the water (something everyone in your household should know in case of a plumbing emergency). Next, you have to determine what you need to repair the leak. Pipe and joint leaks can be sealed with do-it-yourself kits sold at home centers; the kits contain a wide variety of push-on self-sealing fittings or compression fittings that adapt to virtually any type of piping. You might want to call in a pro if soldering or special tools (PEX crimp ring or expander tools) are required.
If a faucet or toilet is leaking and you’re tackling the repairs yourself, I suggest you first search the Internet for your toilet or faucet model. You’re likely to find an exploded parts view along with details about repairs or parts to order. Armed with this information, a trip to your local big-box retailer won’t be half as frustrating as it would be if you were to stare blindly at a wall lined with thousands of parts. Once you have the parts, complete the replacement according to the manufacturer’s directions.
The savings: Let’s say you’ve discovered several drippy faucets. You check the water-meter reading over an eight-hour period and find you’ve lost 4 gal. (that’s 126 drips per minute). Is it worth your time and effort to fix the faucets? Repair parts might cost $5 to $50 and a few hours of your time. If the leaks are on the hot side and you heat with oil, those drips cost about $185 a year. Chances are the repairs will last for 10 years (or longer), saving you $1845 over the long run.
4. ADD A THERMAL-EXPANSION TANK
The facts: When water is heated, it expands. Heating 40 gal. of 40°F water to 140°F generates 3⁄4 gal. of thermal expansion. Without an expansion tank, this water leaks out of the tank’s temperature and pressure (T&P) valve, ruins the water heater, or causes a leak in the piping—the weakest link in the chain. T&P relief valves discharge under three conditions: pressure that is 150 psi (pounds per square inch) or above; temperatures above 210°F; or when the valve is worn out or fouled with debris. A badly leaking relief valve can double or triple your water-heating bill.
The fix: A properly sized thermal-expansion tank (TXT) should be installed to accommodate the increase in volume as water is heated. You’ll find TXTs in home centers next to the water heaters. Installation instructions come with each tank.
Grip fittings available today have virtually eliminated the need to solder piping, so the trickiest part of installing a TXT is providing proper support. Because water weighs 8.34 lb. per gal., good support is essential to prevent stressing newly installed joints. Provide that support with metal hanger strapping; don’t use the cheap plastic stuff. Most thermal-expansion tanks for residential use come in two sizes: 2-gal. and 4.5-gal. For an extra $15, your system will be better protected by the larger one.
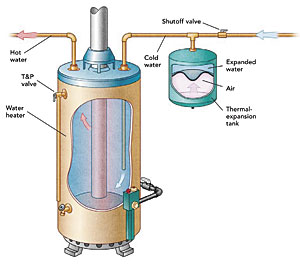
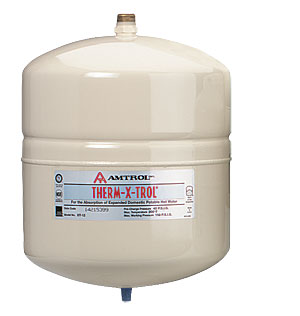
The savings: Adding a properly sized TXT can save money by reducing wear and tear on your home’s plumbing. The water heater will last longer; the faucets won’t wear out as quickly; and piping and fittings won’t break, split, or develop leaks caused by high pressure. It’s a wise investment.
5. ADD A GRAVITY-FED RECIRCULATION SYSTEM
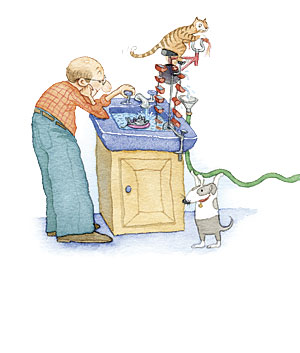
The facts: A family of four wastes as much as 12,000 gal. of water every year waiting for hot water to travel from the heater to the tap. That wait wastes water and energy, and puts an unnecessary burden on sewage-treatment systems.
The fix: Recirculating systems eliminate the wait by delivering instant hot water to all the fixtures in your house. Most systems use an electric pump, but even energy-efficient pumps cost money to run. You can put the pump on a switch, timer, or motion sensor for efficiency, but you sacrifice the convenience of hot water on demand.
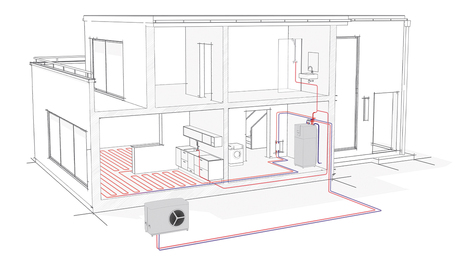
If you really want to save energy dollars and always have hot water at the tap, ask your plumber about a gravity-fed recirculation system. If you want to reduce your water-heating bill to $0, consider combining gravity-fed recirculation with a solar water heater, as I did in my home.
This is how gravity-fed recirculation works: When water is heated, its molecules expand and become less dense. Gravity causes the denser, and therefore heavier, cold-water molecules to sink to the lowest point in the system. All that’s needed to set up circulation between the hotter water at the top and the colder water at the bottom is a loop that returns from wherever the desire for instant hot water is located to the lower connection of the water heater. This generates a thermal circulation flow that gently moves hot water out to the end of the loop and back through the return. The entire loop must be well insulated to prevent wasting energy and short-cycling. With no moving parts to wear out, this system supplies instant hot water throughout the house 24 hours a day.
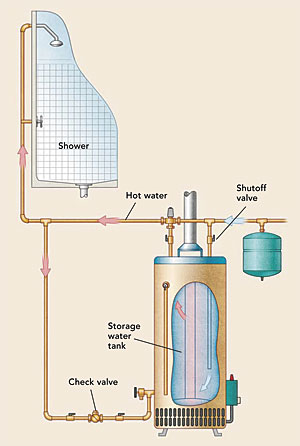
The savings: At between $600 and $1400, the initial cost of a recirculation system might seem like a deal breaker, but if you consider the return on investment (rather than payback), you’ll see the real value a recirculation system can offer. Let’s say you’re wasting 12,000 gal. a year waiting for hot water to come through. Eliminating that waste with a gravity-fed recirculation system saves you $265 in water, sewage, and water-heating costs (in my case, roughly half that expense was for heating the water). Now, if you’re saving a total of $265 annually and the system costs $1200, the annual ROI is an attractive 22%. A hefty tax-free return and no waiting for hot water—it doesn’t get better than that. A recirculation system powered by a pump will save you somewhat less.
6. TOSS YOUR OLD TANK AND TRY SOME NEW TECHNOLOGY
The facts: Efficiencies for water-heating systems range from 63% to 99%, and savings rise markedly with these efficiencies. Because upgrading your water heater can save significantly on energy costs, start by evaluating its efficiency. This chart lists household water-heating systems from least to most efficient based on the energy factor (EF), a measure of overall efficiency. Energy efficiency is not the same as cost efficiency, however. Electric storage-tank heaters have a high EF, yet typically cost more to operate; the wiser economic choice would be an appliance with a lower fuel cost, even if it’s a bit less efficient. Also, while all indirect water heaters are highly efficient, their actual efficiency depends on the boiler they’re connected to.
Listed from least to most efficient:
• Oil storage tank
• Propane-gas storage tank; natural-gas storage tank
• Propane-gas tankless; natural-gas tankless
• Electric storage tank
• Electric tankless
• Indirect water heaters attached to electric, oil, or gas boilers
• Solar
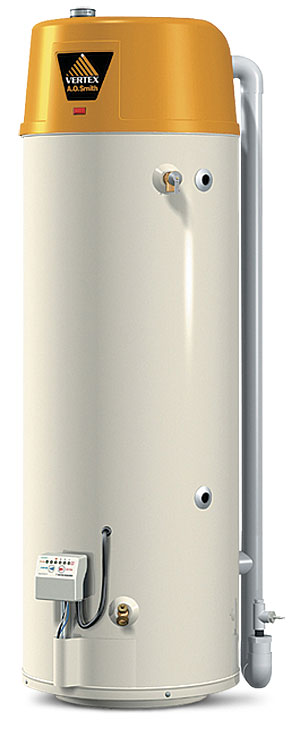
The fix: TRY A NEW TANK Replacing a tank-style water heater is a relatively straightforward task. Due to federally mandated changes, today’s models are safer and more efficient than those from just a few years ago. One change is beefier insulation (making them slightly bigger, so measure the space first). The feds have also lowered the Btu input, which, while boosting efficiency, also lowers the water heater’s gallon-per-hour recovery rate. As a result, you might need to increase storage volume by installing, for example, a 50-gal. model in place of a 40-gal. one.
You can expect to spend $500 to $1900 for a good-quality water heater. The range is due to the variety of gas and oil tank-style water heaters available today: atmospheric chimney-vented, where exhaust exits unassisted through a chimney (the least expensive to purchase, but the most expensive to operate); indirect-vented, where an electric blower exhausts combustion gases through horizontal piping (moderately more expensive to purchase and more demanding to install correctly); and high-efficiency sealed-combustion models with direct vents, in which both exhaust and combustion air are hard-piped to and from the home’s exterior (the most expensive, but the least costly to operate). Sealed combustion also eliminates combustion-related outdoor-air infiltration, which adds to a home’s heating load.
The savings: Switching out an old tank style with 63% efficiency for another with 67% efficiency won’t save you much, but upgrading to a 90% efficient, sealed-combustion model is a step in the right direction.
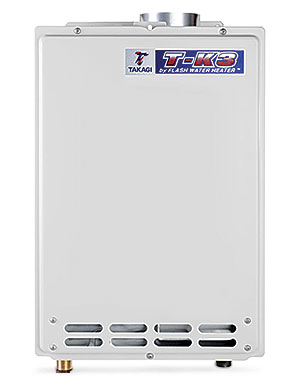
The fix: GO TANKLESS Although tankless and tank-style water heaters both operate at roughly 82% thermal efficiency when their burners are on, tank-style water heaters lose so much heat during standby mode that their actual efficiency averages 63%. If you install a tankless model and use the same number of gallons of hot water, you could save that 19% difference. But here’s the catch: Because there’s no threat of running out of hot water with a tankless heater, some people who’ve installed them start using more hot water, wiping out any savings. Used with restraint, however, tankless models can be more efficient than tank-style water heaters and save money.
The savings: Many of my customers switch from tank to tankless for the endless supply of hot water, rather than the cost savings. The cost of replacing a tank-style water heater with a tankless model ranges from $1500 to $2900. If you control your hot-water use and get the maximum 19% savings, you’ll save about $76 on a typical annual water-heating bill of $400.

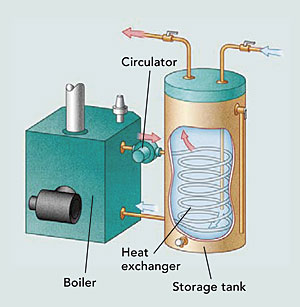
The fix: USE YOUR BOILER If you have a boiler for hydronic (water-based) heating, you can add an indirect water heater, essentially a tank that stores potable water heated through the boiler. Installed properly, an indirect water heater’s operating efficiency will closely match the boiler’s; when used with a high-efficiency modulating condensing boiler, the overall efficiency can range well above 90%. Because the boiler’s full Btu output is devoted to making domestic hot water, these models can meet the output of tankless water heaters. With no need for fuel lines or flues, highly insulated indirect water tanks can be located remotely from their energy source (the boiler) and closer to the points of use, reducing the wait for hot water. Adding an indirect water heater to a hydronic-heating system costs $1600 to $2800. These units last up to 30 years, and in lifecycle cost comparisons offer one of the lowest-overall costs for domestic hot water.
The savings: An indirect water heater is as efficient as the boiler to which it’s connected, from 78% to 98%. The range of savings is just as broad: Depending on water usage, fuel type, and other factors, you could save from about $50 to $400 a year.
The fix: GET STOKED BY THE SUN Solar hot-water systems provide free hot water, but at an up-front cost that might seem too steep: $6000 to $12,000, on average. Maybe that’s why the minute solar is mentioned, everyone asks about the payback. Federal and local incentives can help offset the cost. (Visit the North Carolina Solar Center’s database at www.dsireusa.org for incentives in your area.) Currently, the federal residential tax incentive for solar installations equals 30% of the system’s cost or $2000. Solar hot-water systems fall into two categories: flat panel and vacuum tube. Both systems work well when properly installed and can last 30 years or longer.
The savings: My home’s Viessmann 30-vacuum-tube system produces about 80% of our hot-water needs (typical savings are 70% to 80%). My payback is expected to be 12 years, but my ROI at today’s energy costs is 5%—better than current CD rates. As fuel costs increase, so does my ROI, which also shortens the payback time. Showering in liquid sunshine feels better, too.
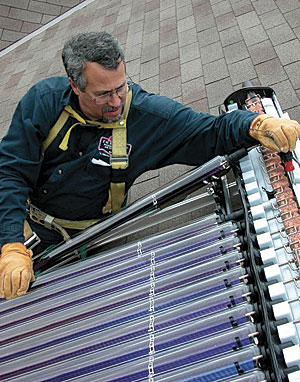

Dave Yates owns and operates F.W. Behler Inc., a mechanical-contracting firm in York, Pa. Photos courtesy of manufacturers, except where noted. Technical drawings by John Hartman; illustrations by Jackie Rogers.


