New Winders for an Old House
Don’t even think about tackling these space-saving stairs without a full-scale drawing and a pair of dividers.
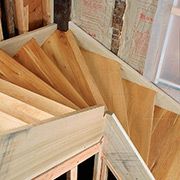
Synopsis: Building any set of stairs can be a complex procedure, but winder stairs are among the toughest to build. Veteran builder Andy Engel outlines his procedure for building winder stairs, which starts by creating a full-scale drawing of the winders on a couple of sheets of plywood. The drawing serves as the basis for the projected elevation of the stringers and also serves as the pattern when it’s time to cut the treads. Engel also describes the jigs he uses for building the winder stairs and his use of subtreads for support. Finally, Engel assembles the stairs in place; they are too unwieldy to build as a unit.
Magazine extra: Listen to an audio slide show where Kevin Ireton explains how he finished the stairs and installed the handrail.
It was hard to wrap my head around all the complexities of these stairs. Not only were they winders with all their attendant geometry, but the house itself hadn’t been plumb, level, straight, or square since the Lincoln administration. And there was some personal stress. Kevin, the homeowner, is my former boss and a capable carpenter himself. You’d probably expect this because he’s the editor of Fine Homebuilding.
Unlike spiral or curved stairs, winders have straight stringers and turn corners with a series of wedge-shaped treads, usually with a run of common stairs above and/or below them. Instead of turning a corner with a landing, winders squeeze several risers and treads into the same space, thereby fitting into a smaller overall footprint.
Measure total rise at the walk line
Measuring for winders is no different from measuring for any stair that turns a corner. You need to know the distance between the upper landing and the wall opposite, and the amount of room you have to extend the lower end of the stair. This is the total available run. You also need to know the total rise between floors. Because neither floor was level in this house, I measured the overall rise at the walk line — defined by code as being 12 in. from the narrow ends of the treads — and I oversized the top and bottom risers to allow for scribing later.
These stairs were to have housed stringers, meaning the treads and risers fit into mortises routed in the sides of the stringers. The mortises are angled to accept wedges (or shims) below the treads and behind the risers, which, combined with glue, tighten and bond the joints. I used my regular plywood stair jig to rout the common stringers, but I had to make a special jig for the winder treads (more on this later).
Start with a full-scale plan drawing
Drawing a plan view of the winders full size on a couple of sheets of plywood helps me to figure out the sizes and the angles of the treads and risers, and the pitch of the stringers. I draw both edges of all stringers, as well as a dotted line on each stringer representing the 3⁄8-in. depth of the tread mortise. The total run of the lower flight isn’t known yet, so I extend the lower stringer lines a little farther than I think is needed.
I start my layout at the top, drawing in the common treads first. For housed stringers, the unit-run layout lines represent the fronts of the risers; my unit run on these stairs was 9 in., which was the code minimum in Connecticut. I stop when I’m a foot or so away from the inside corner. Then I draw the walk line, using my dividers (set at 12 in.) to swing an arc around the corner.
Moving to the lower flight, I draw a line square to the stringers representing the back of the top common tread. The back of this tread is the same distance from the corner as the front of the upper flight’s first common tread. These two lines are the beginning and end of the winders.
For more photos, drawings, and details, click the View PDF button below:
Fine Homebuilding Recommended Products
Fine Homebuilding receives a commission for items purchased through links on this site, including Amazon Associates and other affiliate advertising programs.
Sledge Hammer
Portable Wall Jack

Magoog Tall Stair Gauges


