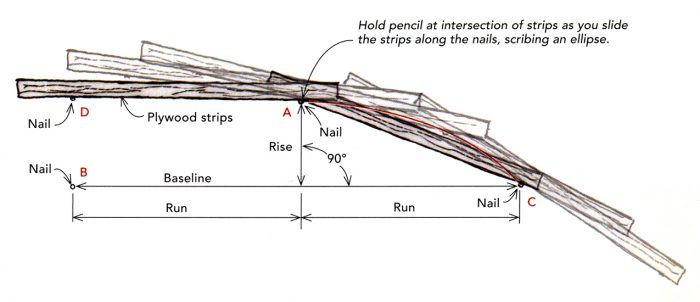
Arched openings add a nice touch to a doorway, an alcove, or even a piece of built-in furniture. Architects and builders typically choose the easy-to-draw, equal-rise- and-run section of a circle for this application. Just swing an arc, and be done with it. But sometimes an arc doesn’t look right because the curve wants a softer transition to the intersecting wall. That’s when you need the harder-to-draw unequal-rise-run ellipse. The drawing shows a simple way to solve this layout problem.
Start by measuring the baseline. For an arch at the end of a hallway, for example, the baseline is the distance between the walls. Divide this number in half to get the run of the ellipse. Next, determine the height of the arch in relation to its intersection with the wall. That’s the rise of the ellipse. On a sheet of plywood, lay out the baseline, run, and rise of the ellipse, as shown in the drawing. Now drive 10d finish nails at points A, B, and C. Next, square a line from point B the distance of the rise to find point D. Drive a nail into it. Now take two strips of plywood, overlap them as shown in the drawing, and nail them together so that they are in contact with the neighboring nails. Remove the nail at point D.
To draw the ellipse, place a pencil at the intersection of the two strips, and slowly slide the strips, always in contact with the remaining nails, as you move the pencil from point A to point C. Repeat from point A to point B to scribe a perfect ellipse.
Watch Chuck Miller demonstrate how to draw an ellipse.
Click here to enlarge the illustration.
David Kalin, Kaneohe, HI
Edited and Illustrated by Charles Miller
From Fine Homebuilding #204









View Comments
Great tip and a great video link demonstrating the process. Another not so elaborate method is three nails and a piece of lattice on edge. Two end points and the rise and you're good to go. This is useful for long arches you might find on cornice assemblies.
Not a true ellipse. Much, much easier to simply use the string method. You can use math (an "a", "b", "c", and an equation), like I taught my students, OR...
The length of the string is twice the width of the hall. Put a nail at the top of the ellipse. Now put the string around this nail and one finger on each hand (forming a triangle in the string), gradually moving those fingers out along the width (from the centerline) of the hallway. When the string is tight, put a nail where each finger is. These are called the focii. (Hopefully your two stretched-out arms are long enough to make the string tight.) Oh, and make sure each of your nails are the same distance from the centerline of the hall.-but I guess that just makes sense.
Yeah, it's not an ellipse. But that technique is an excellent way to draw an arc of a true circle, without having to find the center of that circle (a lot of the time, who cares what the radius is?)
For instance, if you're trimming out an arch-top window, trying to guess the radius and playing around with trammel points can take forever..
Instead, you can simply hold a straightedge across the window from spring line (where the curve leaves the vertical side and starts its arc) to spring line, and measure the distance to the top of the arc.
The width of the window and the distance to the top of the arc tells you where to place your three nails.
Bingo! You're there!
But it ain't an ellipse, it's an arc.