
“The definition of insanity is doing the same thing over and over again and expecting different results.”
-Albert Einstein
The first stab at any technique inevitably ends up with a few mistakes made along the way. When the composite decking of a friend of mine prematurely deteriorated, I was called in to help rebuild. After considering a variety of different composite and real wood choices, we finally settled on Ipé. Tough, long-lasting and eye-catching, Ipé is fast-becoming one of the most common choices for decking.
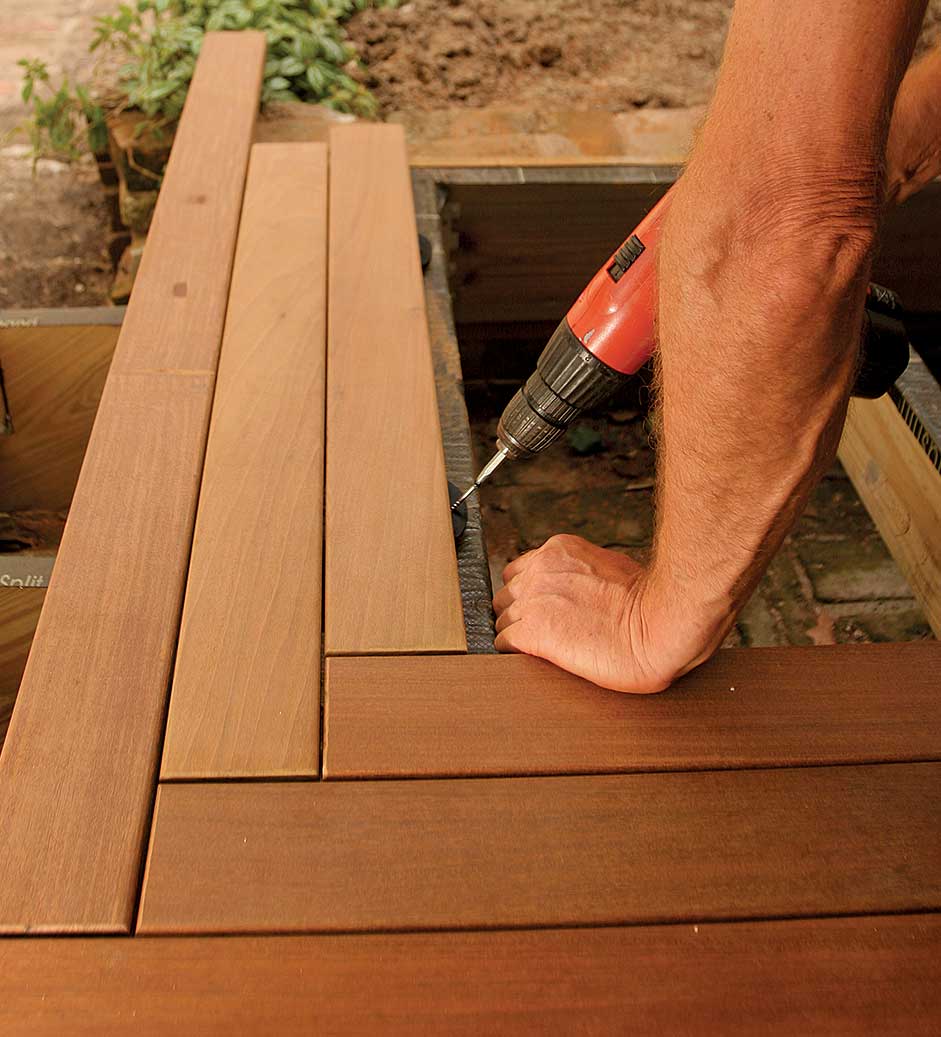
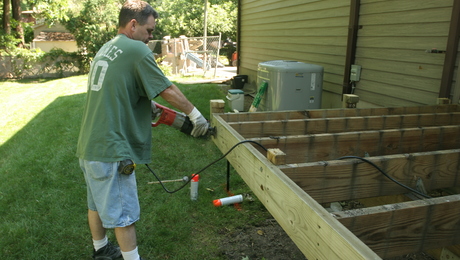
While my experiences in deck building had been primarily pressure-treated framing, cedar decking and conventional nails and screws, I had an urge to try something new this time around. Our plans involved preserving the natural unweathered color of the wood. We didn’t want the appearance of exposed screw heads interfering with that beautiful sea of amber tones so we went with the crowd and installed using hidden fasteners.
This being my first time working with both Ipé and hidden fasteners, I learned a few lessons and picked up a few tips along the way.
Protect Yourself
Wear a long-sleeved shirt, gloves and a dust mask when working with Ipé. I made the common mistake of not worrying about saw dust since I was cutting outdoors. Bad move. Although different people react in a variety of ways, I found the dust produced by Ipe to be rather irritating. By the end of the first day, I had developed a rash on both arms, was feeling lethargic (not from the labor, mind you) and had developed cold-like symptoms that included chest and nasal congestion. Ipé is able to resist decay due to compounds called naphthoquinones which can have adverse affects on skin and lung tissue.
Use Pre-Grooved Boards
I decided to save about $1,000 by ordering my lumber without fastening grooves milled into the edges, thinking I could simply cut slots using a biscuit joiner. While the method certainly works, it’s incredibly tedious. Cutting a slot on the edges of each board where it intersect a joist is a major waste of time and labor. It’s also murder on your tool’s motor!
Sort Your Lumber Ruthlessly
Ipé is tough stuff, so the more vigilant you are at weeding out bent or warped boards, the easier your job will be in the long run. This isn’t cedar. Your board bender will get a serious workout. I went through two during the course of the installation. I used the old tried-and-true Stanley model although you might want to have a look at Ipé Clip’s newly-released Hardwood Wrench. If you do end up using a straightening tool the likes of the Stanley 93-310, make sure you’ve got replacement bolts for the swiveling hook in your tool belt. You will break them. These are great tools but even steel has its limitations when it comes to Ipé!
Prepare for Frequent Bit and Blade Replacement
Sharp tools mean crisp cuts. Ipé will burn through drill bits and saw blades faster than a fox clearing out a henhouse.
Prevent Checking
Ipé end grain has a tendency to check, so be sure to use a wax-based sealer. Be vigilant with your sealing. Once you get your rhythm going during installation, it becomes very easy to forget this step. Manufacturers generally suggest sealing end grain within 24 hours of installation.
For more information, tips and techniques, be sure to consult our Deck Planning Center.
Fine Homebuilding Recommended Products
Fine Homebuilding receives a commission for items purchased through links on this site, including Amazon Associates and other affiliate advertising programs.

Affordable IR Camera

Reliable Crimp Connectors
8067 All-Weather Flashing Tape
This being my first time working with both Ipe and hidden fasteners, I learned a few lessons and picked up a few tips along the way.


View Comments
In issue 202 Deck boards done right, great article, i use the quikdrive system, and joist saver to create a 100 year old joist and most of the other techinques except i found it easier to fix the first board at the rim and work to the house adding the width of one deck board and a spacer gap multiplied by 5 then mark and stringline or chalkline and screw down every 5th deckboard, then cut and lay all the boards loosly in between, then use a few shims/wedges to space the gaps evenly between each fixed deckboard then screw one section down, no need to use a board bender the wedges do the job (hardwood wedges),in Oz we mainly use Imported and native hardwood decking most of it the hardest in the world, with this process it is 'no worrys'. (I havn't gone into full depth), and on another issue it is far easier to build using the metric system - example handrail spacing is simple division not so simple fractions with the imperial system, i feel sorry for you guys.
I was wondering if water would be able to pass through the ipe boards after they are installed?
If you had a second or third pair of hands would a board bender or hardwood wrench be necessary?
I really like the design of your deck. Simple and elegant.
Hello, mlherbe:
The deck you see in the photograph is actually from the current issue of Fine Homebuilding. John Michael Davis put together an excellent piece titled "An Elegant Border for Your Deck."
I tried various methods involving the use of clamps in order to straighten boards but in the end, found that the traditional bender was easiest.
As for spacing, the clips used generally provide you with 1/8" spacing for drainage.
Best,
-Ed
If you developed a rash from the dust...
Can walking on an ipe deck cause someone to have a rash on their feet??
If you developed a rash from the sawdust, what is the possibility of someone developing a rash from walking with bare feet?
PS To add with the framemonkey, metric is better.
Hi Dirk,
All of the reports I've found have involved dust, and not direct contact with the actual lumber. After I began using the dust mask and gloves during cutting, I continued to haul boards around without gloves and noticed no problems at all. It's a good question though. I'm going to put that before a couple of biologists I know who might be able to give you a more detailed answer than I can. Check back!
Best,
Ed
Hi again, Dirk:
I just placed a couple of phone calls and the response I received was in keeping with my own theory.
The fine dust caused by the sawing of Ipé settles on the skin and mixes with your perspiration. This "slurry" then settles into the skin's pores and causes a contact dermatitis. Simply touching the board isn't really going to cause any penetration into the skin but that fine dust/sweat mixture certainly will!
Best,
Ed
I have used Ipe on the west coast but now I'm here in Nashville; a totally different environment. I had always used stainless screws and plugs before. My partner here insisited on using the plastic anchors. We have had nothing but headaches with this system. The boards are cupping and the plasic anchor can't prevent them from lifting. I'll stick to the screw and plug method. Anyone else have any issues with these plastic bisquit anchors?
Hi teleart24, How close to the ground was your deck's surface? In my experience, as long as I had plenty of ventilation beneath my decking, I was OK with regards to cupping. I used Ipe Clip "extreme" clips and had about 16" of clearance between deck surface and the soil. Cheers, -Ed
Hi Ed,
You're onto something. We were about 16" at the highest point and 12" at the lowest point above the ground but we did install a vapor barrier. It is definetly a moisture issue. My partner bought the stock which was 1" x 6". He said that the 5/4" stock was not available in this area. I had only used the 5/4" stock on my decks in the SF bay area. I am not familiar with the "extreme" clips, maybe thats the ticket. When we used the plastic clips on the 1" stock it only left appx 1/4" of stock above the groove that was in the edge of the stock. In my opinion it was not enough to hold the stock down. Thanks Ed....Art
Before starting my own remodeling business I installed an ipe deck for a contractor who knew nothing about it, including its irritating dust. This made three of us since the person I worked with and I didn't' know either. After the first week we both had a major reaction.
My rash started on my elbow and quickly spread to my shins and after another week to my abdomen area. Now when I say rash, I mean a torturously itchy blistery rash which I had to treat with prednisone. At first glance the doctor immediately diagnosed it as poison ivy. He couldn't understand (or believe me) how I got it from this wood that he’s never heard of. The other guy who I worked with was lucky since his rash went away on its own.
It's important to note that we create the perfect situation for this to occur. We were working in 90+ degree humid Iowa weather with shorts and t-shirt. It wasn't until after the rash that our boss contacted the supplier who then told him the possible side effects. I also feel confident that it was the dust and not the wood that caused the reaction.
Even though we did not where a dust mask, we never did experience congestion or were lethargic.
In the end the deck looked amazing. People should know however that ipe looses all color after a few years resulting in a silverfish grey.
Has anyone stopped to consider where this wood is coming from and if it is being harvested sustainably or are we just using up some other countries resource until it is depleted?
Hi ChimeWind,
Excellent question. There are a variety of companies out there now using sustainable harvesting techniques. Most of the suppliers I looked into when pricing out my material were obtaining material from these types of sources. I think it's simply a reflection of the popularity of the species in construction these days.
On a relates side note, there are even farms in South America offering investment plans for tropical hardwood. These farms run sustainable outfits and have some pretty decent ROIs. It's an interesting phenomenon.
Best,
-Ed
I'm a homeowner and I'm about to install 5/4 by 6" air dried Cumaru decking on three decks in Brookline, MA and intend to use a hidden fastener system. I've read all the content on this site as well as the various manufacturers material and can't form a definitive point of view regarding what the best deck fastener is for my use. The big deck is about 1,000 sq. ft. and ~ 12" off the ground. The framing is pressure treated with 16" spacing. I intend to use long board lengths - 16', 18' and 20' as much as possible. It seems that EB-Ty, Dec Clip, Lumber Loc, Equator, and Ipe Clip Extreme are all reasonable products. What about Sure Drive's Mantis Deck Clip System? I care about longevity and will pay a premium to not have to do this project a second time. What are the pros and cons of a clip that srews only into the joist versus the clips that are screwed at a 45 degree angle through the bottom corner of the deck board and then into the joist? It would be great to hear a point of view.
I wish my lumber salesman mentioned this Ipe dust problem. I am home sick instead if finishing it today.
I've done about 10 IPE decks in the past few years and the system for fastening that I've found works the best is to drill a 3/8 pilot hole and countersink for
#8 x 1 1/2 deck screws and then make wood plugs from the IPE and use Gorilla glue or other polyurethane glue to install the wood plugs. Chisel the plugs flush and then sand the entire deck with a large square pad floor sander ( #60 grit then #80 to finish. We use a couple of coats of marine teak oil to seal. Looks beautiful,
teak oil will need to be re-applied every 6 months but is very easy to apply.
It may seem like a lot of work to screw and plug everything but any type of hidden fastener is not strong enough to control the IPE.And the plugs give a real nice marine look. They seem to be holding up fine, areas with exposure to the weather need to be maintained more.
This is in British Columbia Canada where our climate is very wet and rainy. A drier climate would prob be easier on the IPE
IPE decks look beautiful when first put down and oiled. However, to keep that "new" appearance you have to constantly, like yearly, power wash and reoil or they will grey up on you. Other than that they are a great long lasting deck
Let me share my experience with Ipe on a 900 sq.ft. deck. First the wax sealer for the ends (I used Anchor seal) tends to soak into the end grain and leave an unsightly satin about 1 1/2" on each side of the board. Now that mine has weathered it is not as apparent unless the deck is wet and then the wax stain shows up. I have tried cleaning the ends, sanding but the wax blemish is still there after two years.
As far as keeping the unweathered look, I hope you like maintenance. Surface sealers don't work, you need to use something like Penofin as the wood is extremely dense and won't absorb most sealers. The deck need to be cleaned with a deck cleaner to remove mill burnishing (when new) and oxidation (when refinishing) and allowed to dry for 24 to 48 hours. Then the hard part. The sealer needs to be applied and allowed to sit for 20 minutes and wiped off. If it's a hot day the sealer gets real thick and is hard to wipe off. Beware that the oily rags can combust if left in a pile Its a lot of work and I have done mine twice and now have let it go natural (grey). When you finish Ipe it is extremely beautiful, after twice I proved too much work. I might do it again if I'm feeling I need some pain. Be aware that oily spills are difficult to get off and really need to eventually wear off. I spilled olive oil on the deck and the stains are still apparent.
I don't want to discourage anyone, just share some of my experience. I don't think there is such a thing as a maintenance free deck material. I personally don't like the synthetics.
Hope this helps
kind of a tangental thread BUT , I was wondering if any of you chaps have experienced much widthwise shrinking with IPE? I want to lay the boards diagonally on a 45 and want to dress up the ends with a border board.
I have experienced very obvious width wise shrinkage on Select DecK press treated SYP and it showed up at the mitred ends. Laid diagonally w/ the ends cut on a chalk line only to have everything shrink creating a sawtooth zigzag line instead of the the strait cut line..I recut that line a year later, eased the edges AGAIN and then bordered it .ANd it stayed good
I am hoping IPE is dry enuf that this won't occur . SHould I biscuit and glu each 45'd edge into the preguved edge of the border board? Thanks for any input
GNC59 how did your install go and what type of hidden fastener system did you go with? Also how was it working with 18 foot boards?
-Scott
GNC59 what hidden fastening system did you end up going with? Any issues with them? Also I'm specifically interested in your experience working with 18 foot boards. Thank you.
-Scott
Has anyone tried installing IPE decking over top of an existing pressure treated deck surface? I have a 1000 sq. ft deck that structurally is sound and would like to install IPE decking directly on top. The IPE boards would run perpendicular to the existing boards.
Great article about some of the things to watch out for! We put together something similar of our own:
http://www.edeck.com/blog/ipe-problems-run/
I think the other thing to remember is that the decking lasts so long you want to make triple sure you do it right the first time.
Thanks
Paul