FHB Logo Facebook LinkedIn Email Pinterest Twitter X Instagram Tiktok YouTube Plus Icon Close Icon Navigation Search Icon Navigation Search Icon Arrow Down Icon Video Guide Icon Article Guide Icon Modal Close Icon Guide Search Icon Skip to content
Subscribe
Log In
  • How-To
  • Design
  • Tools & Materials
  • Restoration
  • Videos
  • Blogs
  • Forum
  • Magazine
  • Members
  • FHB House
  • Podcast
Log In

Fine Homebuilding Project Guides

Drywall

Guide Home
  • Drywall Basics
  • Tools and Materials
  • Hanging Drywall
  • Taping and Sanding
  • Special Installations
  • Drywall Repairs
  • Plaster
How-To

Fight Mold With Paperless Drywall

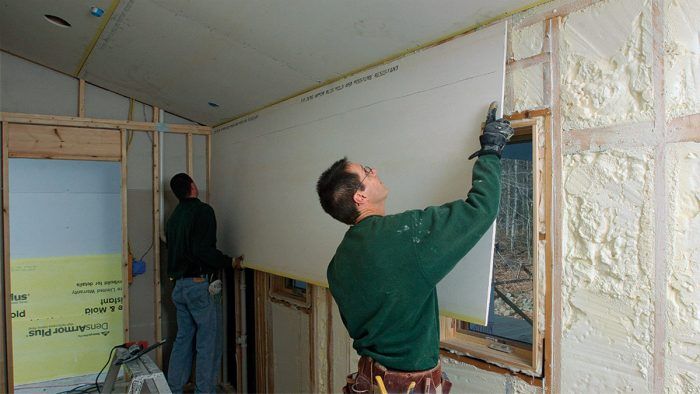
Switching to fiberglass-faced drywall makes kitchens, baths, and basements more mold resistant, but it also means adopting some new work habits.

By Myron R. Ferguson Issue 210
  • X
  • facebook
  • linkedin
  • pinterest
  • email
  • add to favorites Log in or Sign up to save your favorite articles

Synopsis: For walls in damp environments, such as bathrooms, kitchens, and basements, paperless (or fiberglass-faced) drywall is a good alternative to the traditional paper-faced material. However, working paperless drywall entails learning a new set of rules. Drywall expert Myron R. Ferguson shares his advice on four new work habits to adopt when you’re working with paperless drywall. Ferguson advises using both screws and adhesive to fasten these panels. Also, he advises using hand tools instead of power tools to minimize dust. Inorganic tape helps with the mold resistance of the drywall. Finally, Ferguson says to sand the surfaces that you can, but to skim-coat where you can’t.


Paper-faced mold-resistant drywall
Paperless product choices. Paper-faced mold-resistant drywall panels are made by most gypsum companies, but only a few make paperless gypsum for interior applications. The average cost for a 1/2-in.-thick 4×8 sheet is about $18, but thicker panels and different sizes are also available from each company. (Aqua-Tough: usg.com; DensArmor Plus: gp.com)

Let’s face it there’s been a lot of talk about mold in the past few years. The topic has gotten plenty of attention in the news, has been the focus of lots of building-science research, and has made many homeowners nervous. Here’s the thing: Mold spores are everywhere and are nearly impossible to avoid, never mind eliminate. What we can do, though, is help to prevent those mold spores from taking root in our indoor living spaces. That’s where products like paperless drywall come into play.

Mold needs four things to grow: oxygen, water, a temperature between 40°F and 100°F, and an organic food source. Considering this group of ingredients, it’s not surprising that mold is commonly found on lumber in the basement, on the wall behind the sink in the kitchen, and on the wallpaper adhesive in the bathroom.

New Work Habit #1: Back up screws with adhesive

Paperless drywall can be fastened with ordinary drywall screws. I use 1-1/4-in. screws for both 1/2-in. and 5/8-in. panels. Because these panels are harder to fasten properly, I don’t rely on screws alone.

applying drywall adhesive
Adhesive is cheap insurance. Applying a bead of drywall adhesive not only reduces the number of fasteners necessary on wall panels (chart below), but it also makes up for the high likelihood that some of the fasteners will be set too deep. Without the paper facing, it’s much easier to overdrive fasteners into fiberglass-faced products. Make sure to adjust the clutch of the screw gun so that fasteners are driven until they indent the surface of the board slightly, but not so far that they tear through and lose holding power. Consider adhesive and screws to be best practice with fiberglass-faced products.

installing paperless drywall

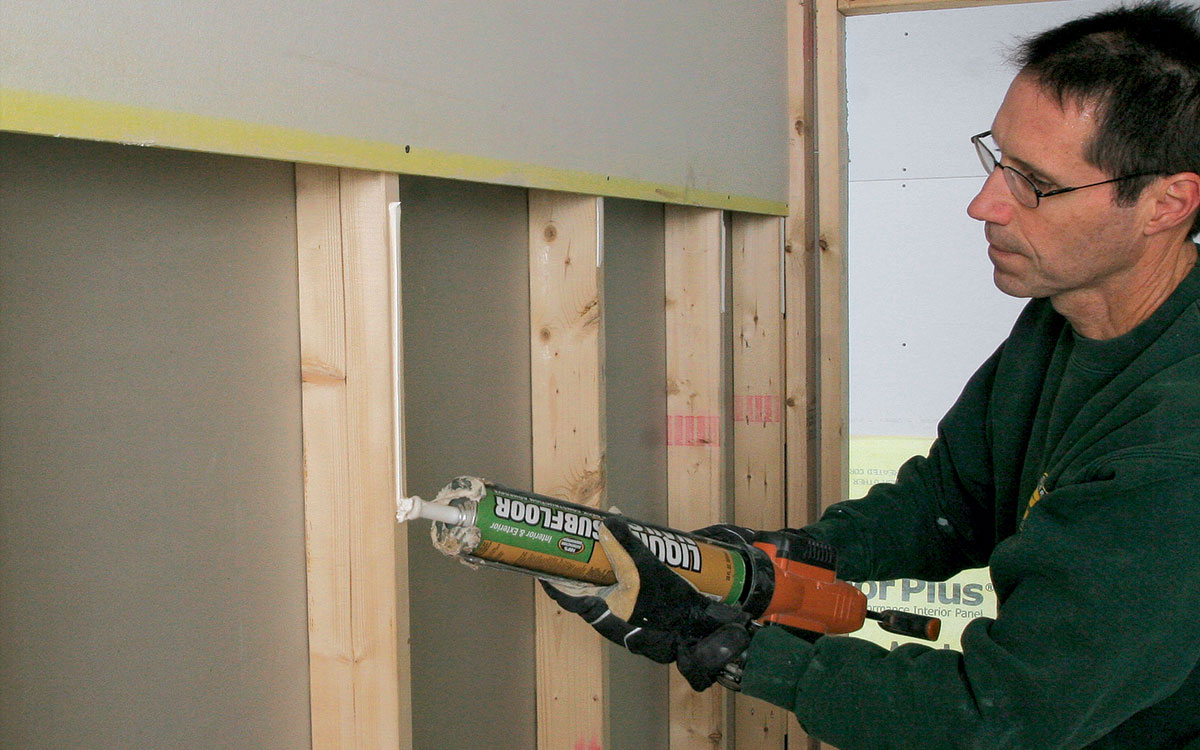
The first step in preventing mold growth is to get firm control over the level of moisture in the air (see “Breathing Fresh Air Into Bathroom Ventilation,” online at FineHomebuilding.com). After that, the focus should be on eliminating the organic food source.

Paper is a gourmet meal for mold

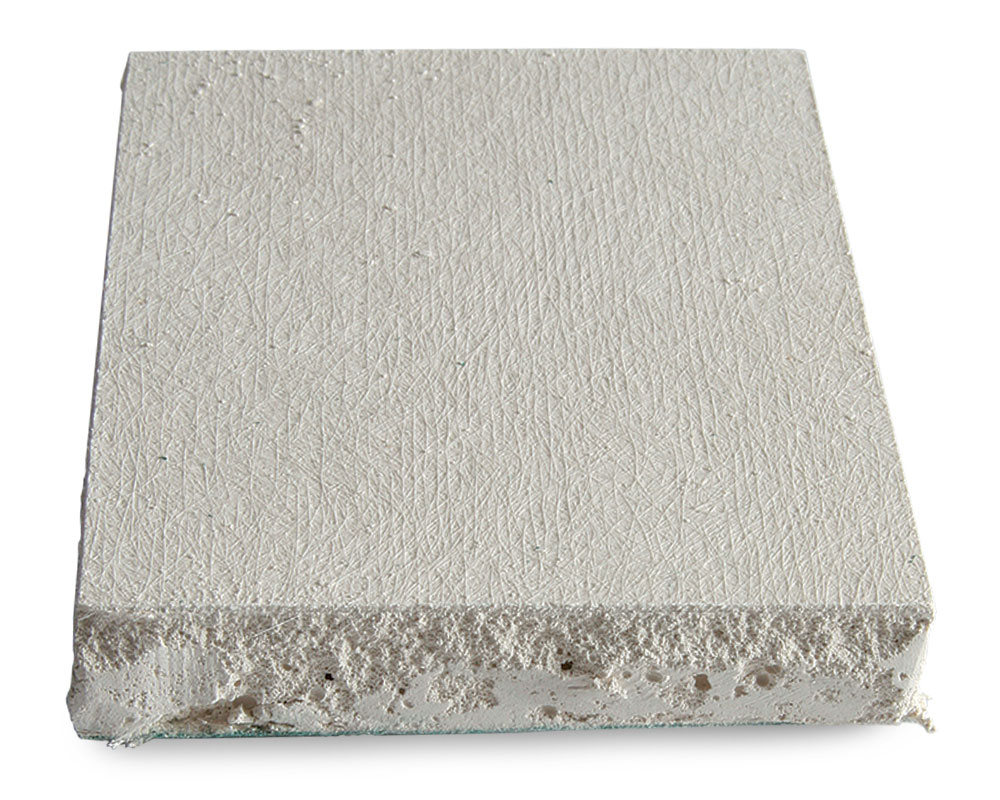
Because mold decomposes organic (once living) material as a food source, the paper facings on the front and back of drywall are an easy target. Most drywall manufacturers have fought this problem by offering modern versions of the old wax-coated “greenboard” that has been used in bathrooms for years. Many of these modern paper-faced products even scored a perfect 10 on the ASTM standard for mold resistance. For the ultimate peace of mind, though, a few drywall manufacturers have now created paperless drywall, removing all sources of organic food.


screws in drywall

TIP: I often leave screws slightly proud and then sink them by hand for a perfect dimpled depth.


drywall screws and adhesive
Glue means fewer screws. There are several brands of drywall adhesive on the market, but any construction adhesive that meets ASTM C-557 can be used. If the local building inspector wants to see the proper amount of fasteners and can’t verify what’s behind the walls, consider the belt-and-suspenders approach: adhesive and standard screw spacing. See the chart at right to compare fastening schedules with and without adhesive.

New Work Habit #2: Put away power tools to minimize dust

Because paperless drywall has fiberglass facings on the front and back, it’s in your best interest to keep airborne dust to a minimum. I recommend wearing a dust mask when cutting these products. Drywall dust alone warrants a mask. Add fiberglass to the equation, and your throat and lungs can become seriously irritated. Also, gloves and a long-sleeve shirt will help you to avoid getting itchy slivers of fiberglass on your hands and arms. the equation, and your throat and lungs can become seriously irritated. Also, gloves and a long-sleeve shirt will help you to avoid getting itchy slivers of fiberglass on your hands and arms.

cutting drywall
Avoid the router where possible. Drywall routers are a fast method for making drywall cutouts. In fact, they leave an even cleaner cut in paperless drywall than in regular paper-faced products. However, they create an enormous amount of fiberglass-laden dust. For cutting around electrical boxes, the small amount of dust is a fair trade-off for the more accurate cutout, but for door and window openings, use a utility knife and a handsaw.


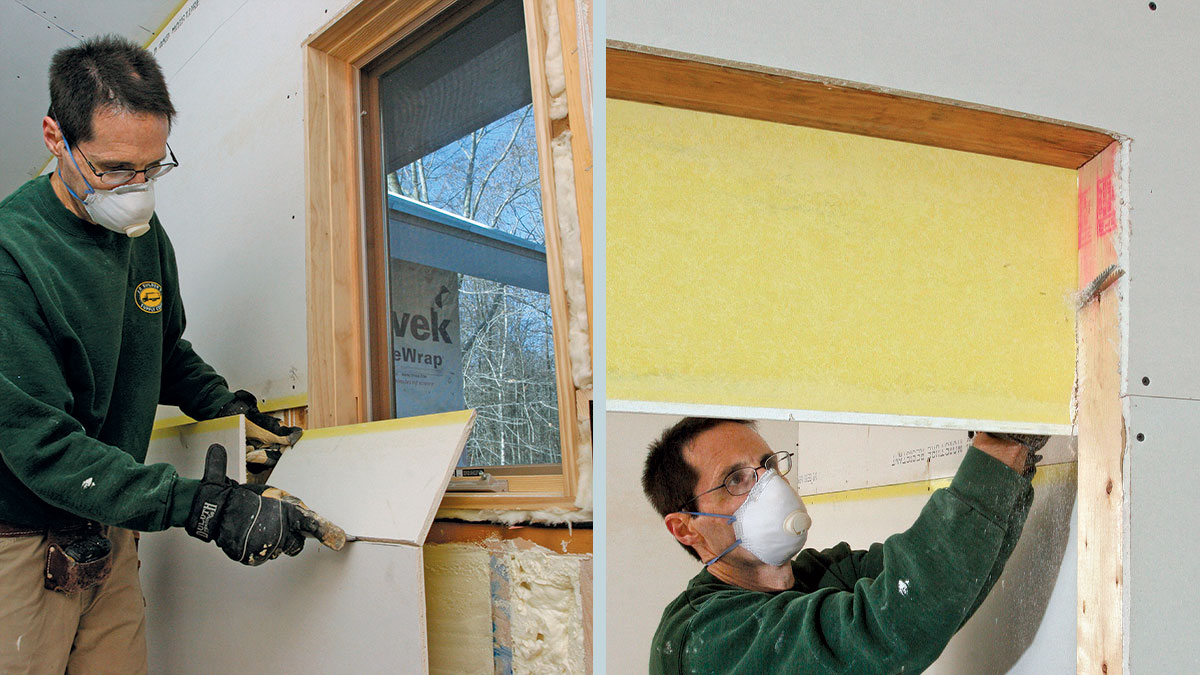
By replacing drywall’s paper facing with an inorganic fiberglass mat, products like DensArmor Plus offer excellent mold resistance compared to standard paper-faced wallboard products. But don’t get a false sense of security; these products are only as good as the installation.

For example, I once had a truckload of paperless drywall delivered to a job site, and when I started to install the product, I noticed that the back side of one sheet was dirty. I guess the drywall must have been stacked at a convenient height for a lunch or a coffee break because somebody had spilled coffee or soda on it. Then dirt and sawdust from the lumberyard and the job site clung to the sheet. If I hadn’t noticed the stain and tossed the sheet, I would have quickly defeated the mold resistance of the paperless drywall. If paperless drywall isn’t handled properly or installed correctly, the job may be little more than a pricier route to the same place.

router on paperless drywall
If you use a router, use it smart. If you can’t bring yourself to part with the drywall router, there are still ways to minimize the dust. Begin by avoiding the larger 1/4-in.-dia. “window and door” drywall bits. Bigger bits can be pushed harder and faster and are less likely to break, but they also create much more dust than the standard 1/8-in.-dia. bits.

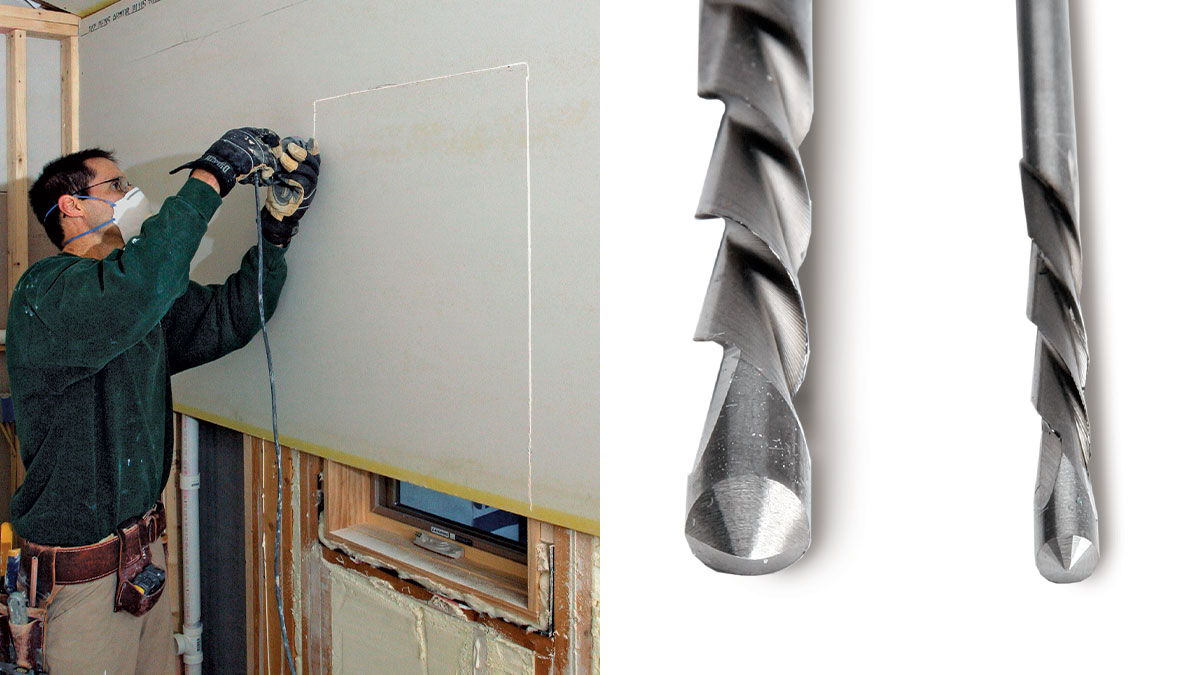
TIP: Large offcuts falling to the floor can kick up lots of dust. To avoid this, leave a little bit of drywall at the edge of the cut, then slice the piece free with a utility knife and carefully remove it.


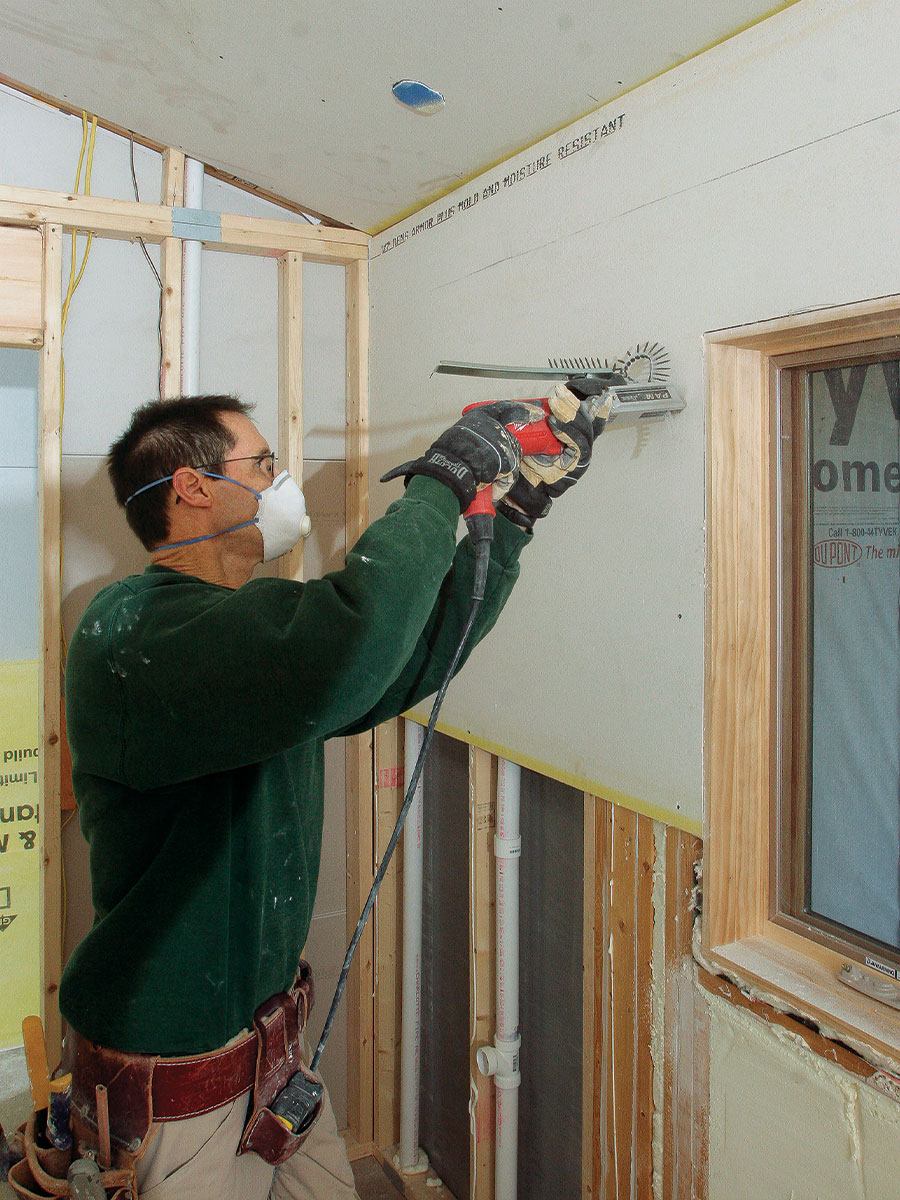
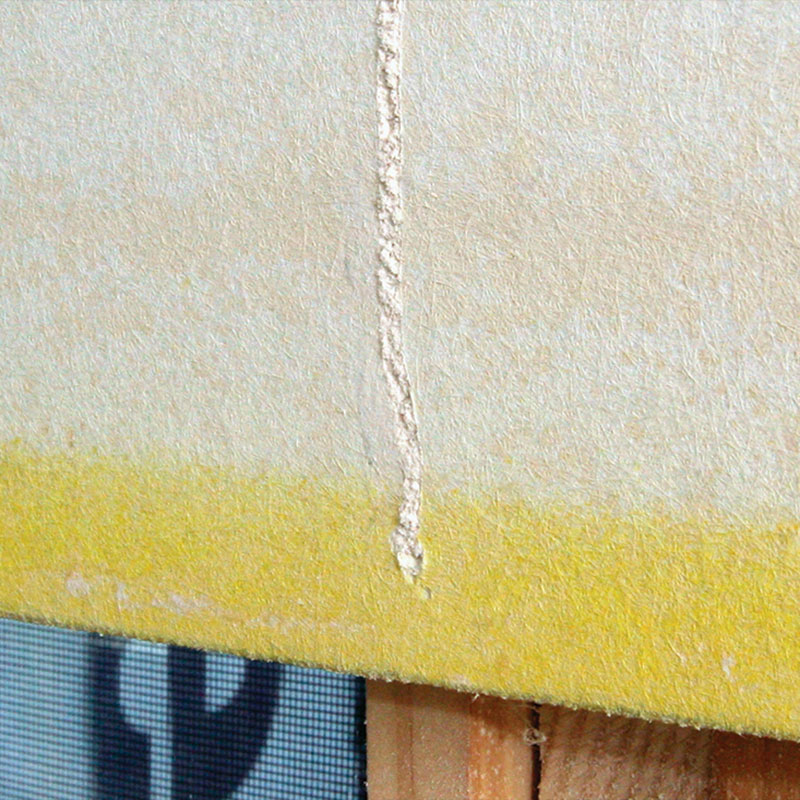
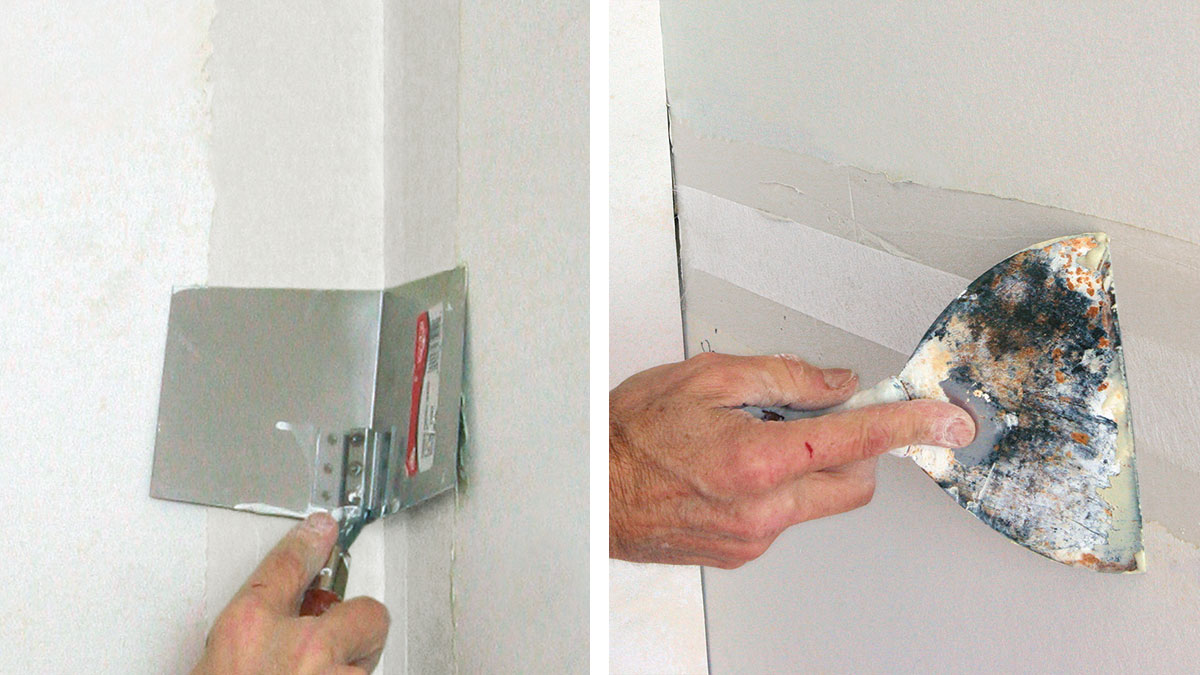
New Work Habit #3: Switch to inorganic tape

Paper tape set in premixed joint compound is a manufacturer-approved option for finishing joints on paperless drywall, but most encourage the use of setting-type compound (photo below left) and mesh tape, which further reduces the chances of mold growth by removing a food source. Standard mesh tape is widely available and a fine choice, but I prefer FibaFuse fiberglass tape (photo below right; sgtf.com), which has a thinner open-fiber weave. Either way, these tapes come with their own set of rules.

FibaFuse fiberglass tape


embed drywall tape
Embed the tape with care. Apply the mesh tape in a thinned mixture of compound because it’s easy to cut through fiberglass tape accidentally with the edge of a taping knife. Likewise, use a corner knife to avoid tears on inside corners, a relatively new knife for the rest of the seams, and fairly gentle handling all around.

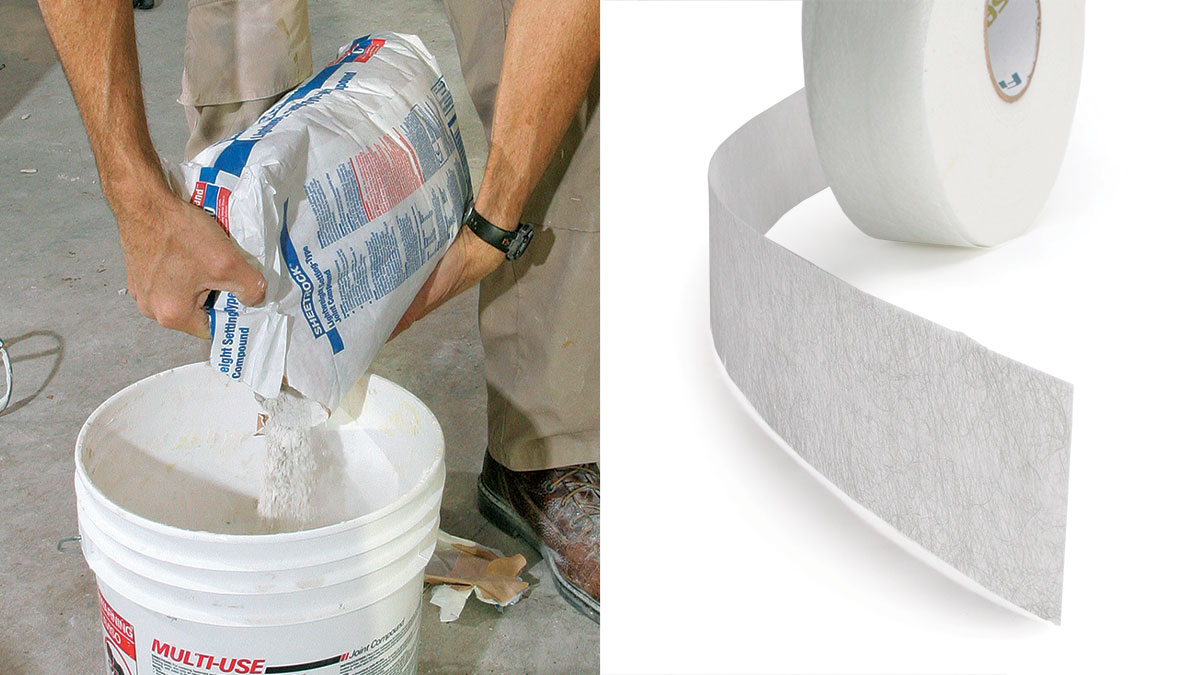
TIP: Use a relatively new taping knife for working with mesh tape. The older the knife, the sharper the edges will be.


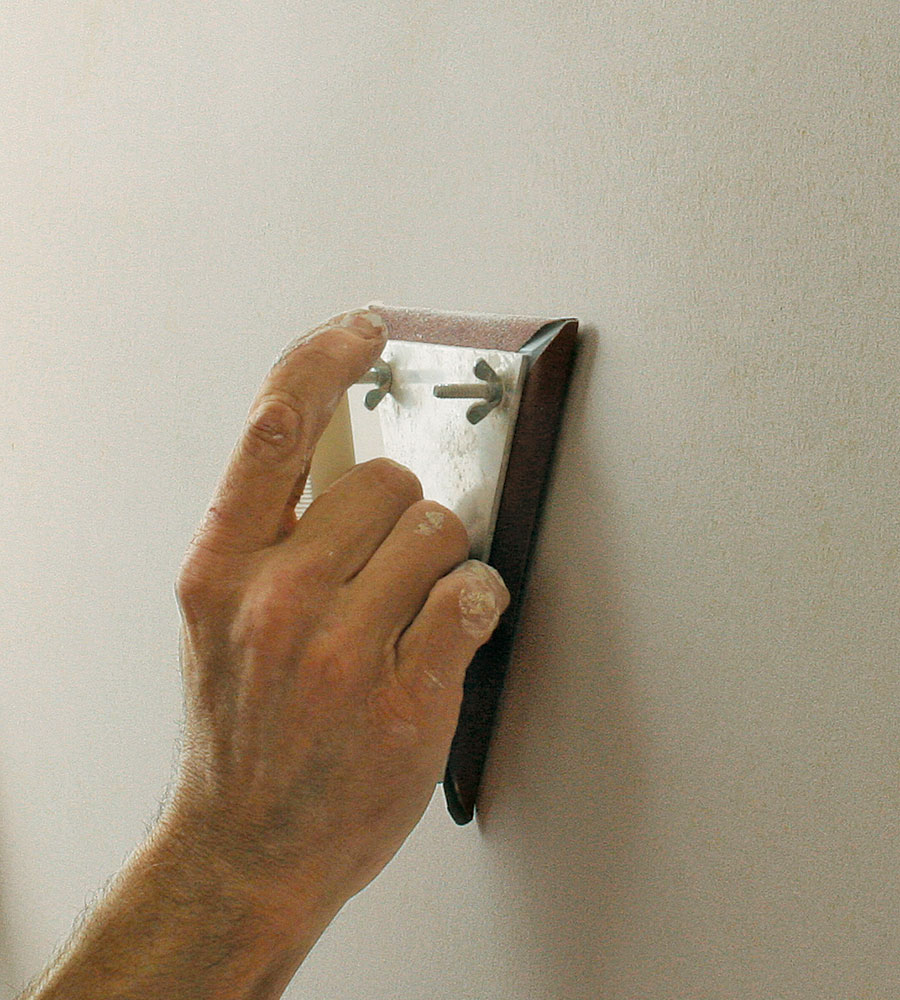
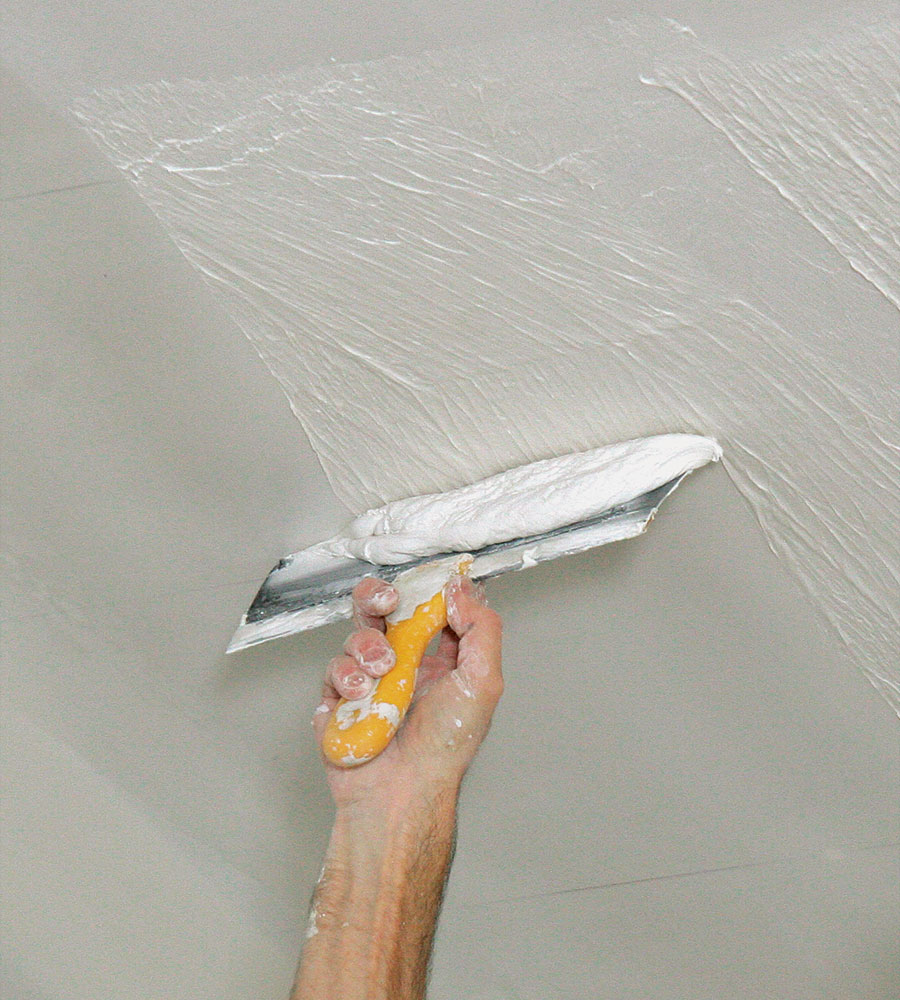
New Work Habit #4: Sand where you can; skim-coat where you can’t

Fiberglass-faced wallboard has a slightly rougher surface than paper-faced drywall, and there’s a lot of fuss about how to make this surface blend with the smooth-sanded taped seams. A typical drywall job is taken to what’s known as a level-4 finish: two coats of joint compound on all seams. Paperless drywall can be finished to the same level, but only if you plan to roll on a high-solids primer. It’s not much extra work either to sand all the walls lightly to knock down the fiberglass texture or to do a level-5 finish (two coats of joint compound on all seams, followed by a skim coat of the entire surface).

sanding drywall
OPTION 1: Lightly sand the walls and ceilings after applying the third coat of joint compound to the seams. Unlike paper-faced drywall, these products become smoother when sanded. The trade-off to this faster approach is more airborne fiberglass dust, so protect yourself accordingly.

skim-coating drywall
OPTION 2: Skim-coating the entire surface of the drywall with a thin layer of joint compound is fine if you’re comfortable with taping knives. In fact, this is the best option for any type of drywall that will be coated with high-sheen paint or exposed to strong raking light at any point in the day.


Paperless products behave similarly to standard paper-faced drywall, but they are a bit more fragile to handle and install, require different products to tape, and typically must be finished to a more uniform surface before being painted. Learn these quirks, though, and you’re likely to have a successful experience with paperless products.

Click the View PDF button below to see the article as a PDF:

View PDF
Previous: What’s the Difference: More Moisture-Resistant Drywall Next: Fire-Resistant Drywall

Guide

Drywall

Chapter

Drywall Basics

Sign up for eletters today and get the latest how-to from Fine Homebuilding, plus special offers.

Signing you up...

This site is protected by reCAPTCHA and the Google Privacy Policy and Terms of Service apply.
See all newsletters
See all newsletters

View Comments

  1. MichaelRW | Jan 29, 2021 12:10am | #1

    Would an oscillating tool (like a Fein) be better for cutting the fiberglass wallboard than a rotary tool? I know when I use my Fein on wood the dust created generally drops right below the cut and I don't see much of any airborne dust.

Log in or create an account to post a comment.

Sign up Log in

Become a member and get full access to FineHomebuilding.com

Drywall

Drywall

Trusted, comprehensive guidance for choosing, hanging, taping, sanding, and repairing drywall—the right way

View Project Guide

View All Project Guides »

Become a member and get unlimited site access, including the Drywall Project Guide.

Start Free Trial

Drywall Basics
  • Types and Uses of Drywall
  • Planning the Job
Tools and Materials
  • Hanging Tools
  • Taping Tools and Materials
  • Sanding and Finishing Tools and Materials
Hanging Drywall
  • Prep for Hanging
  • Measuring and Cutting Drywall
  • Guidelines for Hanging and Fastening Drywall
  • Hanging Ceilings
  • Hanging Walls
  • Hanging Airtight Drywall
  • Trim Accessories/Corner Beads
Taping and Sanding
  • Taping Basics
  • Taping Seams
  • Taping Inside and Outside Corners
  • Sanding
Special Installations
  • Tricky Transitions
  • Curved Surfaces
  • Other Special Installations
  • Decorating with Drywall
Drywall Repairs
  • Patching Holes, Cracks, and More
Plaster
  • Working with Lime Plaster
  • Plaster Repair
  • Classic Plaster Techniques

Fine Home Building

Newsletter Sign-up

  • Fine Homebuilding

    Home building tips, offers, and expert advice in your inbox.

  • Green Building Advisor

    Building science and energy efficiency advice, plus special offers, in your inbox.

  • Old House Journal

    Repair, renovation, and restoration tips, plus special offers, in your inbox.

Signing you up...

This site is protected by reCAPTCHA and the Google Privacy Policy and Terms of Service apply.
See all newsletters

Follow

  • Fine Homebuilding

    Dig into cutting-edge approaches and decades of proven solutions with total access to our experts and tradespeople.

    Start Free Trial Now
    • Facebook
    • Instagram
    • X
    • LinkedIn
  • GBA Prime

    Get instant access to the latest developments in green building, research, and reports from the field.

    Start Free Trial Now
    • Facebook
    • YouTube
  • Old House Journal

    Learn how to restore, repair, update, and decorate your home.

    Subscribe Now
    • Facebook
    • Instagram
    • X

Membership & Magazine

  • Online Archive
  • Start Free Trial
  • Magazine Subscription
  • Magazine Renewal
  • Gift a Subscription
  • Customer Support
  • Privacy Preferences
  • About
  • Contact
  • Advertise
  • Careers
  • Terms of Use
  • Site Map
  • Do not sell or share my information
  • Privacy Policy
  • Accessibility
  • California Privacy Rights

© 2025 Active Interest Media. All rights reserved.

Fine Homebuilding receives a commission for items purchased through links on this site, including Amazon Associates and other affiliate advertising programs.

  • Home Group
  • Antique Trader
  • Arts & Crafts Homes
  • Bank Note Reporter
  • Cabin Life
  • Cuisine at Home
  • Fine Gardening
  • Fine Woodworking
  • Green Building Advisor
  • Garden Gate
  • Horticulture
  • Keep Craft Alive
  • Log Home Living
  • Military Trader/Vehicles
  • Numismatic News
  • Numismaster
  • Old Cars Weekly
  • Old House Journal
  • Period Homes
  • Popular Woodworking
  • Script
  • ShopNotes
  • Sports Collectors Digest
  • Threads
  • Timber Home Living
  • Traditional Building
  • Woodsmith
  • World Coin News
  • Writer's Digest
Active Interest Media logo
X
X
This is a dialog window which overlays the main content of the page. The modal window is a 'site map' of the most critical areas of the site. Pressing the Escape (ESC) button will close the modal and bring you back to where you were on the page.

Main Menu

  • How-To
  • Design
  • Tools & Materials
  • Video
  • Blogs
  • Forum
  • Project Guides
  • Reader Projects
  • Magazine
  • Members
  • FHB House

Podcasts

  • FHB Podcast
  • ProTalk

Webinars

  • Upcoming and On-Demand

Podcasts

  • FHB Podcast
  • ProTalk

Webinars

  • Upcoming and On-Demand

Popular Topics

  • Kitchens
  • Business
  • Bedrooms
  • Roofs
  • Architecture and Design
  • Green Building
  • Decks
  • Framing
  • Safety
  • Remodeling
  • Bathrooms
  • Windows
  • Tilework
  • Ceilings
  • HVAC

Magazine

  • Current Issue
  • Past Issues
  • Magazine Index
  • Subscribe
  • Online Archive
  • Author Guidelines

All Access

  • Member Home
  • Start Free Trial
  • Gift Membership

Online Learning

  • Courses
  • Project Guides
  • Reader Projects
  • Podcast

More

  • FHB Ambassadors
  • FHB House
  • Customer Support

Account

  • Log In
  • Join

Newsletter

Get home building tips, offers, and expert advice in your inbox

Signing you up...

This site is protected by reCAPTCHA and the Google Privacy Policy and Terms of Service apply.
See all newsletters
See all newsletters

Follow

  • X
  • YouTube
  • instagram
  • facebook
  • pinterest
  • Tiktok

Join All Access

Become a member and get instant access to thousands of videos, how-tos, tool reviews, and design features.

Start Your Free Trial

Subscribe

FHB Magazine

Start your subscription today and save up to 81%

Subscribe

We hope you’ve enjoyed your free articles. To keep reading, become a member today.

Get complete site access to expert advice, how-to videos, Code Check, and more, plus the print magazine.

Start your FREE trial

Already a member? Log in

Privacy Policy Update

We use cookies, pixels, script and other tracking technologies to analyze and improve our service, to improve and personalize content, and for advertising to you. We also share information about your use of our site with third-party social media, advertising and analytics partners. You can view our Privacy Policy here and our Terms of Use here.

Cookies

Analytics

These cookies help us track site metrics to improve our sites and provide a better user experience.

Advertising/Social Media

These cookies are used to serve advertisements aligned with your interests.

Essential

These cookies are required to provide basic functions like page navigation and access to secure areas of the website.

Delete My Data

Delete all cookies and associated data