How to Build Basic Deck Stairs
Notched stringers make strong stairs that are easier to build than you think.
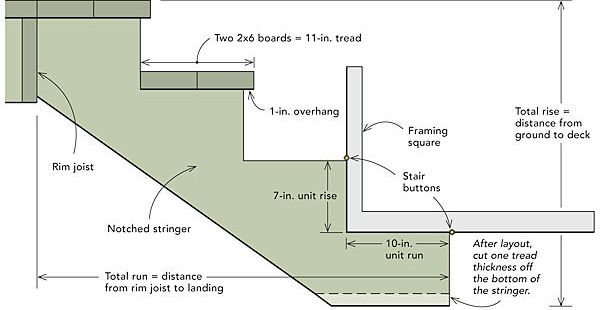
Building even a simple set of stairs can seem pretty intimidating if you’ve never done it before. But once you understand how to lay out the stringers, you’ll see it’s largely a matter of measuring the overall height, or rise, of the stairs and determining a comfortable, safe depth for the treads, known as the run. the hardest work is done by the time you get out your saw. If your project calls for a basic stair or if you just need to understand the fundamentals so that you can confidently tackle a custom project, the notched-stringer stairs shown here will get you started.
How many steps?
Divide the total rise by a comfortable riser height (7 in. is standard); the result is the number of risers, plus a fraction. Divide the whole-number portion back into the total rise to get the exact rise per step. The number of treads will be equal to or one less than the number of risers, depending on how the stairs are attached to the deck. Multiply the number of treads by their depth for the total run.
Lay out and cut the stringers
1. Determine total rise. Use a level and a measuring tape to find the total rise. Remember to factor in a concrete pad if one will be installed later. Use the calculations explained above to figure out the number of steps and the total run.
2. Stair buttons ensure an accurate layout. Small clamps known as stair buttons screw onto a framing square to mark the unit rise and the unit run on a stringer. Working from bottom to top, slide the square up the stringer, marking each notch the same way. The bottom of the stringer is marked parallel to the tread cuts, but the first riser must be shortened by the thickness of the tread.
3. Start the cuts with a circular saw. Cut the notches on the waste side of the line. Stop the blade just shy of the intersecting line, and finish the cut square and plumb with a jigsaw, a handsaw, or a reciprocating saw.
Install the stringers and the treads
1. Attach the tops of the stringers. The easiest method is to attach the stringers to the rim joist so that the top tread is flush with the deck. Plumb-cut the stringers, butt them against the rim joist, and bolt them in place. If the rim joist is serving as the top riser, extend it by adding a board to support the stringers. You can also continue the stringers beyond the rim joist and bolt them to blocking.
2. Anchor the bottoms of the stringers. The bottoms of the stringers can land on concrete and be fastened with bolts to an angle iron or to a pressure-treated kicker. Alternatively, the stringers can land on a pad of compacted gravel; in this case, nail or screw 2x material across the bottoms of the stringers.
For more photos, drawings, and details, click the View PDF button below:
Fine Homebuilding Recommended Products
Fine Homebuilding receives a commission for items purchased through links on this site, including Amazon Associates and other affiliate advertising programs.
Lithium-Ion Cordless Palm Nailer

Jigsaw
Standard Marking Chalk


