Flashing Windows in Rain-Screen Walls
Foam sheathing and furring strips make the wall thicker; Make sure the sill can drain and the head is tight.
It’s important to consider fastidious window-flashing details before you raise the walls of any house. If you’re building a house with rigid-foam sheathing and a rain-screen gap behind the siding, you’ll need to incorporate some new practices.
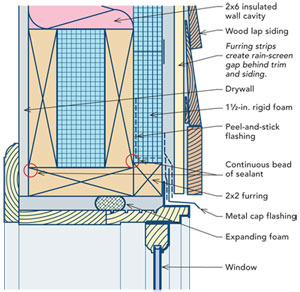
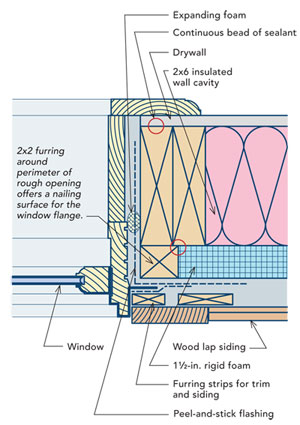
The details shown here were developed for walls sheathed with 1-1/2-in.-thick rigid-foam insulation applied directly to the studs. The foam is taped and acts as an air barrier and drainage plane. To provide solid nailing for the window flanges, the rough opening is picture-framed with 2×2 furring. The furring also needs to be air-tight and watertight, so it is flashed before the foam is installed and caulked to the framing.
The Sill Pan Can Be Built On Site
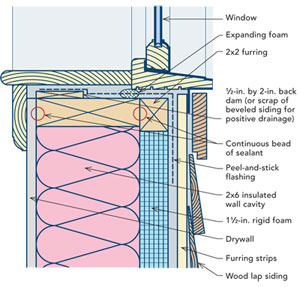
All windows leak, so rough openings need to be designed so that they can handle water entry. Although the illustration on the facing page shows a peel-and-stick membrane used to form a site-built pan flashing, some builders prefer to use ready-made sill pans.
If you build sill pans on site, install a 1/2-in.-tall back dam made from scrap lumber on the rough sill to prevent water from entering the interior. Lap the peel-and-stick membrane over the back dam, rough sill, 2×2 furring, and foam sheathing. Be careful when folding the membrane up the sides of the rough opening. It’s important to avoid accidental punctures at this vulnerable location because the bottom corners of window openings are a common path for wind-driven rain to enter a wall.
Because there is no housewrap in this installation, the next step is to wrap peel-and-stick membrane up the sides of the rough opening, again lapping over the 2×2 furring and onto the rigid foam.
Vent The Rain Screen Below The Window
Rain-screen siding is vented at the top and bottom of the wall. You don’t necessarily have to vent the siding where it meets the windowsill. It will speed drying, but it isn’t strictly necessary. If this detail is important to you, there are two ways to do it.
You can hold down the vertical furring strips from the window-sill, leaving enough of a gap to allow air to circulate horizontally to vented rain-screen spaces on each side of the window. Or you can shim the windowsill trim board with spacers so that air can loop around the trim board and make its way out. If you take this approach, be sure the window is proud of the trim board below to keep the trim board dry.
Air Sealing Shouldn’t Trap Water
When using expanding foam to air-seal the gap between window frame and rough opening, keep the foam toward the inside, or it could prevent water from draining. The best approach is to squirt a bead of expanding foam on top of the back dam. Because air-sealing is usually done before trimwork, foam goes at the inside edge of the window frame before the extension jambs and stool are applied.
Peel And Stick Away
When flashing windows to rigid-foam sheathing, peel-and-stick membranes are the flashing material of choice because they can be lapped continuously from the inside of the rough opening over the furring (or window nailer) and onto the foam. Because there is no housewrap (the rigid foam acts as the air barrier and drainage plane), peel-and-stick membrane is used to waterproof the rough opening before the window is installed and to flash the window flange to the foam.
Sill Protection You Can Purchase
Building a sill pan on site is quick and requires only common job-site scraps. Some builders create a back dam, as shown in the drawing, from a small scrap of stock. Others create a sloped sill with a scrap of beveled siding. In either case, the key is to install the peel-and-stick membrane flashing properly and puncture-free. To avoid potential errors, some builders prefer to pay for a manufactured sill pan.
Products from AstroPan, Dow Weathermate, Jamsill, Marvin, and SureSill are made from plastics and are designed to create either a back dam or a positive drain slope beneath the window. Proper installation is still imperative, and most products have at least one joint between the pan and leg that needs to be sealed with adhesive, caulk, or tape. A manufactured sill pan can add $20 to $50 to the cost of an average window installation.

