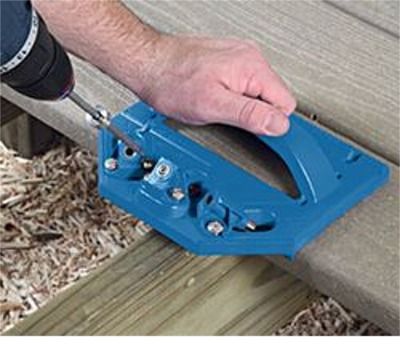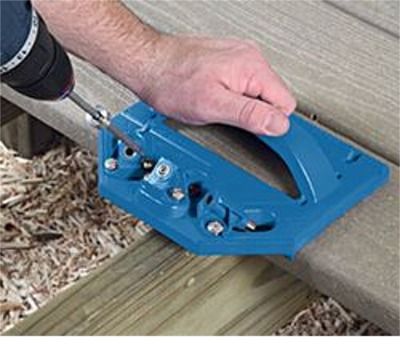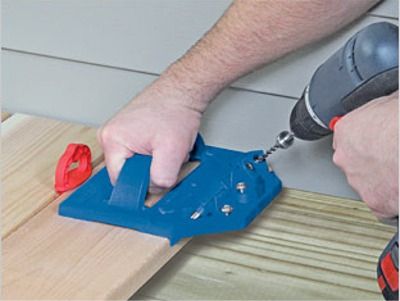
Want the look of hidden fastener attached decking and the positive anchoring you get with screws? Then check out the Kreg Deck Jig. The pocket screw guide drives screws at an angle through the edges of deck boards about 1/8 inch down from the top. You can still see the screws if you peer down between boards; but I don’t find it any more conspicuous than the bit of other types of hidden fasteners visible between deck boards. The deck board surface is blemish-free.
The heavy duty plastic jig rests on top of the deck board and a stop fin on the bottom orients the screw guides to the board edge. The kit comes with a pilot bit and driver bit; you supply the drill / driver. There are three guide holes, one straight on and two at 45 degree offsets. The angled guides are used in two different instances: when screwing decking laid diagonally across joists and at board ends to avoid splits (be they butt ends, the edge of the deck or when boards end at a wall). A sample bag of screws and two 3 pc. sets of board spacers for ¼ in. and 5/16 in. joints are also included in the kit.
The printed instructions and DVD included in the kit are straight forward explaining the assembly and use so I won’t explain those here. You can also get a good sense of the system from the 3 ½ min. promotional video.
Straight off, don’t expect to set any speed records using the Kreg system; it still takes the same time as face screwing – you just get the benefit of a smooth deck surface. Working with the system on a couple projects I found a few tips increase production speed and improve the finish appearance of the decking.
You’ll want at least two Kreg Deck Jigs if you’re laying decking with a crew. Rather than pocket screwing each board as you place it, just drive enough screws to secure the board. I set screws at 2 to 4 joist intervals depending on how straight the boards are. After tack screwing each board course, move on to the next course. Another worker can follow behind focusing just on setting screws with the second jig. Then when all the boards are tacked down, the first jig can go to work production screwing too.
Have two drill/drivers set up, one with the pilot bit and the other with the driver bit. This saves tons of time swapping out the bits with each drive. And don’t try piloting a series of holes and then returning to drive the screws; it’s hard to precisely reposition the guide to the hole.
One modification I made to the jig is to place a 1/8 in. bolt through the base ¾ in. from the center pilot guide. The bottom of the bolt sticks down about an inch and registers the side of the deck joists. You can line the jig up by eye but this simple addition saves several seconds with each screw. The important thing is you have to bore the bolt hole right through the board edge fin on the jig. A drill press makes this an easy step.
Have a piece of sand paper handy when installing wood decking. The pilot bit sometimes leaves a little tear-out that’s easier to clean up as you’re screwing along rather than hunting the spots later.
The instructions call for face screwing along the building and other spots where the jig can’t be positioned. You can avoid face screwing by either using undermount clips or angles for the first couple boards, or screwing up from beneath through the joist and into the decking.
Fine Homebuilding Recommended Products
Fine Homebuilding receives a commission for items purchased through links on this site, including Amazon Associates and other affiliate advertising programs.

8067 All-Weather Flashing Tape

Affordable IR Camera

Handy Heat Gun


View Comments
This jig looks pretty cool. My one concern is for the water that will run over the sides of the deck boards and into the holes where the screws now reside. One big benefit to using hidden fasteners has been that they eliminate the possibility of water intrusion into the center of the board. I am not sure what, if any, trouble this would cause on composite decking, but if water works its way into the hole and around the screw where the wood is not protected it will inevitably cause premature failure. The best fastening system that I have seen are the tiger claws. The manufacturer even makes a pneumatic nailer to speed the installation of the hidden fasteners. It drives screw/nails in at a 45 degree angle through the fastener. An added benefit to this system is the automatic spacing of the hidden fasteners. It seems like a better way. I would be interested in any feedback on this issue.
I've talked with others who share WallaWallaBuilder's concern about the edge-driven screws being a travel path for water. I don't think it would be any different (and probably less) than face-screwed decking. And slotted boards used with hidden fasteners present another concern that I think may be a greater risk than the pocket screws. The real issue with water comes into play with wood decking vs. synthetics which aren't as moisture sensitive. As with most new systems and tools, only time will tell. Until then we can only make educated guesses.
The TigerGun can only be used with their TC-G grooved board fastener and not the TigerClaw pin type fasteners. SureDrive has a tool called the Eliminator - another modified metal connector nailer for driving in NailScrews or Scrails into the Mantis hidden fastener. It works much like the TigerGun and is manufactured by the same company (PneuTools Inc). Another soon to be released nailer will looks like it will be one step beyond the TigerGun and Eliminator because it can be operated while standing on the decking you already have installed rather than the others where you have to stand on the joists to operate effectively.
In addition you work from the top of the deck. As I understand the process of concealed deck screws some of the systems require that you work from the bottom or standing between the joists. I bought the system from Amazon for the free shipping and no tax and intend to use it this summer as my deck is in partial shade with an overhang and the last time I used a step stool on the deck to reach our wind chimes the stool went through the deck at the soggy boards.
I have a question - as the boards have been damaged from pooling water do I have to worry about the joists and if so any suggestions short of beginning over??
I built a deck with k-33 SYP support ledgers and joists and a TREX deck surface. Used the DECKMASTER Hidden Bracket System (Brackets & Screws) where you fasten the bracket to the support joist,apply the TREX board and then apply the screws from underneath. It works great if you have some crawlspace to work with, ( My deck is 30" above ground level. In places where it is difficult to reach, I used some finish deck screws, which when driven into the TREX would practically disappear. We dismantaled an old deck (25' X 25' with a 2-level tower, an put in a 20' X 24' one with the TREX pattern going in 6- different directions. It was fun to do and good therapy (I had just had a 5-bypass heart operation 13 Years ago)
Mike, did you actually say that with this Kreg jig "...it still takes the same time as face screwing..."? You do know the speed one can go when using a Senco Duraspin deck gun, right?
At some point I must have missed the boat that declared face screws offensive. I think they look fine if straight. To each his own, though. Good article, nice to hear from a writer who isn't afraid to admit that the tool he tested needed a little extra modification to work proper.
Oh, and Mike, can you get an article going to showcase those pneumatic guns you mentioned in your follow-up post? I may be swayed into the don't-wanna-seeum crowd if I can move fast enough at it as to make some easy $$$ selling a "premium" product. Also, I haven't heard much about "scrails" lately. I remember seeing a short article a couple years ago but nothing since. Can we get some more info there too. Does just one company make them, how's the price, etc.
Again, talk to Taunton and try to get an article going, please.
DC
DC - The Kreg system definitely won’t compete with an auto-feed screw gun. I have 2 Quik-Drives, 3 DuraSpin models and a Makita and have tried Muro and a couple others. They’re great and fast. I don’t know of any that drive collated trim-head screws though – And I guess I default to hand-driven trim heads as a baseline comparison for the Kreg.
Regarding the automated and semi-automated fastening systems. There’s an article in Decks & Outdoor Projects Vol. 3. (http://store.taunton.com/onlinestore/item/decks-and-outdoor-projects-vol-3-027021.html)
I’m not sure Taunton will repurpose it for FHB but I’ll ask to see if they’ll post it in the Deck Planning Center.
Otherwise, I plan to write up each system as I get a couple decks under my belt with each one. I just finished a large deck using the HID Fast system and plan an post on this blog shortly.
MG
I am looking into building my first deck as a DIY'er. I was curious if anyone has tried the Kreg Deck Jig on grooved Trex Boards. The Kreg website does not recommend it but I was looking for real world experience as using the Deck Jig will save me about $400 as I am doing a 16 X 24 deck. Any information is greatly appreciated.
Response to Rodney:
The Kreg Deck Jig is designed for use on square edged boards. The pilot bit and screw hit the board about 1/4 in. from the top edge which is about where the slot in grooved boards is. So once the screw sets to its depth, it would be in the middle of the groove rather than seated in a pocket hole.
I'm all for saving money too but using the Kreg Deck Jig on a grooved board may be risky. There's only one way to know for sure. You can get some pieces of decking and try the Kreg Deck Jig to see what happens.
Thinking about material cost for your 16x24 deck.
Kreg Deck Jig ($100) plus Kreg screws (~.25/sf= $100) totals $200 for the deck.
The least expensive grooved board fastener is the Wadsworth Deck Clip (0.66/sf)totals $250.
Several other brands can be had for about 0.90/sf which would bring you up to $350 for the deck.
So you do have other alternatives using a grooved deck board fastener system that will be far less than your anticipated 'savings' of $400 using the Kreg system.
My assessment is not a knock against the Kreg Deck Jig. It is a good system if you want to edge screw square edged decking down. But since you intend to use a grooved board, then I'd advise you to spend a few extra bucks and use the proper fastener type.
DeskMaster after 5 years.
Installed my deck, summer 2011. My boards: Brizilian RedWood - approx 3/4" x 6" on 16" ( 2 x 10 ) centers. Approximately 300 sq ft. and deck is well ventilated on three sides and 12 ft above ground level. The decking was delivered with a wax type coating on both faces. FYI: no stress relief kerfs.
We used the Kreg DeskMaster with Kreg SS screws. This wood is really, really hard and required several replacement drill bits to finish. Three months after installation, the deck was washed with acetone and power washed with warm water. When dry, we then hand rubbed Rosewood Oil. Within 6 months, top boards started cupping ( concave from the top.). Thereafter, the same oil was reapplied; spring and fall. After three years, cupping continued to worsen and I used a 3" HD belt sander followed with an orbital sander hoping to address the cupping.
I don't think I would use the DeckMaster again. What I see as one of the big problems - the screw head is so small and tapered (like a bugle head) that there is not enough area to restrict the boards from curling up. The heads are even pulling the screw heads through on the perimeter boards that are drilled and screwed from the top.
So this information might be helpful for those thinking about using this system and these fasteners. While there are many other fastening "systems", some are more applicable depending on the boards used, I wouldn't have thought screw head pull through on this extreamly dense and hard wood would fail.
I'm replacing a few of the worse damage and considering using a pocket hole from the bottom up. This time I'm using Kregs regular pocket hole screws that have a flat (washer) style screw heads.