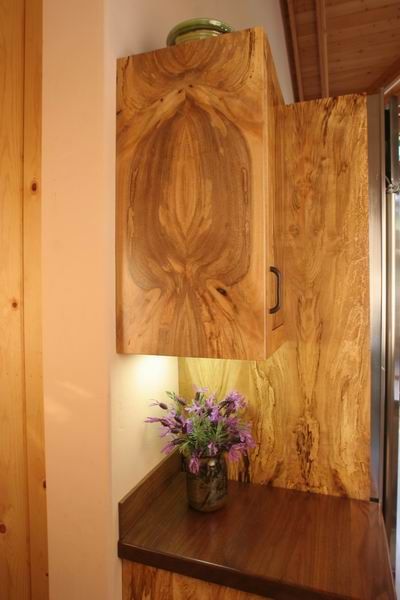
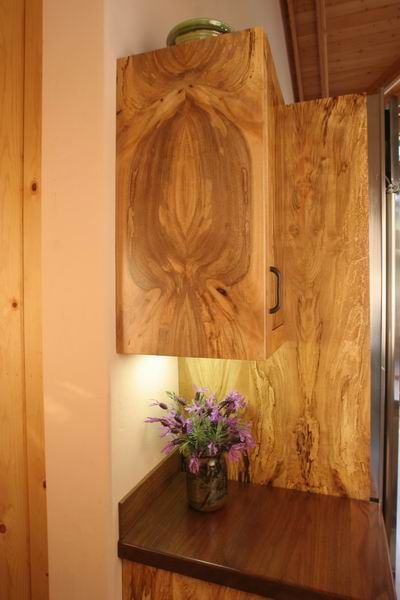
With a few key ingredients (and a shop full of woodworking tools) you too can create your own spalted kitchen cabinets just like Fine Homebuilding’s September 2010 back cover contributor Geoff Alexander*. If you think this might be the perfect recipe for your own kitchen be forewarned–you’ll need to get started ASAP. The first four ingredients need to “marinate” for a long, long, long time. Alexander began cooking up the recipe for his unique cabinetry way back in 1993—and that’s not including the time it took to grow the bay laurel trees!
Ingredients
Bay laurel (the trunk, not the leaves)
Fungi
Equal parts heat and humidity
Several heaping helpings of patience
Directions
Step 1. Obtain enough bay laurel to construct a room full of cabinets.
Alexander’s bay laurel was home-grown and more than ready to be harvested. With approximately 30 trunks sharing one giant root ball cantilevered 10 feet out and 50 feet over the Soquel Creek, it was only a matter of time before erosion and gravity would have sent the trees crashing into the creek below, taking a significant portion of the cliff-bank with it. To reduce the load on the root ball, he cut all the trunks extending out over the creek, about 15 in total. Trunks a foot or larger in diameter were cut into lengths 4 to 7 feet long and stacked.
Step 2. Have sous chef Mother Nature season the logs with the next three ingredients; fungi, heat and humidity. Not a very durable wood, the bay laurel began to deteriorate fairly quickly—relatively speaking.
Step 3. Add the first heaping helping of patience.
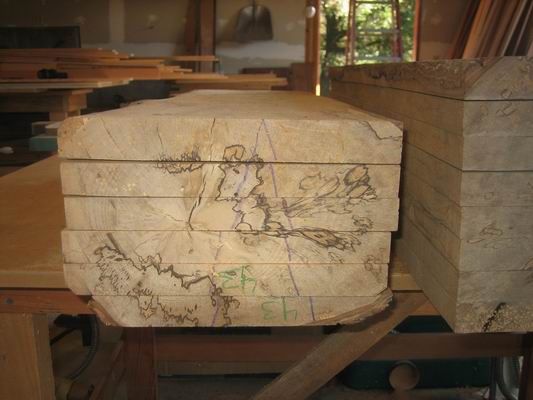
Four years after stacking the logs, Alexander checked to see how the fungi, heat and humidity “marinade” was coming along. Using a chain saw, he cut into some of the logs to reveal just what he had hoped for–a lovely infusion of swirls and colors where the fungi had begun the spalting process. He milled the sections into 1 inch thick boards to stop the spalting and stacked them in flitchs.
Step 4. Add the second heaping helping of patience.
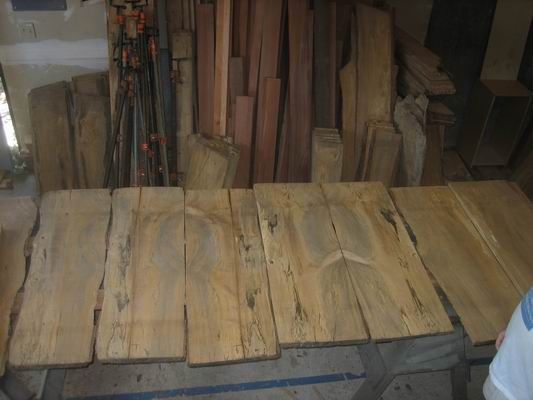
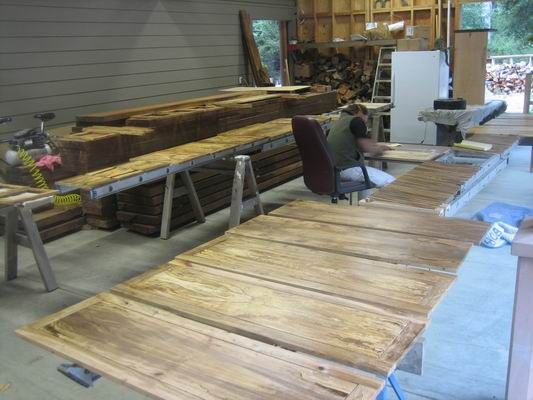
After waiting several more years to allow the bay laurel wood time to cure, Alexander was ready to begin the board selection process. He enlisted the assistance of fine woodworker Bob Frank to help “true up” each flitch and decide on which boards to use for each cabinet carcase.
Step 5. Add the third heaping helping of patience.
Carefully construct, finish and install each piece of cabinetry in the kitchen.
Step 6. Step back and admire the finished kitchen. Take photographs and send them to Fine Homebuilding.
Step 7. Turn off the heat and ruminate on the next “home-cooking” project.
*A long-time subscriber to Fine Homebuilding, the September 2010 back cover is not Geoff Alexander’s first contribution to the magazine. The fine woodworking of his “Redwood Turrett” was featured on the back cover of issue #3, July 1981.
To learn more about spalting, read Fine Woodworking’s article, “Spalted Wood” by Sara Robinson.
Fine Homebuilding Recommended Products
Fine Homebuilding receives a commission for items purchased through links on this site, including Amazon Associates and other affiliate advertising programs.

8067 All-Weather Flashing Tape

Reliable Crimp Connectors

Affordable IR Camera




View Comments
Hey Maureen, and FHB readers:
Thanks for posting the "recipe" for spalted woods. It's true, I just left the logs in the weather to rot naturally.
When I milled the logs, I sawed a total of 57 log sections, creating 57 flitches, ranging from 3 to 7 feet long, and up to 16" wide. I ended up with about 1300 board feet of full 1" material.
Home-spalting is definitely an inexact science. Stop the spalting too soon and get boring wood, or let it go too long and get useless rot.
After the flitches had been stacked and stickered for a couple of years, I noticed that there was substantial insect frass around the boards. Yep, a serious beetle infestation. So I fumigated the entire pile, and hoped that the bugs wouldn't return too soon. In the end, the beetle damage just added to the character of the wood.
The kitchen is in the new house that I built for my wife and I and our dear friends, Clayton and Jennifer Crawford. The house has 2 master wings and a huge great room, with the kitchen creating the core of the great room. There are a lot of cabinets, and we wrapped all of them in the spalted bay laurel--end panels, drawer faces, doors.
All of the surfaces were book-matched. For banks of drawers, the book-match extended from top to bottom, across all of the drawers. For wide banks of drawers, we used multiple book-matches, as many as 3-wide.
Searching for the right book-match for each cabinet was like an enormous puzzle. We laid out each flitch on sawhorses, and looked for great pictures in the grain. In each flitch, there are 2 sets of matches (pairing boards 1&2; 3&4, etc, OR pairing boards 2&3; 4&5, etc.) and we looked at all of them. Flip, flip, flip, . . .
One very interesting feature was that the spalt infiltrated each log most vigorously from the end-grain. Of course, if there was any checking, that was also at the ends of the boards. Thus it was always a balance to try to get the maximum beauty without grievous flaws. Many of the boards had sections that were decayed beyond use.
Now I'm curious how many book-matches we actually used. I'll count them up and post that later, but it's at least several dozen.
To see more photos of the kitchen (and of some of the rest of the house), go to http://www.photopete.com/geoffs
If you're interested in what we did, or have any questions, please feel free to email me at [email protected].
Happy sawdust to all,
Geoff