FHB Logo Facebook LinkedIn Email Pinterest Twitter X Instagram Tiktok YouTube Plus Icon Close Icon Navigation Search Icon Navigation Search Icon Arrow Down Icon Video Guide Icon Article Guide Icon Modal Close Icon Guide Search Icon Skip to content
Subscribe
Log In
  • How-To
  • Design
  • Tools & Materials
  • Restoration
  • Videos
  • Blogs
  • Forum
  • Magazine
  • Members
  • FHB House
  • Podcast
Log In

Carving a stair railing transition

By Charles Bickford
  • X
  • facebook
  • linkedin
  • pinterest
  • email
  • add to favorites Log in or Sign up to save your favorite articles
Photo 6. Ready to be mounted on the railing.

The following text were sent to us by Seth Kiser, a trim carpenter in Anacortes, Washington. Look for more of Seth’s take on stairbuilding in the future, both here and in the magazine.


I have been a carpenter for over 16 years and have specialized in stairs and railings for the past 9.  Over the years, I have witnessed many carpenters and homeowners scratch their heads in frustration from stairs and railings.  To many, railings seem to hold a mystery.  My hope with this article is to simplify one aspect of railing installation.

One of the most common problematic issues for wall mounted railings is what to do with the railing when the stairs make a turn.  If the stairs make a turn and have a landing, the code stipulates the landing is a separation between the flights and allows the railings to be separate and terminate into the wall.  However, many times limited space doesn’t allow for landings and require pie-shaped treads, making it a winding stair.  Along with other requirements pertaining to rise and tread size, the code mandates a continuous handrail.  As most people who have installed handrails have learned, when a stair turns, the handrail must twist to follow the stair.  To my knowledge, there are but 2 options for a wood handrail to turn: 

clamp section of stair rail

First is for the rail to go from pitched, level out, turn the corner, drop down (usually with a goose necked part), then resume the angle of the stair. 

Second is a part that both turns and twists, which is a hand-carved part.
My goal here is to give step by step instruction on how to produce a hand carved part, from layout to final installation.  It is my opinion that in many cases this produces the most aesthetically pleasing option.

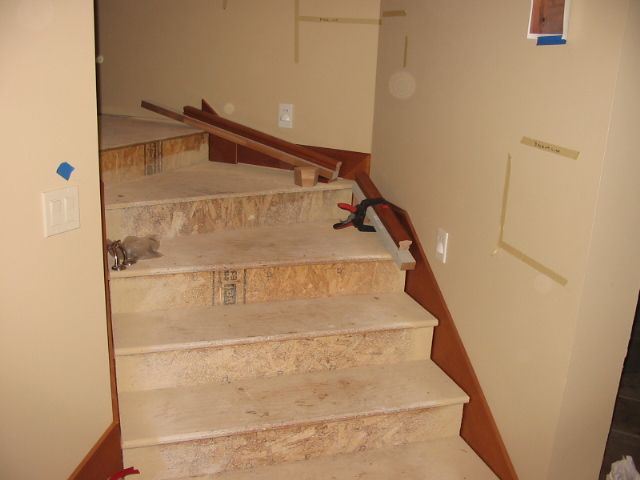
1. I start by laying lengths of scrap material across the noses of the treads. (photos 1 and 2)  This establishes the angle or pitch of the stair.  I nail the scraps directly to the treads.  This gives me something to clamp the rail to while I fit the block to be carved.  Once I have the angles, I shim the scraps then cut them back so they don’t interfere with the fitting of the block.

2. Next, I cut clean, square ends on two lengths of rail and space the rail pieces the exact distance from the wall that the rail will eventually be mounted and slide them up or down to roughly the same distance from the corner (this will ensure a uniform part), and clamp them down.  The space between the two rails is arbitrary, just keep in mind the bigger it is the more to carve but will produce a more gradual turn.  I usually try and gage the part to be carved by the size of the rail, the smaller the rail, the shorter the part.

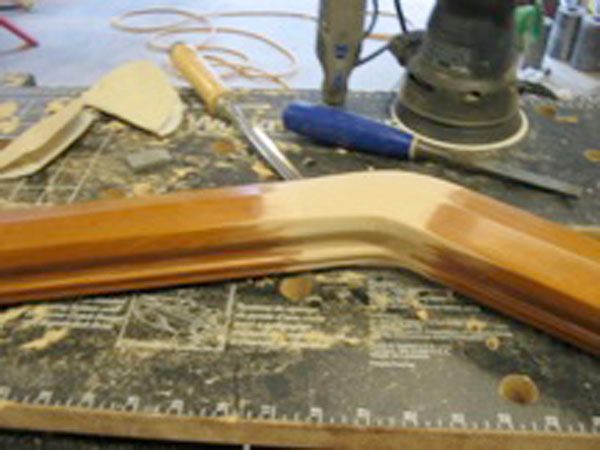
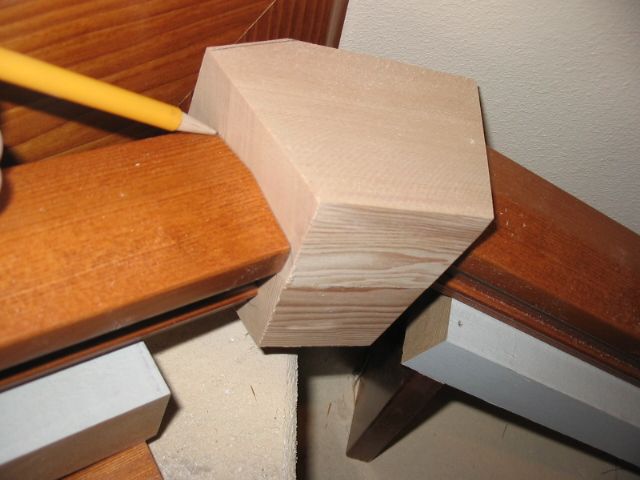
Once the rail pieces are clamped down, I go to work fitting the block to the two rails. The block is of the same material as the handrail, hemlock in this case.  You could glue something up. I buy a square 4×4 post from my stair parts distributor (Johnson Postman) and am able to use the post for several jobs.  Because this stair turns 45 degrees, I start by cutting the block 22½ degrees on both sides, bigger than is necessary, and then adjust the cuts until the block fits tight to both rails (photo 3).

3. After I have established a perfect fit, I scribe the outline of the rails onto the block (photo 4). Then mark for the rail bolts, 7/8” up from the bottom and centered side to side for the bolt.  Depending on the size of the block, the bolts may need to be cut down so they don’t meet in the middle of the block.
I usually like to carve against scrap pieces of rail so if I slip, it doesn’t ruin the rail.  When this is the case, I put a small dot of glue between the parts when I bolt them together, this makes sure the parts don’t move during carving, yet is easy to break loose once I’m done.  (photo 5).

4. After the parts are carefully aligned with the marks and bolted together, I mark out the general shape of the part.  I have found it is handy to have a clamping work bench to clamp the work piece down.  Then I go to work with my angle grinder.  I try to match the grit of the paper to the density of the wood, 36 grit for maple, oak, and jatoba.  In this case, 60 grit for hemlock.  I start cutting down the bulk of the material, no details, just the general shape.
I work the piece from all sides, gradually bringing it down to size.  I stop here and there to reestablish the shape.
Once the general shape has been ground down, I’m finished with the grinder.

5. Next, it’s just a matter of drawing lines between the two rails for the details.  The dremel is the tool for this job.  Again, I take my time to whittle the piece down to the details.  I work the part down with my dremel as far as possible, then grab my chisels.  I use a skew chisel and a flat chisel to even out the profile.  Once I’m as far as the hand tools can go, I hit the areas I can reach with my random orbital and hand sand the tight spots.

Once I get down to this stage, I let my hands tell me how far to go.  I run my hand over the piece until I am satisfied with how it feels.  Here is a picture of the piece with all the tools I use to produce the finished product (photo 6).  From layout to here takes me about 2 hours.

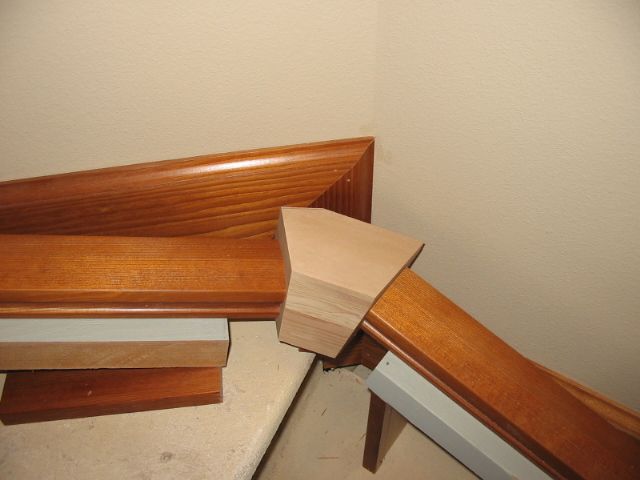
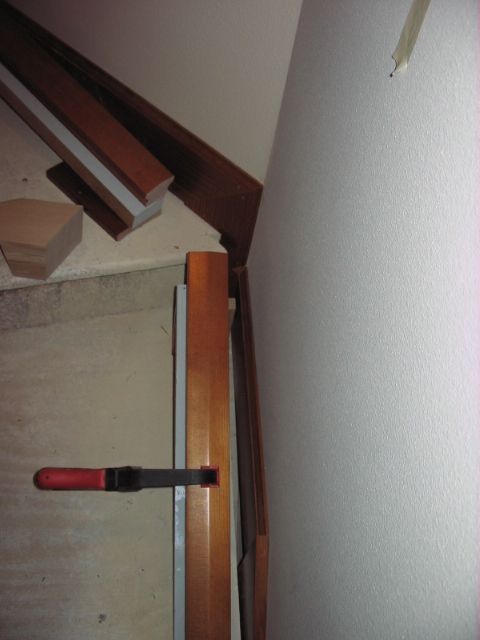
6. After the part is finished, the hard part is over.  So I start putting the rest of the handrail together.  I like the top of the rail 36” off the nose of the treads.  After I subtract the depth of the rail, I set the brackets at about 34”.  On a wall mounted handrail, I always build the rail in place.  This way, I can be assured that everything will fit and won’t be tweaked when the handrail gets fastened to the brackets.  I fit the wall returns last, so I can scribe them to the wall if necessary.


 Photos and text by Seth Kiser, Anacortes, Wa

Fine Homebuilding Recommended Products

Fine Homebuilding receives a commission for items purchased through links on this site, including Amazon Associates and other affiliate advertising programs.

Handy Heat Gun

This heat gun is great for drying joint compound, primer and paint when patching drywall and plaster walls. Plus it can soften adhesive, get a very cold small engine to start, and shrink heat-shrink tubing.
Buy at Amazon

Affordable IR Camera

This camera is super useful for tracking down air leaks in buildings. The one-hand pistol grip arrangement frees your other hand for steadying yourself while maneuvering tricky job sites.
Buy at Amazon

Reliable Crimp Connectors
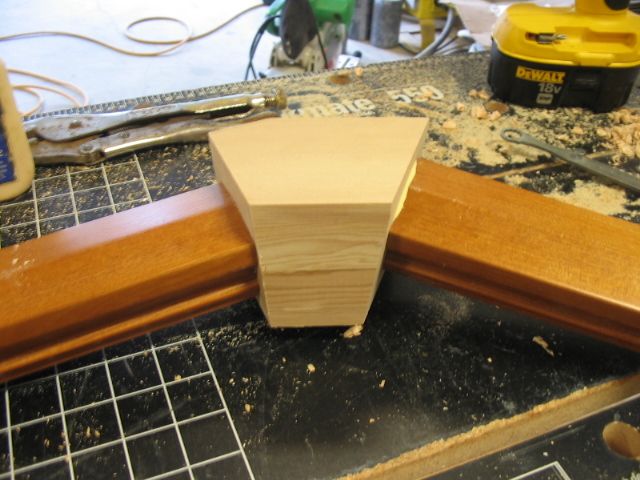
These reliable, high-quality connectors from Wirefy work on 10-22-gauge wire have heat-shrink insulation to keep out water and road salt.
Buy at Amazon

Sign up for eletters today and get the latest how-to from Fine Homebuilding, plus special offers.

Signing you up...

This site is protected by reCAPTCHA and the Google Privacy Policy and Terms of Service apply.
See all newsletters
See all newsletters
×

Get home building tips, offers, and expert advice in your inbox

Signing you up...

This site is protected by reCAPTCHA and the Google Privacy Policy and Terms of Service apply.
See all newsletters
See all newsletters

New Feature

Fine Homebuilding Forums

Ask questions, offer advice, and share your work

  • X
  • facebook
  • linkedin
  • pinterest
  • email
  • add to favorites Log in or Sign up to save your favorite articles

View Comments

  1. Garry | Jan 31, 2011 07:02am | #1

    This website format makes it very hard to follow along with the photos and the format of this site make no sense.

  2. SteveDallas | Jan 31, 2011 08:26pm | #2

    I agree that the article layout is a bit odd... but looking past that and on to the important aspects… I’m very appreciative of the information.

    I’ve faced this dilemma with fence caps meeting at odd angles couple of times and wondered how best to solve it. In the case of fences, hand carving is a bit over the top, but this answers my question and provides me with a method that could very well come in handy in the future.

    Thank you for settling this for me.

  3. Wikawinno | Jan 31, 2011 09:40pm | #3

    Makes for a beautiful smooth transition and well executed. From layout to finished part, 2 hours is fast. How did you handle the dust? Maybe we can see a final installed on the wall photo next time.

Log in or create an account to post a comment.

Sign up Log in

Become a member and get full access to FineHomebuilding.com

Up Next

Video Shorts

Featured Story

Fire-Resistant Landscaping and Home Design Details

These defensive details give homes a better chances of surviving wildfires.

Featured Video

How to Install Exterior Window Trim

Learn how to measure, cut, and build window casing made of cellular PVC, solid wood, poly-ash boards, or any common molding material. Plus, get tips for a clean and solid installation.

Related Stories

  • Podcast Episode 689: Basement Garages, Compact ERVs, and Safer Paint Stripper
  • A Closer Look at Smart Water-Leak Detection Systems
  • Podcast Episode 688: Obstructed Ridge Vent, Buying Fixer-Uppers, and Flashing Ledgers
  • Podcast Episode 687: Flat Roofs, Spray Foam vs. Loose-Fill Insulation, and Building Your Own Cabinets

Discussion Forum

Recent Posts and Replies

  • |
  • |
  • |
  • |
  • |
  • |
View More Create Post

Highlights

Fine Homebuilding All Access
Fine Homebuilding Podcast
Tool Tech
Plus, get an extra 20% off with code GIFT20

"I have learned so much thanks to the searchable articles on the FHB website. I can confidently say that I expect to be a life-long subscriber." - M.K.

Get home building tips, offers, and expert advice in your inbox

Signing you up...

This site is protected by reCAPTCHA and the Google Privacy Policy and Terms of Service apply.
See all newsletters
See all newsletters

Video

View All Videos
  • A Closer Look at Smart Water-Leak Detection Systems
  • Podcast Episode 678: Live from the Builders' Show-Part 2
  • Podcast Episode 677: Live from the Builders' Show-Part 1
  • FHB Podcast Segment: The Best of the Fine Homebuilding Podcast, Volume 8
View All

Fine Homebuilding Magazine

  • Issue 332 - July 2025
    • Custom Built-ins With Job-Site Tools
    • Fight House Fires Through Design
    • Making the Move to Multifamily
  • Issue 331 - June 2025
    • A More Resilient Roof
    • Tool Test: You Need a Drywall Sander
    • Ducted vs. Ductless Heat Pumps
  • Issue 330 - April/May 2025
    • Deck Details for Durability
    • FAQs on HPWHs
    • 10 Tips for a Long-Lasting Paint Job
  • Issue 329 - Feb/Mar 2025
    • Smart Foundation for a Small Addition
    • A Kominka Comes West
    • Making Small Kitchens Work
  • Issue 328 - Dec/Jan 2024
    • How a Pro Replaces Columns
    • Passive House 3.0
    • Tool Test: Compact Line Lasers

Fine Home Building

Newsletter Sign-up

  • Fine Homebuilding

    Home building tips, offers, and expert advice in your inbox.

  • Green Building Advisor

    Building science and energy efficiency advice, plus special offers, in your inbox.

  • Old House Journal

    Repair, renovation, and restoration tips, plus special offers, in your inbox.

Signing you up...

This site is protected by reCAPTCHA and the Google Privacy Policy and Terms of Service apply.
See all newsletters

Follow

  • Fine Homebuilding

    Dig into cutting-edge approaches and decades of proven solutions with total access to our experts and tradespeople.

    Start Free Trial Now
    • Facebook
    • Instagram
    • X
    • LinkedIn
  • GBA Prime

    Get instant access to the latest developments in green building, research, and reports from the field.

    Start Free Trial Now
    • Facebook
    • YouTube
  • Old House Journal

    Learn how to restore, repair, update, and decorate your home.

    Subscribe Now
    • Facebook
    • Instagram
    • X

Membership & Magazine

  • Online Archive
  • Start Free Trial
  • Magazine Subscription
  • Magazine Renewal
  • Gift a Subscription
  • Customer Support
  • Privacy Preferences
  • About
  • Contact
  • Advertise
  • Careers
  • Terms of Use
  • Site Map
  • Do not sell or share my information
  • Privacy Policy
  • Accessibility
  • California Privacy Rights

© 2025 Active Interest Media. All rights reserved.

Fine Homebuilding receives a commission for items purchased through links on this site, including Amazon Associates and other affiliate advertising programs.

  • Home Group
  • Antique Trader
  • Arts & Crafts Homes
  • Bank Note Reporter
  • Cabin Life
  • Cuisine at Home
  • Fine Gardening
  • Fine Woodworking
  • Green Building Advisor
  • Garden Gate
  • Horticulture
  • Keep Craft Alive
  • Log Home Living
  • Military Trader/Vehicles
  • Numismatic News
  • Numismaster
  • Old Cars Weekly
  • Old House Journal
  • Period Homes
  • Popular Woodworking
  • Script
  • ShopNotes
  • Sports Collectors Digest
  • Threads
  • Timber Home Living
  • Traditional Building
  • Woodsmith
  • World Coin News
  • Writer's Digest
Active Interest Media logo
X
X
This is a dialog window which overlays the main content of the page. The modal window is a 'site map' of the most critical areas of the site. Pressing the Escape (ESC) button will close the modal and bring you back to where you were on the page.

Main Menu

  • How-To
  • Design
  • Tools & Materials
  • Video
  • Blogs
  • Forum
  • Project Guides
  • Reader Projects
  • Magazine
  • Members
  • FHB House

Podcasts

  • FHB Podcast
  • ProTalk

Webinars

  • Upcoming and On-Demand

Podcasts

  • FHB Podcast
  • ProTalk

Webinars

  • Upcoming and On-Demand

Popular Topics

  • Kitchens
  • Business
  • Bedrooms
  • Roofs
  • Architecture and Design
  • Green Building
  • Decks
  • Framing
  • Safety
  • Remodeling
  • Bathrooms
  • Windows
  • Tilework
  • Ceilings
  • HVAC

Magazine

  • Current Issue
  • Past Issues
  • Magazine Index
  • Subscribe
  • Online Archive
  • Author Guidelines

All Access

  • Member Home
  • Start Free Trial
  • Gift Membership

Online Learning

  • Courses
  • Project Guides
  • Reader Projects
  • Podcast

More

  • FHB Ambassadors
  • FHB House
  • Customer Support

Account

  • Log In
  • Join

Newsletter

Get home building tips, offers, and expert advice in your inbox

Signing you up...

This site is protected by reCAPTCHA and the Google Privacy Policy and Terms of Service apply.
See all newsletters
See all newsletters

Follow

  • X
  • YouTube
  • instagram
  • facebook
  • pinterest
  • Tiktok

Join All Access

Become a member and get instant access to thousands of videos, how-tos, tool reviews, and design features.

Start Your Free Trial

Subscribe

FHB Magazine

Start your subscription today and save up to 70%

Subscribe

You have 1 free article remaining.

Get complete site access, including thousands of videos, how-to tips, tool reviews, and design features.

Start your FREE trial

Already a member? Log in

We hope you’ve enjoyed your free articles. To keep reading, become a member today.

Get complete site access to expert advice, how-to videos, Code Check, and more, plus the print magazine.

Start your FREE trial

Already a member? Log in

Privacy Policy Update

We use cookies, pixels, script and other tracking technologies to analyze and improve our service, to improve and personalize content, and for advertising to you. We also share information about your use of our site with third-party social media, advertising and analytics partners. You can view our Privacy Policy here and our Terms of Use here.

Cookies

Analytics

These cookies help us track site metrics to improve our sites and provide a better user experience.

Advertising/Social Media

These cookies are used to serve advertisements aligned with your interests.

Essential

These cookies are required to provide basic functions like page navigation and access to secure areas of the website.

Delete My Data

Delete all cookies and associated data