
Several months ago we were completing a custom home on Florida’s Gulf Coast. A neighbor who was impressed with our clean and organized jobsite asked us to look at a leak in their exterior balcony. The house was three years old. It included two living floors over a garage level and had balconies on two sides of both the upper floors.
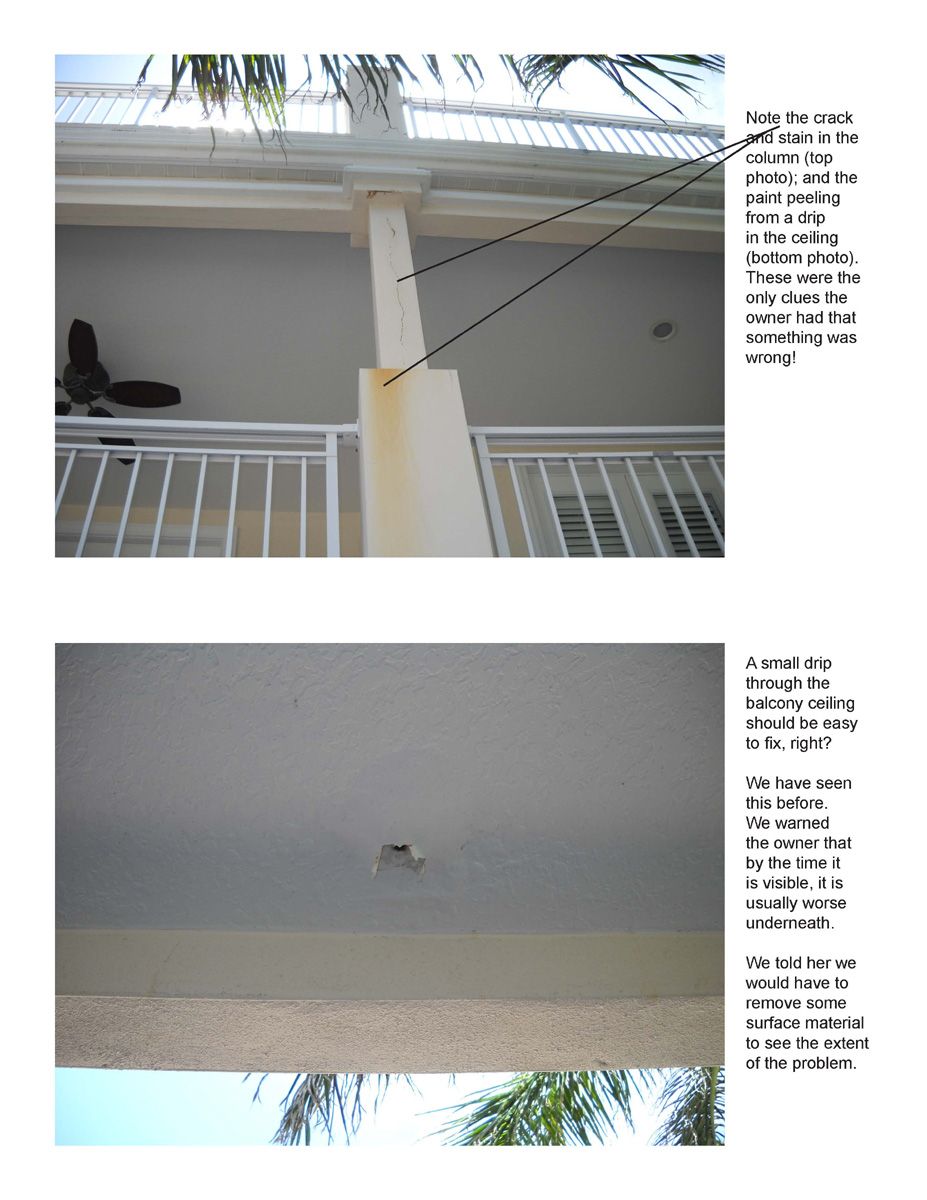
What was visible at the time was a small hole in the drywall ceiling above the ground floor where water would drip after a rain, and crack lines in the stucco on the columns and along the beams. (see photos). These were different from normal shrinkage cracks. The stucco surface showed signs of displacement due to swelling. We have done repair work on a number of similar projects. Our experience has been that the size and displacement of the cracks are signs that water has been trapped in the wall behind the stucco. The wet sheathing swells and the wire lath rusts, causing the cracks to appear.
In this case, the owner had already hired an inspector who took pictures showing clean, dry plywood in the deck. We had hopes that the damage might have been caught early and that we would not have to do major structural repairs. Even so, we knew from past experience that hidden damage can be extensive. We proposed to do an investigation consisting of removal of drywall around the leak, loose tile above the leak, and stucco at the worst of the stucco cracks. Based on our findings, we would recommend a repair plan.
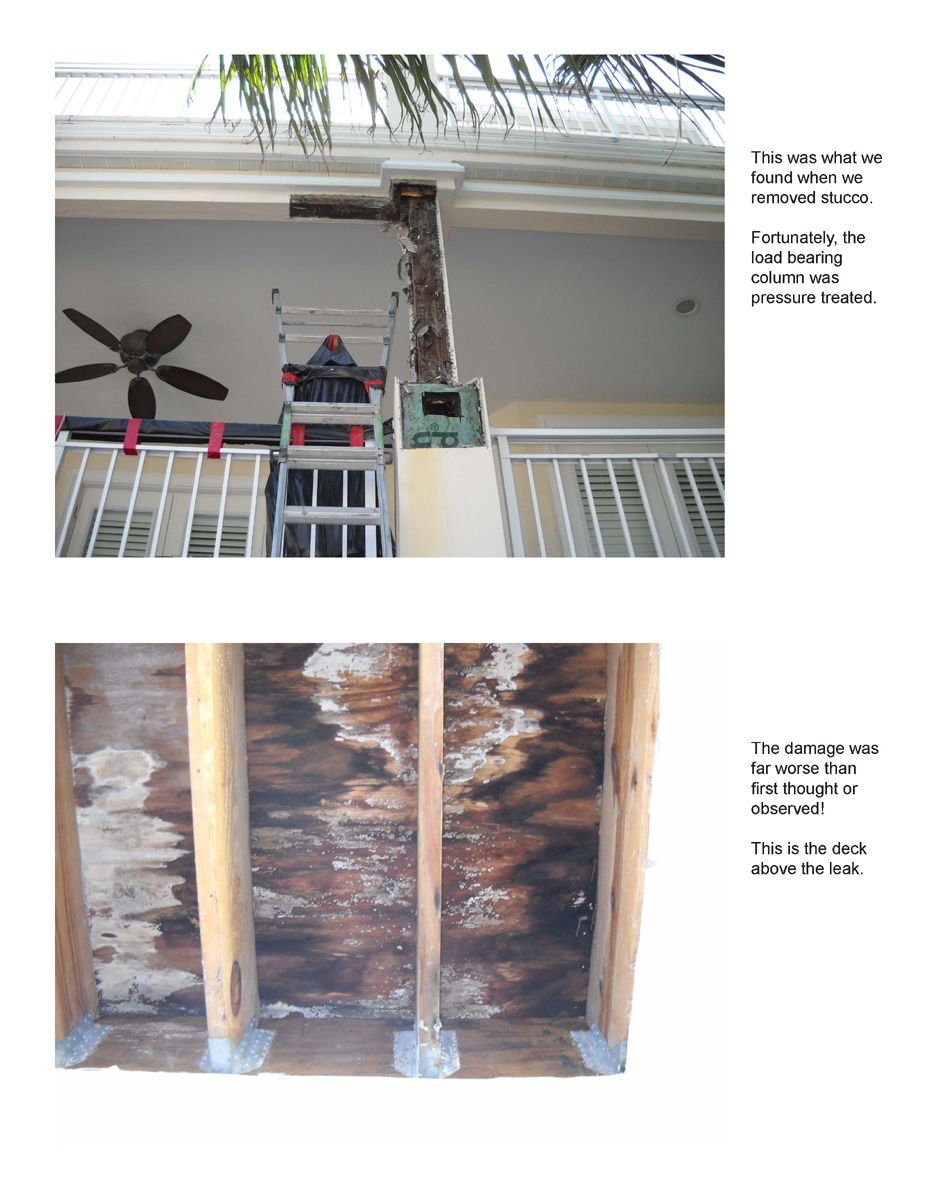
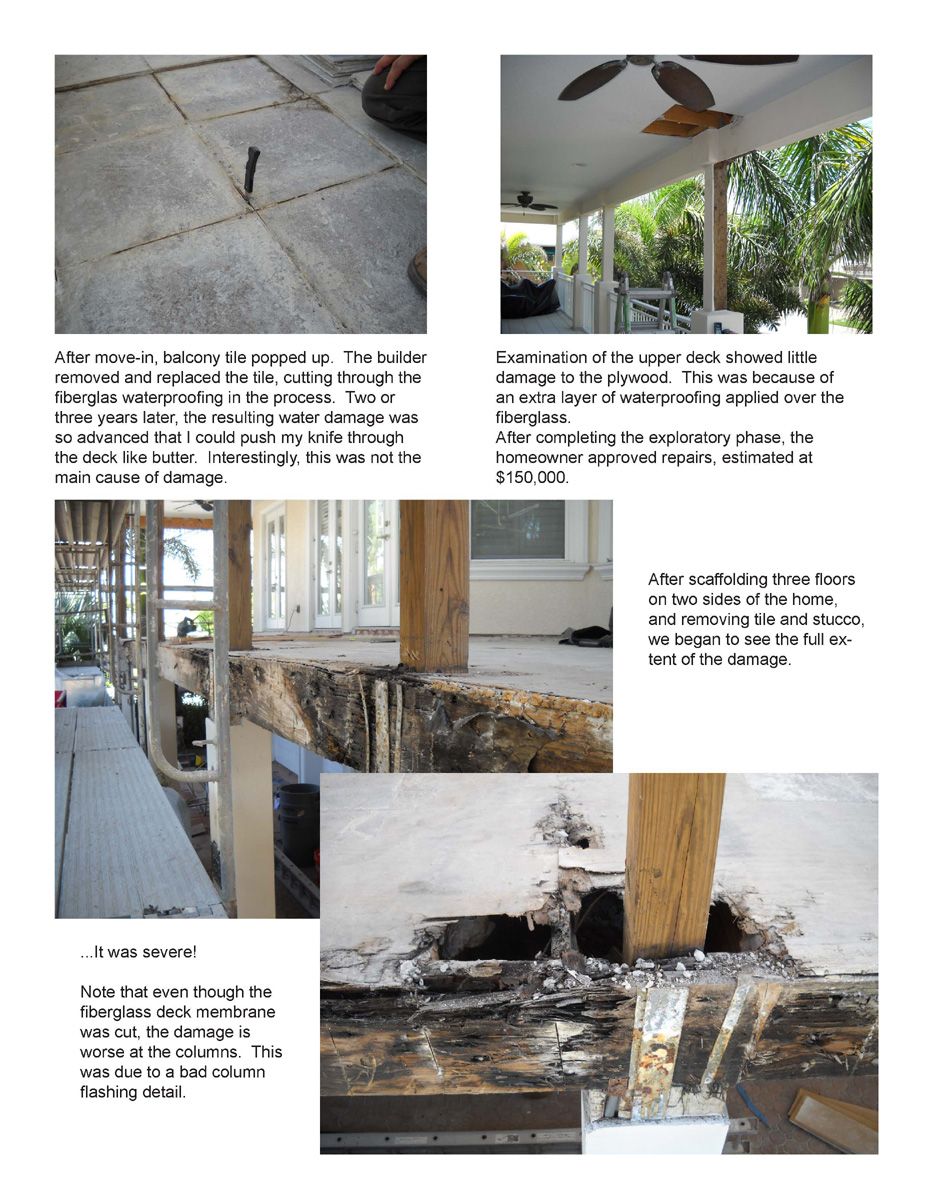
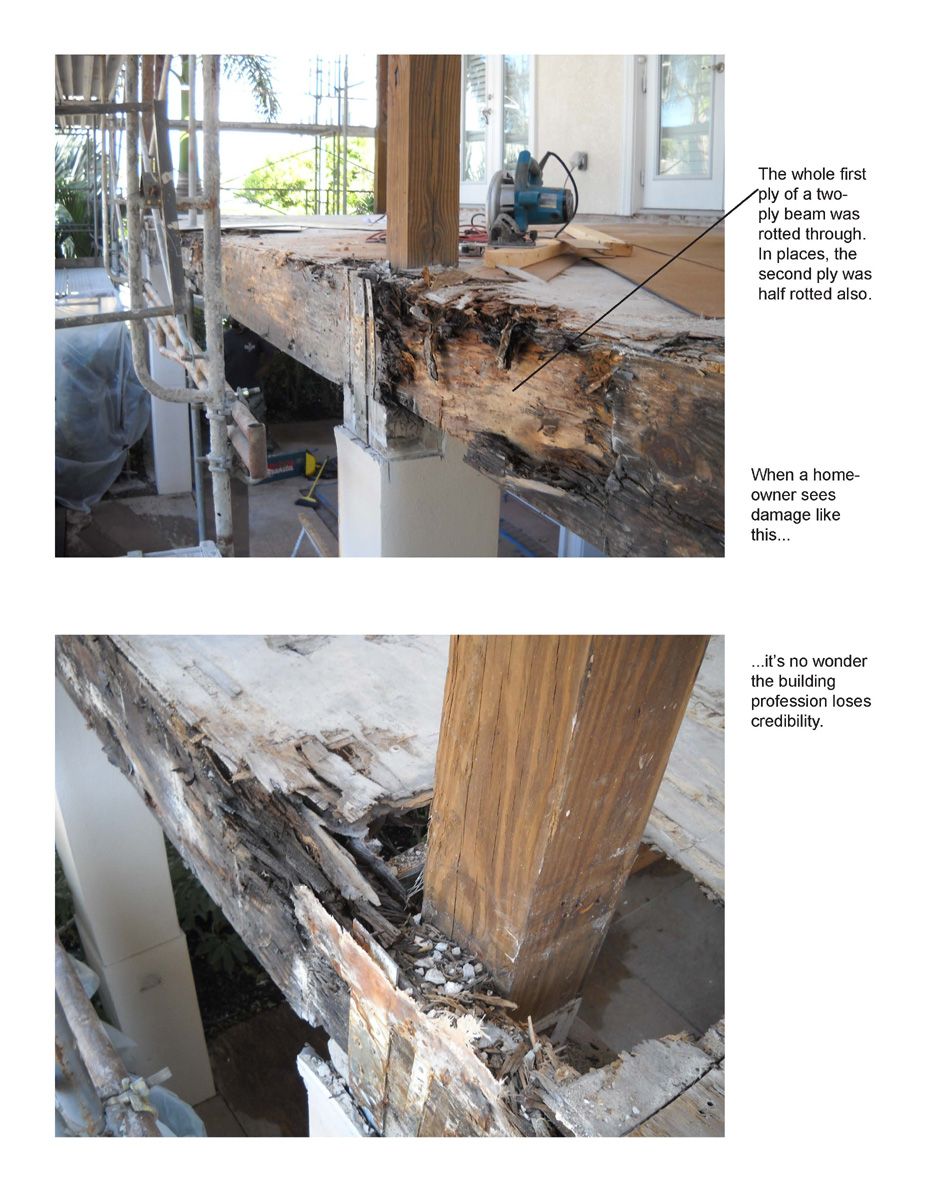
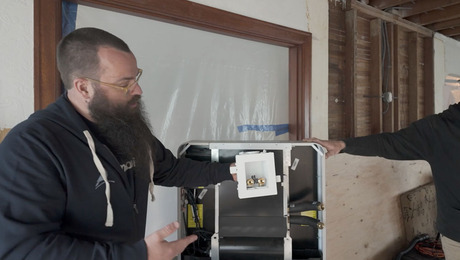
When we removed the drywall ceiling, we saw that the plywood along the outside edge of the deck was completely stained with water and mold. When we removed the tile above that area and probed the plywood decking, it was so badly rotted that I was able to stick my pocket knife completely through the deck with no more resistance than if it was Styrofoam (see photos). Apparently, the tile on the balconies had come loose shortly after the owner moved in. The contractor sent someone to remove the tile and re-install it. Whoever did the work used a grinder to cut through the tile joints. They cut through the fiberglass waterproofing at almost every joint.
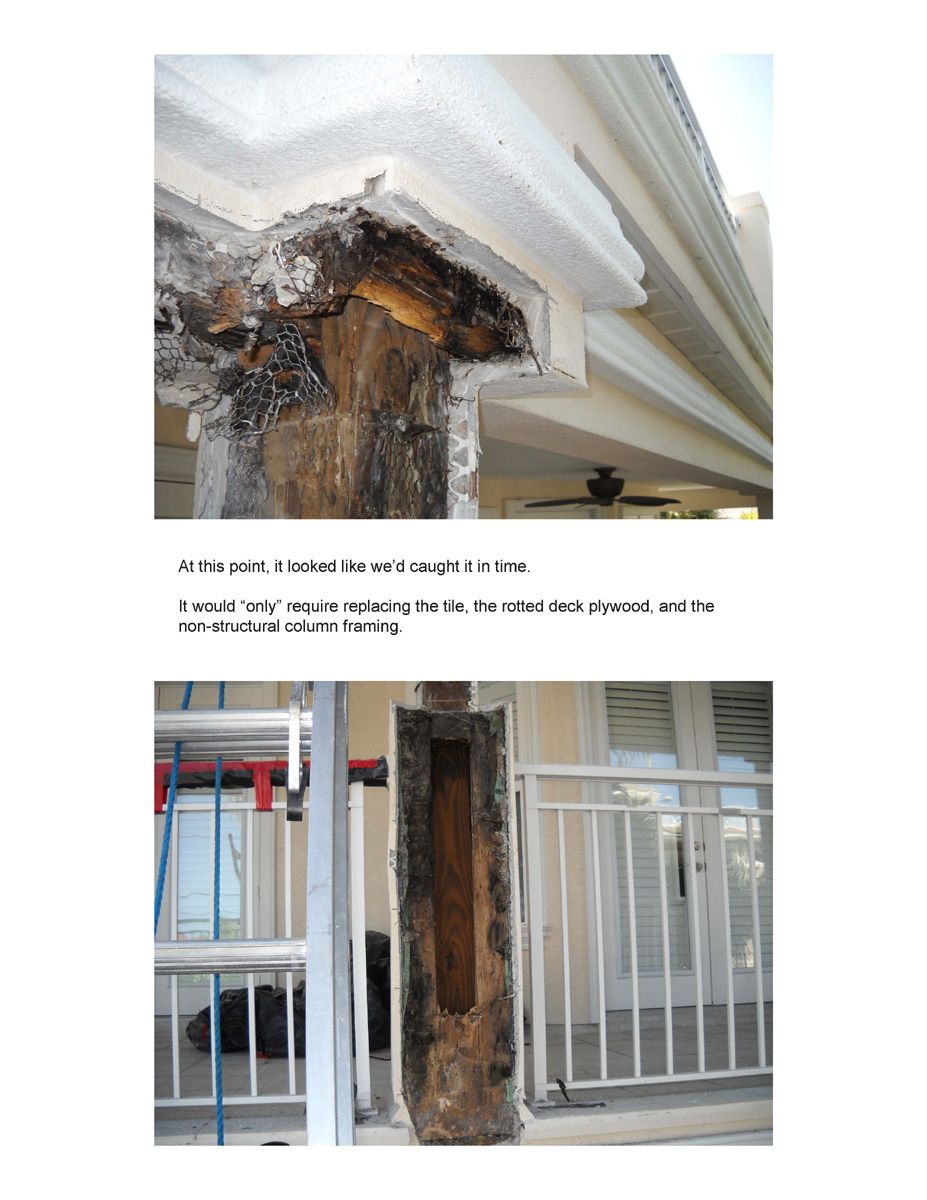
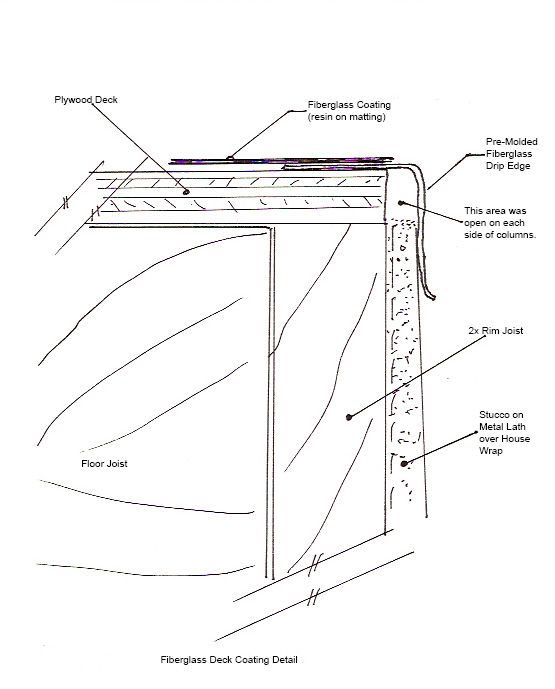
We removed stucco from a column and a section of beam where the cracking was pronounced. We found that the flashing on the edge of the decks stopped at each side of the column. Water had entered the boxed out framing around the column and spread laterally into the beam. Fortunately, the six by six columns were pressure treated and were still intact. (See photos).
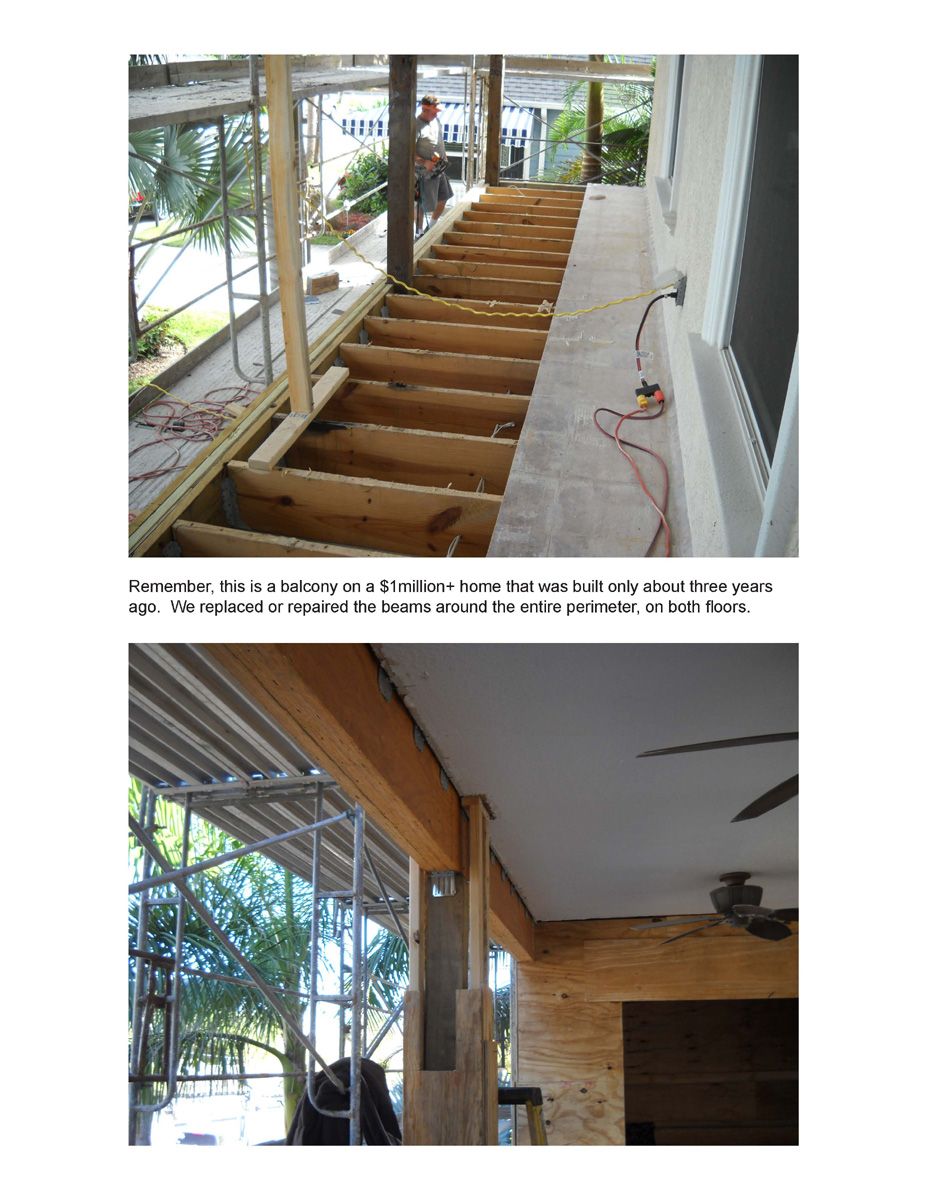
Based on our findings and the extent of the cracks, we realized that we would have to remove all the tile from both deck levels, remove the stucco from the columns and beams, replace rotted plywood, apply a new waterproofing system, and install new tile and stucco. This would require removing the handrails and scaffolding the entire front and side of the home.
The owner was aghast at the extent and cost of the work required on this three year old, custom home, but had little choice. The problems were obvious. Since they were going to have to go through so much expense, they asked us to enclose some of the balcony areas so they would at least get some added square footage for the money. We had an architect work with the owner on designing the added spaces. The work was approved and we started demolition.
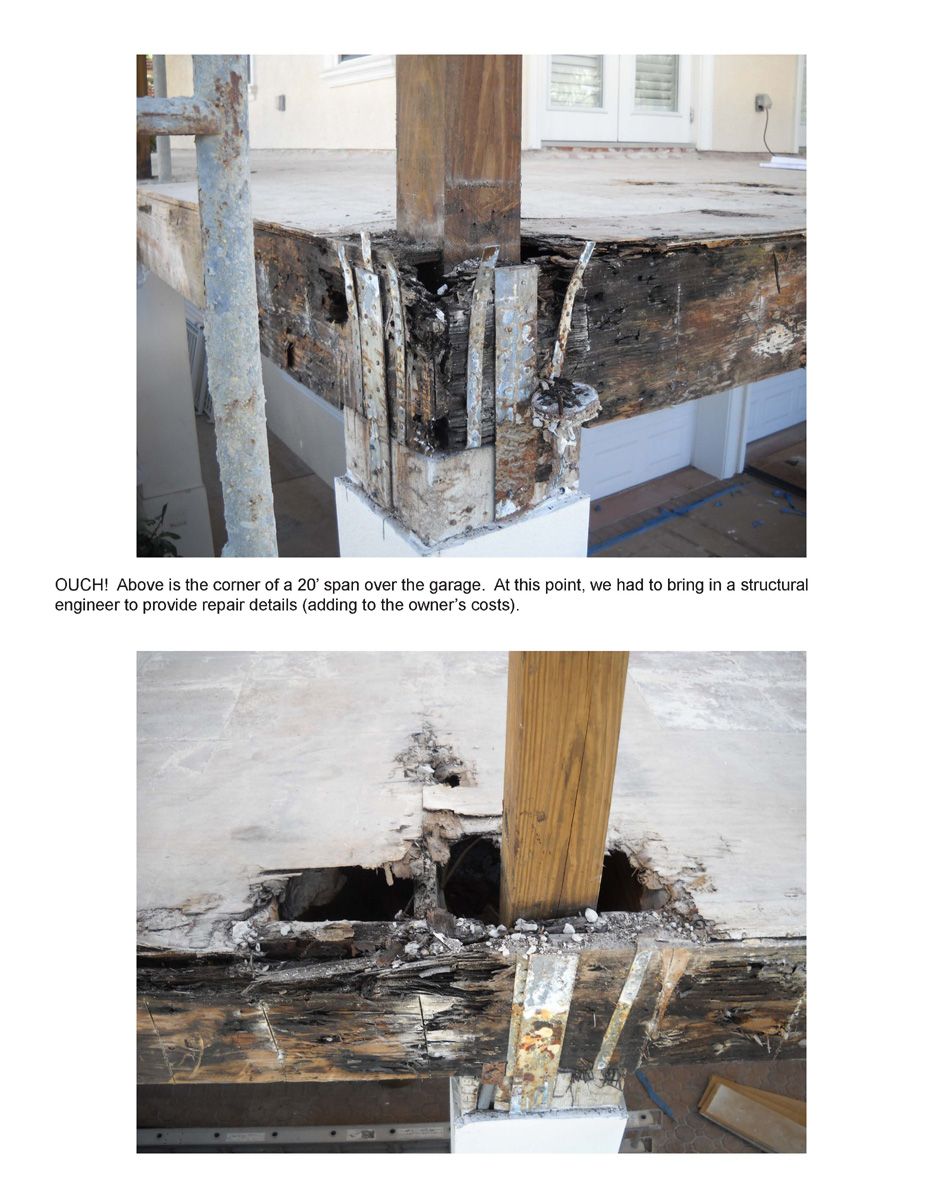
When we removed the stucco from the beam system, we found that the damage was even more extensive than what showed in our limited exploratory work. Most of the perimeter beams were damaged at the column locations. A number of them were so far rotted that they required complete replacement. We ended up replacing the micro-lam beam spanning over the garage, and the entire 2×12 beams in several places. We also had to remove and replace the outside ply of most of the other 2×12 beams. We had to have a structural engineer come in and design a repair system for the load-bearing members.
As can be seen from the photos, the trapped moisture in the balcony deck systems took only three years to degrade the structural framing from new to the verge of catastrophic failure. The beams were more than half rotted and it looked to me like the balconies were not that far from collapse. The structural engineer agreed with me.
By comparison, we were working on another project next door to a three year old foreclosed home. The framed balcony system on that home had never been waterproofed and consisted of raw plywood over framing with no drywall or cover below. This deck system was grey and weathered on the surface but the structural members were basically intact.
What caused the difference in weathering between the two structures? Both were similar age, with similar framing and had almost identical weather exposure. The one that was left unfinished and unprotected survived relatively intact. The one in the finished home was rotted to the point of replacement.
I have spent many hours in building science courses to find the best practices for construction. The damage that we saw on this project is consistent with what the theory of moisture movement predicts. Water moves from wetter to dryer areas and the greater the moisture/temperature differential the faster the movement. When the building surfaces heat up during the day, the vapor pressure of the water trapped in the walls goes up significantly. Basically it turns to steam and is driven into the wood (In building science terms this is vapor drive and it moves from warmer and dryer to cooler and wetter). Also, since it is covered with house wrap and stucco, the wood stays wet, providing the optimum conditions for mold growth (mold is feeding off the wood). The foreclosed structure was open to the weather. It did not have the water trapped and it was able to dry out (the temperature and humidity were in balance). Therefore it had only surficial damage.
The conditions we found reinforce a lesson that has been a primary focus of many of my courses. Water will get into even well-built structures; good design allows it to drain out again. The damage also demonstrates the importance of basic construction techniques. In this case, improper flashing at every column-to-beam connection allowed the water easy access to the critical structural areas of the home. The defective flashing caused more structural damage than was caused by the cuts in the fiberglass deck membrane. Once water got through the deck, it was in an open area between joists. There was enough air movement for the joists to dry. However, the water in the beams was trapped behind stucco and house wrap and had nowhere to go but into the wood.
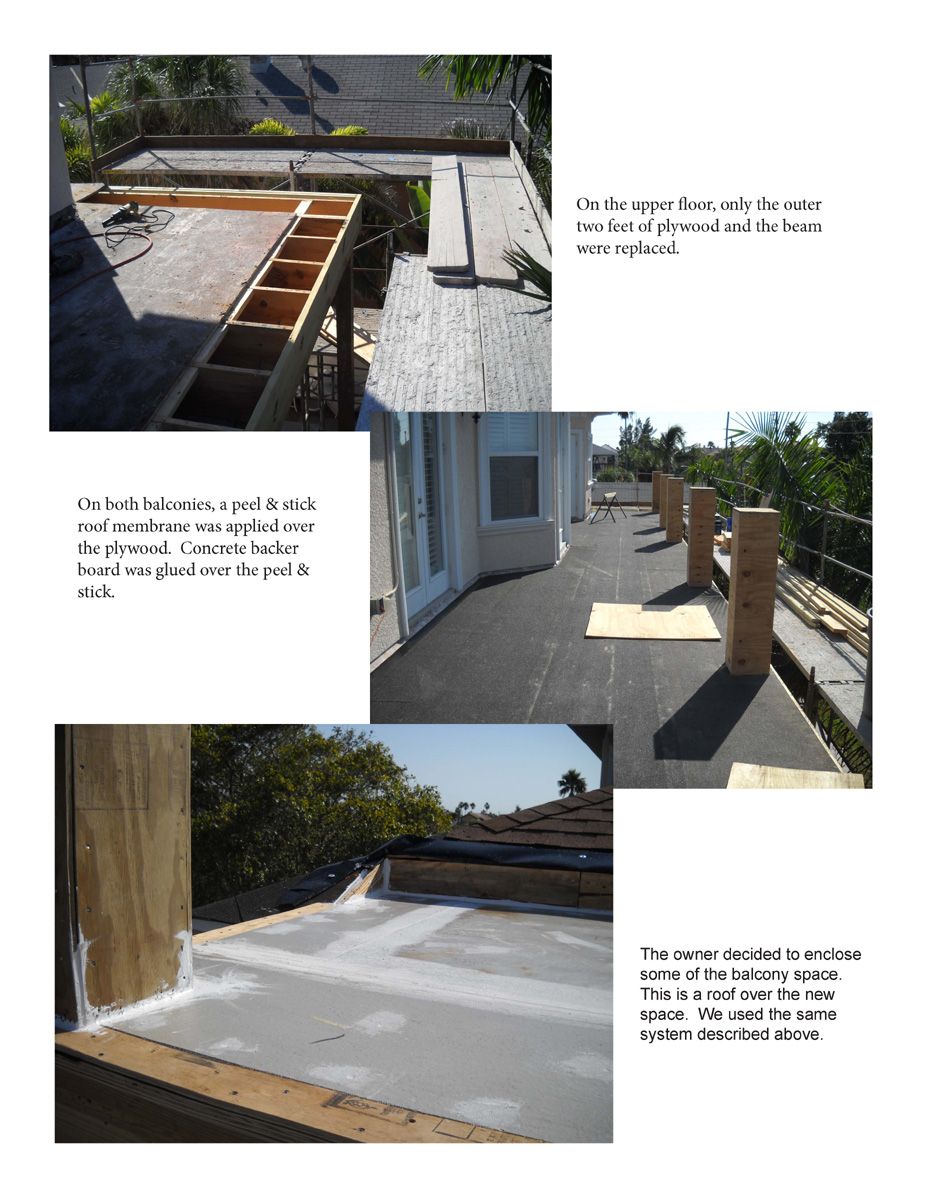
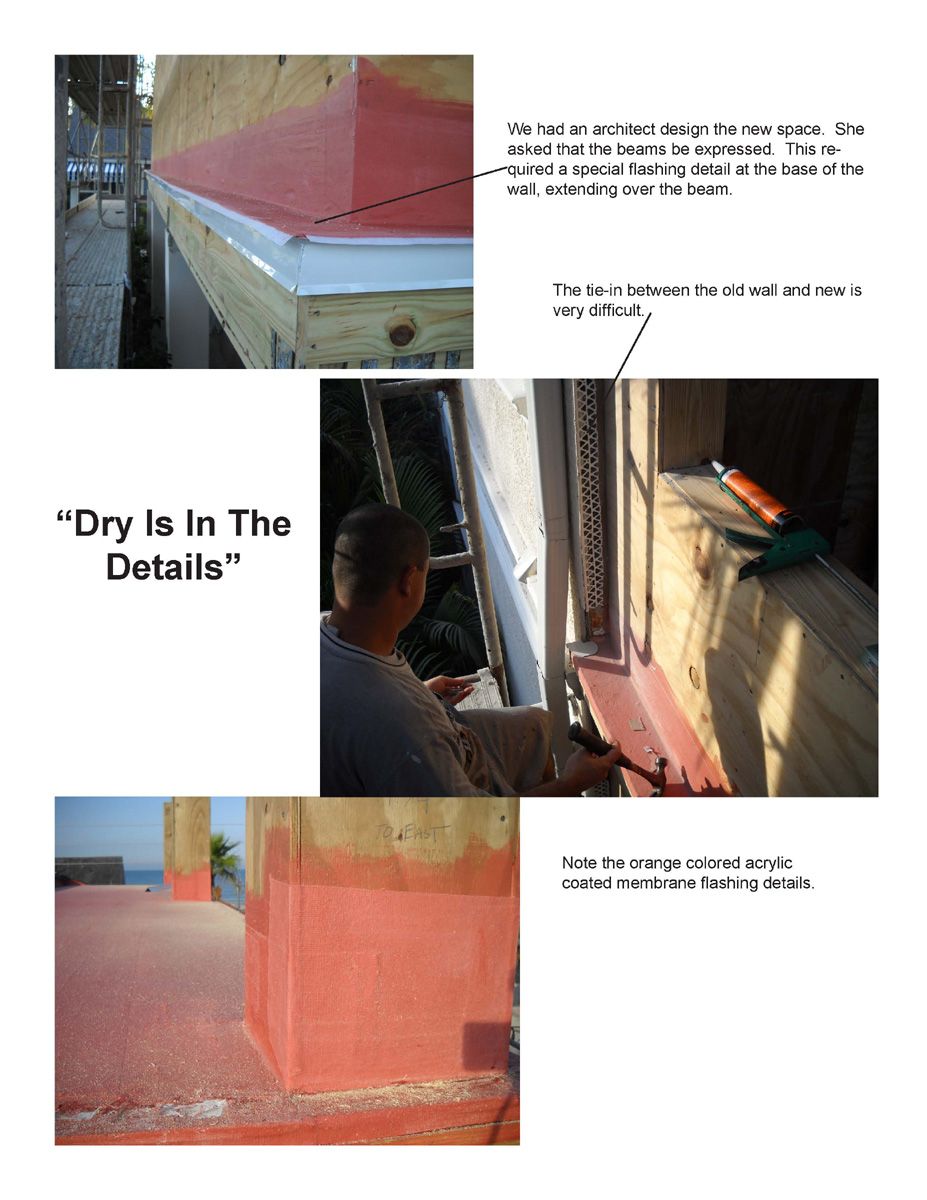
The accompanying pictures show how we detailed the balconies after repairing the structure. I have talked to fellow contractors who agree that exterior balconies present some of the most challenging waterproofing problems in a home. We are always looking for better systems. In this case we used a Seal-O-Flex system.
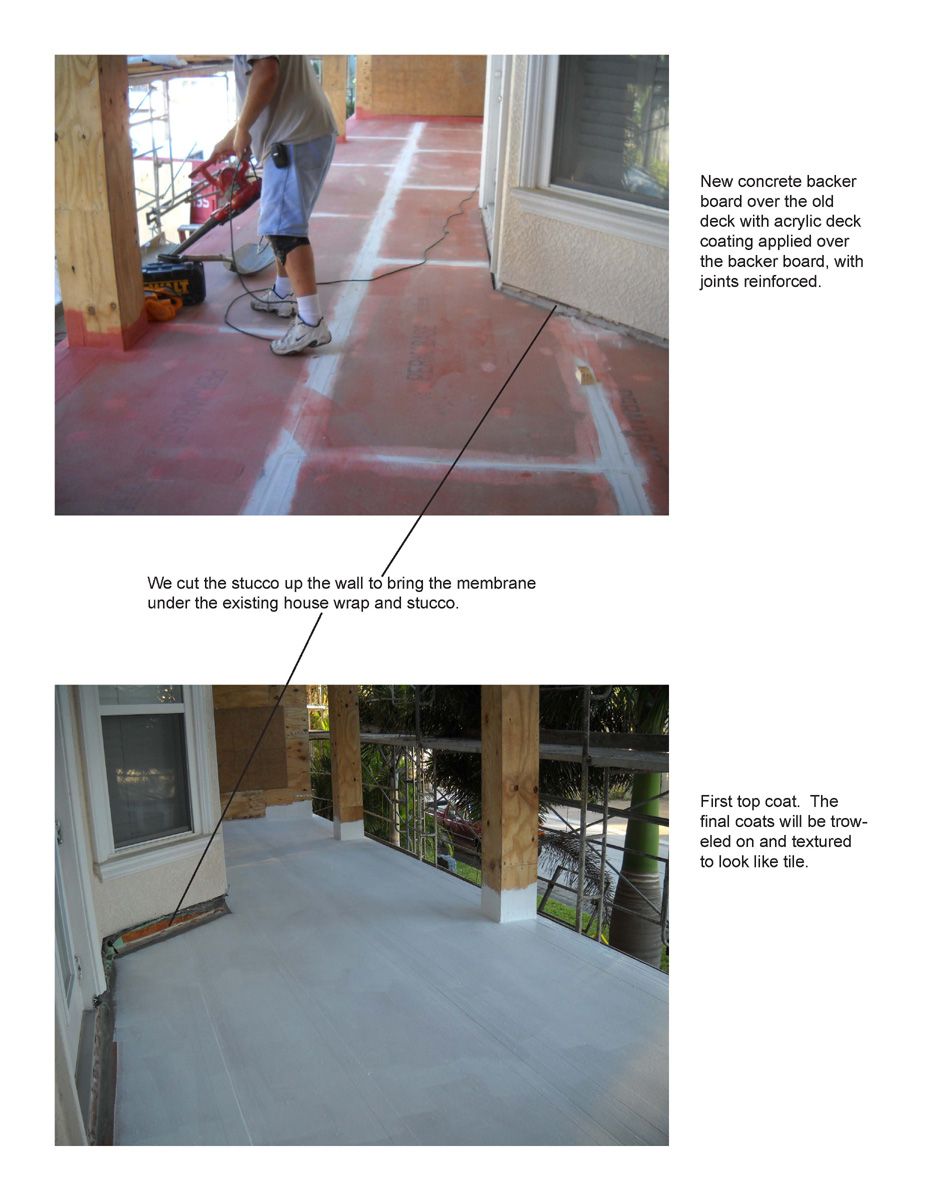
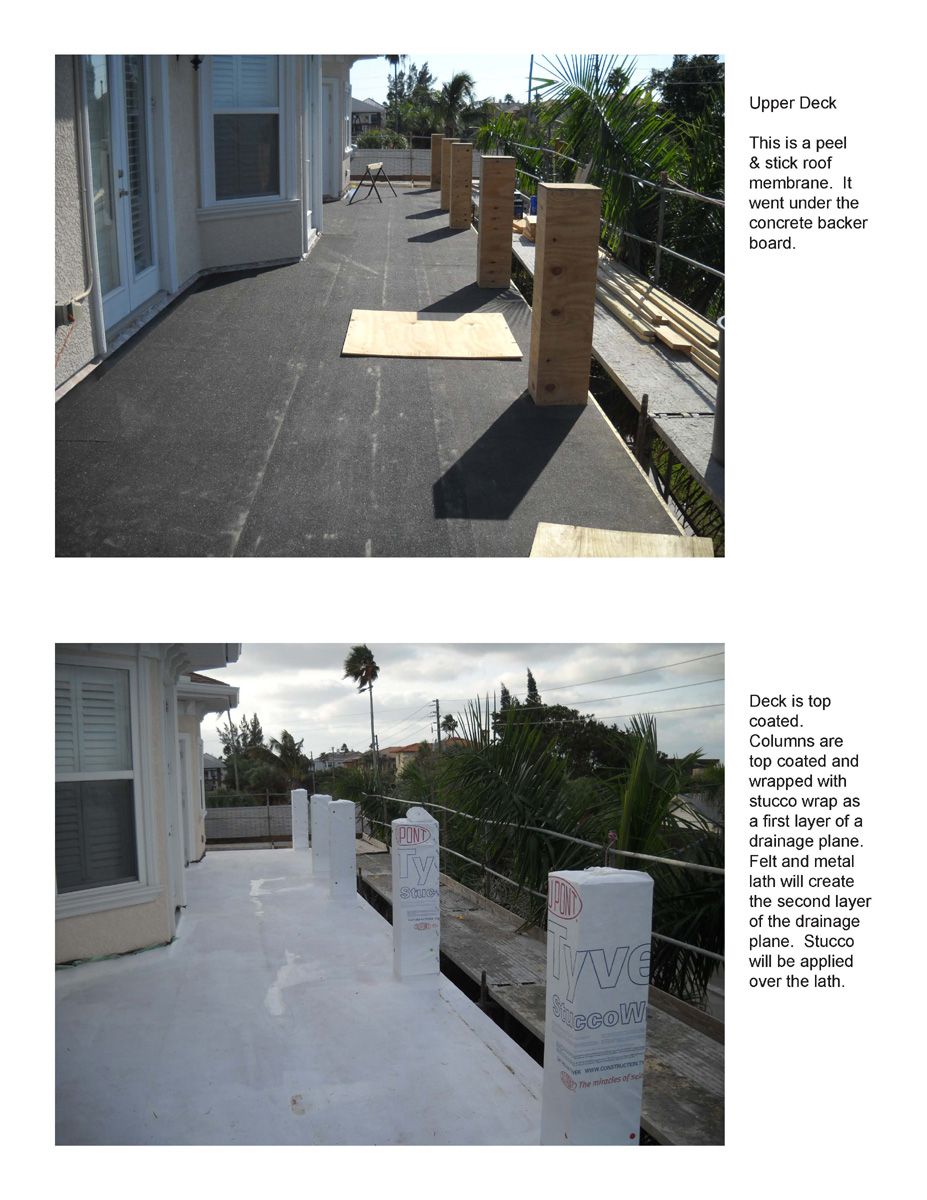
We first removed the rotted plywood and the loose sections of fiberglass waterproofing. We also cut back the stucco to about six inches above the deck level so we would be able to flash the deck-to-wall areas. New plywood was installed and a nail-down roof base sheet was applied to the decks. A concrete tile backer board was placed over the base sheet and secured with minimal nails and urethane foam rated for roof tile adhesion (for uplift). The Seal-O-Flex membrane was applied over the concrete backer board and rolled up the deck-to-wall areas. The membrane system includes a liquid applied acrylic coating, a fabric reinforcing layer, and a trowel grade acrylic top coat.
After the waterproofing cures, we made sure that the house wrap on the wall was not bonded to the deck seal and that the deck seal was lapped under the house wrap. We wanted to make sure that any water that comes down the wall from above can escape at the bottom of the wall. The tie-in between the deck system and the wall is extremely difficult in a repair situation but the only alternative that I can see is to remove all the stucco and start from scratch.
When we replace the stucco on the beams, we are using a stucco stop and j-bead detail that will leave a small slot at the bottom of the beam. The slot should allow any water that gets behind the stucco to drain out again.
The damage to this home could have been prevented with minor changes to the flashing and stucco details. When we get a set of plans we review them for waterproofing details. We try to locate difficult flashing details and work with the architect to make them more buildable. During the course of construction, we review the flashing details in the field and water test our windows before closing in the interior walls so we can find anything that may have been missed. Once we are dried in, I welcome heavy rain days because it gives us an additional chance to inspect. While the review and testing add time and cost to the project, it is less than the cost to repair one leaking window.
Fine Homebuilding Recommended Products
Fine Homebuilding receives a commission for items purchased through links on this site, including Amazon Associates and other affiliate advertising programs.

Reliable Crimp Connectors

Handy Heat Gun

8067 All-Weather Flashing Tape
-
Click to enlarge
-
Click to enlarge
-
Click to enlarge
-
Click to enlarge
-
Click to enlarge
-
Click to enlarge
-
Click to enlarge
-
Click to enlarge
-
Click to enlarge
-
Click to enlarge
-
Click to enlarge
-
Click to enlarge


View Comments
Great lesson, but is this really the only way you guys could present this set of photos and narrative?!? I got tired about four "slides" into this of "clicking to enlarge," clicking again because my browser (like most) automagically fits large images to the brower window, which still leaves the accompanying captions too small to read, then clicking the back button, only to have the main story page re-load, remember which set of photos was next, click to enlarge, go back, etc. Then I read the article text as a separate but repeating accompaniment? The pictures tell a thousand words; why have them do so in such a disjointed manner? Your books and other written materials are usually SO well written and presented. This is a clear case of "there's a better way!"
agree with John M, I just about closed this article because of the disjointed presentation, but decided to get on with it because I have some mold and rot on both my front door and french door to my deck, and thought maybe I could learn from the article.
Why not put the photos into the text, as many other articles have been designed.
Thanks for the info, even tho.
Sue
John: Thanks for the feedback and thanks for taking the time to go through the article. This was my first post and I realized after it loaded that it would be hard to read. I had originally set up the article for print and the text and photos were supposed to be dropped in together. When I found out I had a twelve photo limit I converted the pages to images to keep within the limit. Once they loaded I saw that they would be too small.
For anyone interested, I cam email a pdf file of the photos and comments.
I will also check with the web editors to see if I can take down the images and load new ones. I culled half the pictures to get 12 but I think they will tell most of the visual story.
Jeff Wolf
I see do real discussion about ventilating all of these exterior, enclosed spaces. No matter how much attention is paid to waterproofing, moisture will develop in these enclosed areas and, I suspect in a hot climate like this, you're going to get rot/mold in a hurry. Take those fabricated short columns/posts on the roof...even a space like this..if it's hollow, it has to get ventilated to keep moisture from accumulating - it has no way to get out and even a minor leak will allow moisture to accumulate and not dissipate. Also, I wouldn't dream of specifying anything but all pressure treated material (joist, plywood, beams, columns, etc.) in these type spaces. All it takes is looking at the difference between the treated columns and the untreated plywood and joists in the pictures to see the value of building with treated material.
wmheinz has an interesting question, how much longer would this balcony lasted if it had vents on the underside between the beams?
Nice article, thanks for taking the time to post. BTW, seems photo 9/12 hasn't been uploaded properly... nothing more than a small thumbnail shows for me. If possible, I'd like to receive the PDF set of your photos. How can we do that?
Great article. Thanks for posting it. Don't pay too much attention to the criticism above. Some people forget that when someone gives them something they should be thankful and probably think twice before they ask for more.
I, for one, got the message. I'll be watching the flashings from now on.
I agree with WDMichael - great article with a very good message that some may miss. When it comes to water intrusion arising from construction defect, the Devil is always in the details. Very costly damages can almost always be avoided up front through the attention to detail and spending a few dollars up front - particularly on key elements of the building envelope such as flashings.
Having built in Florida for more than 20 years, I can attest to the challenges that balconies, balustrades, columns and railing supports can pose to properly preventing water intrusion in these areas. However, there is a great deal of information available to every builder, from material manufacturers installation instructions, building science resources and the like to assist with providing quality installations that will endure both the test of time and the elements.
I hope that this unfortunate Homeowner has pursued legal recourse against the original builder to recoup some, if not all, of the costs associated with this repair. The statute of repose for construction defect in Florida is 10 years, and the statute of limitations for negligence of actions founded on the design (i.e. poor flashing details around the corners) is 4 years, both of which are longer than the 3 year age of the original construction noted.
Thanks for posting the article and the photo's.
To all, my apolgy for not posting replies sooner. I did not realize I had additional comments posted.
wmheinz asked about venting the spaces. We detail our stucco finish with a drainage plane behind it and we leave weeps at the bottom of our stucco stops to allow any moisture that gets behind the stucco to dry out. The idea of venting the boxed in spaces is not something we have done. Our experience has been to find water damage between stucco and plywood or at leak points from the outside in. I have not seen much evidence of moisture damage from the inside of an enclosed space. Our deck details vary depending on the ceiling material below. We have not deliberatly allowed for drains or for air circulation. I will consider providing for air circulation in the future.
Bob1998 asked if venting would have helped in this case. I don't think drains or air circulation would have helped this deck. The majority of the damage occured between tile and plywood or between stucco and plywood. We are carefull to create a drainage plane in both of those situations.
Ladybuilder mentioned recourse to the builder. Unfortunately he is out of business. I don't know if the owner has enough information to track down his insurance carrier for a claim.
Pacific Blue asked about getting photos. I will be happy to email photos if you send me your contact information. Our company email is [email protected]
Excellent craftmanship. Thank you for posting.